Not sure where to start? If you bought a Sensor Watch board on Crowd Supply and need to assemble it, follow the instructions in the video below. But first, read these notes:
Did you also get a Sensor Board?
If you have a sensor board (such as the Temperature Sensor included with most early orders), you must install it first, before you begin the steps in the video. Your sensor board will come packaged with instructions describing how to install it in the Sensor Watch 9-pin connector.
Update firmware before assembling!
Sensor Watch Pro ships with a special build of Second Movement that supports both the classic and the custom LCD, via a button press at boot. It’s highly recommended to install a new version of the firmware that targets the LCD you intend to use! If you wish to install an alternate firmware, you should download it and install it before installing your Sensor Watch board in the watch case, as installing it in the watch case renders the USB port inaccessible. Instructions for flashing new firmware can be found here.
Casio’s F-91W uses ‘Module 593’, which was first produced in the 1980s. Whether a watch uses this module is indicated on the back of the case in a rectangular box. We expect that any watch using this module can act as a donor. However, as many of these Casio watches are counterfeited, take care to buy from a reputable seller.
The ‘Works’ column indicates that someone has successfully transplanted the sensor watch module into that watch.
The ‘Counterfeits’ column means that someone has seen probable counterfeits for sale, so extra caution is warranted.
Watches that will not work as they use different movements, although the button layout is the same: A168W, A700W, LA680W, B650W. In general, if the watch is a 3 button digital Casio that has a nice ‘illuminator’ backlight rather than a side light, it’s NOT a 593 and will not work.
1 - Using Sensor Watch: Introducing Second Movement
The new firmware for Sensor Watch is called Second Movement. It supersedes the old Movement firmware, but it works in largely the same way if you’re familiar with it from a previous Sensor Watch iteration. If you are not familiar with it, this section will get you up to speed.
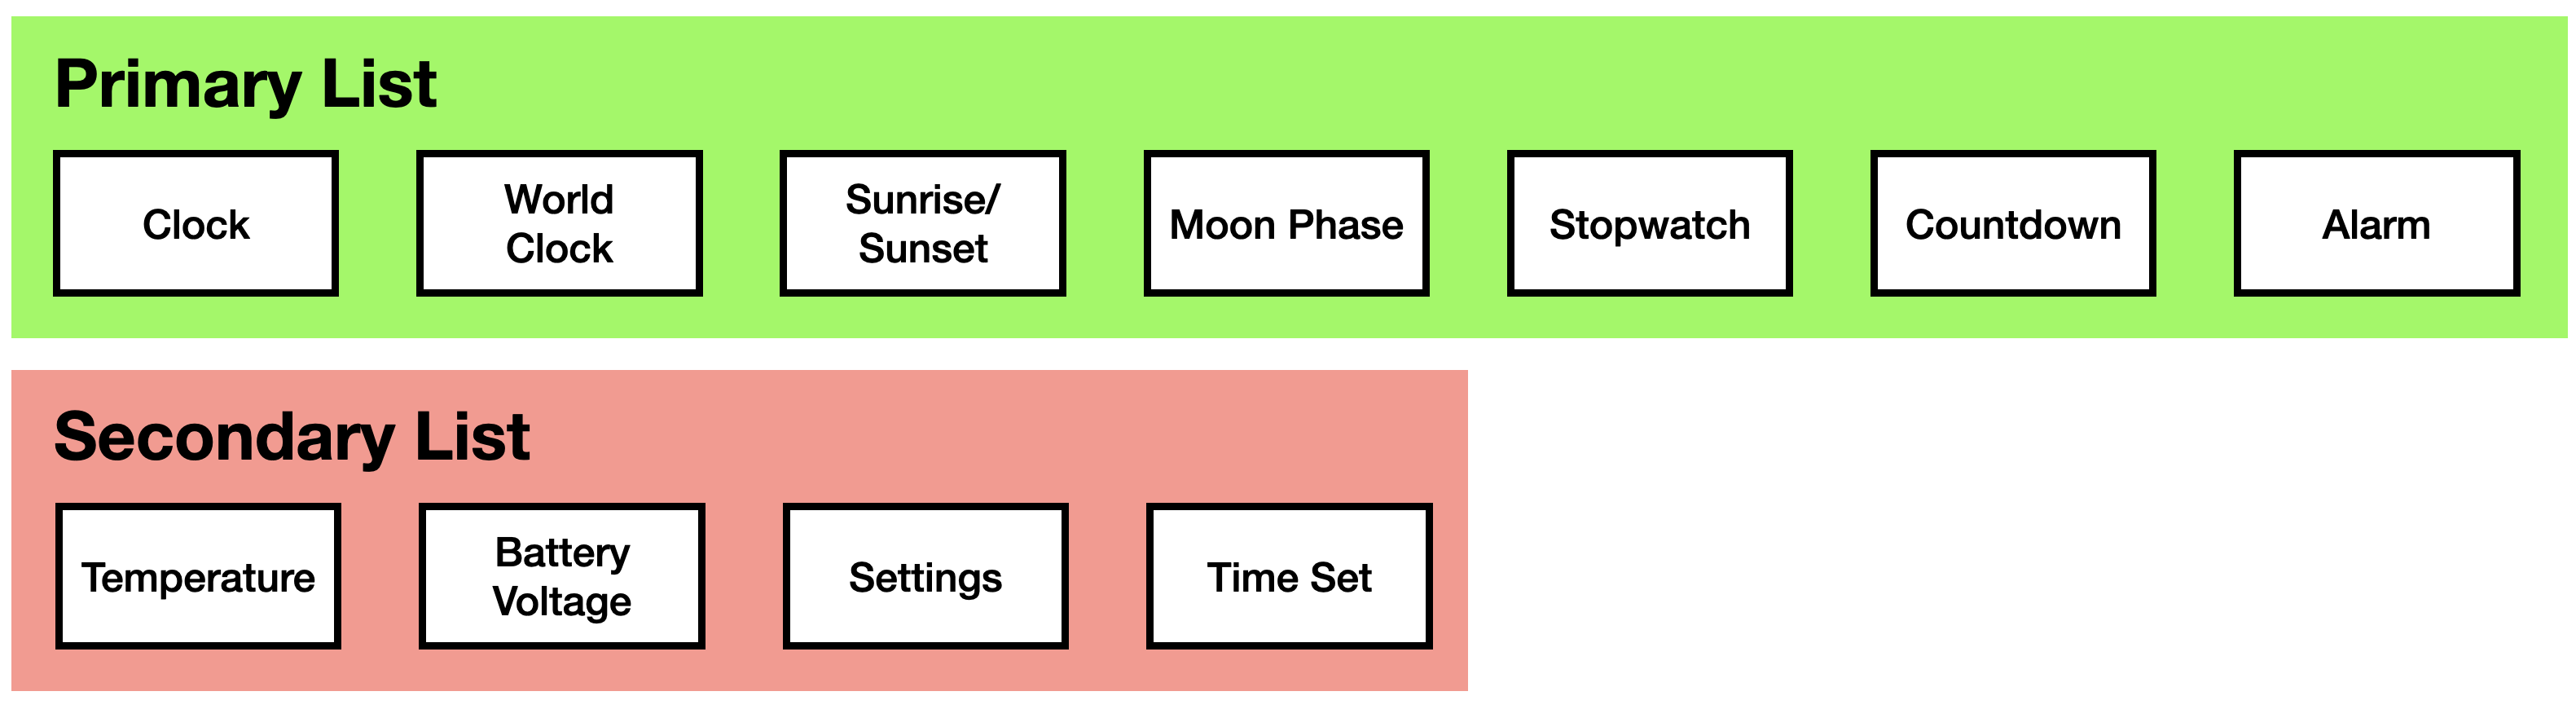
Mental Model: Two Lists of Watch Faces
In Second Movement, a Watch Face is a fully encapsulated block of functionality that you interact with. Your device contains two lists of watch faces that you can use: a primary list, and a secondary list. The primary list of watch faces consists of generally useful bits of information and functionality that you’ll use day to day. The secondary list contains diagnostics and settings you may only need to interact with occasionally.
You interact with watch faces using the buttons on your watch. Each button can be pressed, in which you push it and release, or it can be long pressed, in which you push and hold the button.
There are three buttons on the Casio F-91W: the MODE button, the ALARM button and the LIGHT button. While watch faces are free to use these buttons however they see fit, most watch faces adhere to a set of idioms that should make navigating your watch easy; you can expect the behavior of the buttons to be generally consistent across watch faces.
The MODE button
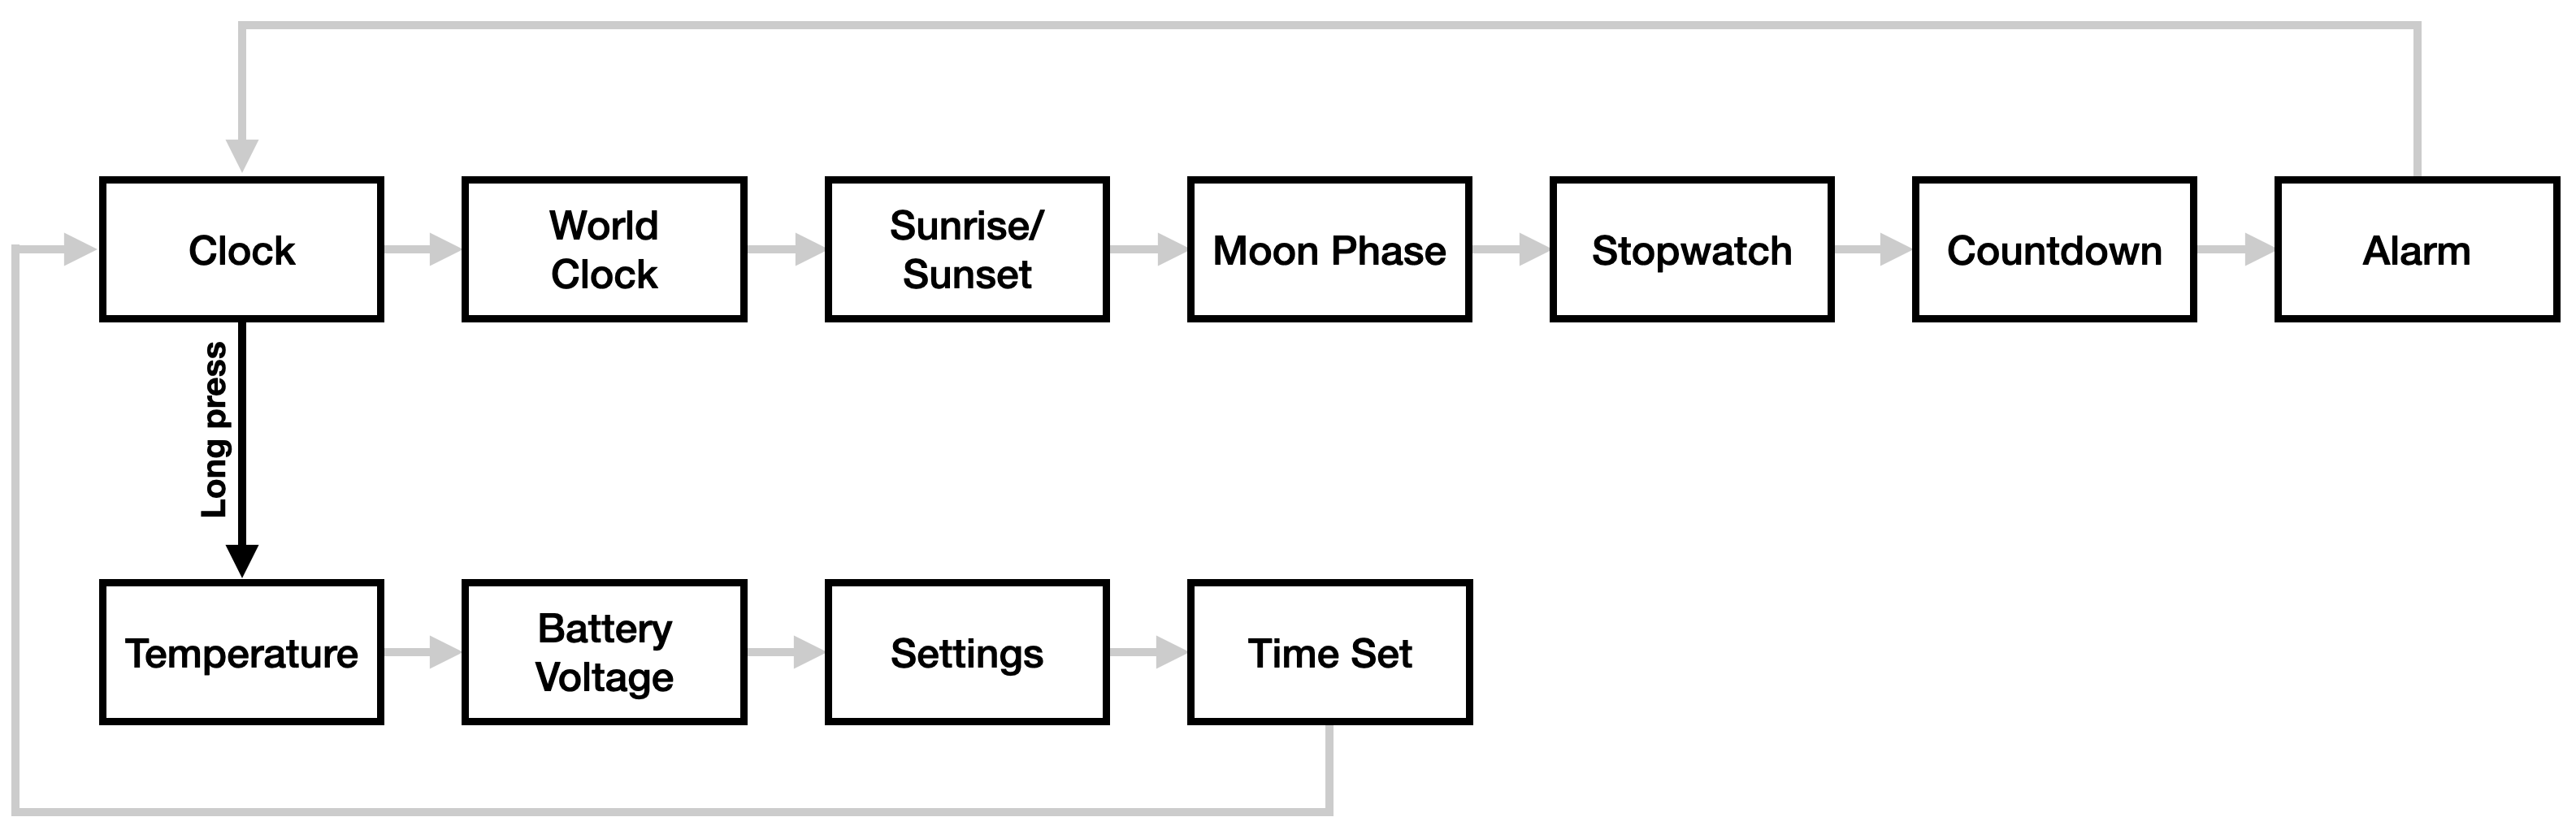
A short press of the MODE button immediately moves from the current watch face to the next watch face in the list, until you reach the end of the list and wrap around. You can repeatedly press the MODE button, and you’ll find yourself right back where you started.
If button beeps are enabled, each press of the MODE button will be accompanied by a low-pitch beep, except for the first watch face in the primary list — usually Clock — which gets a higher-pitched beep.
NOTE: As a shorthand, we will refer to this first face as Clock going forward, but if you build your own custom firmware, you can place any watch face first in the list.
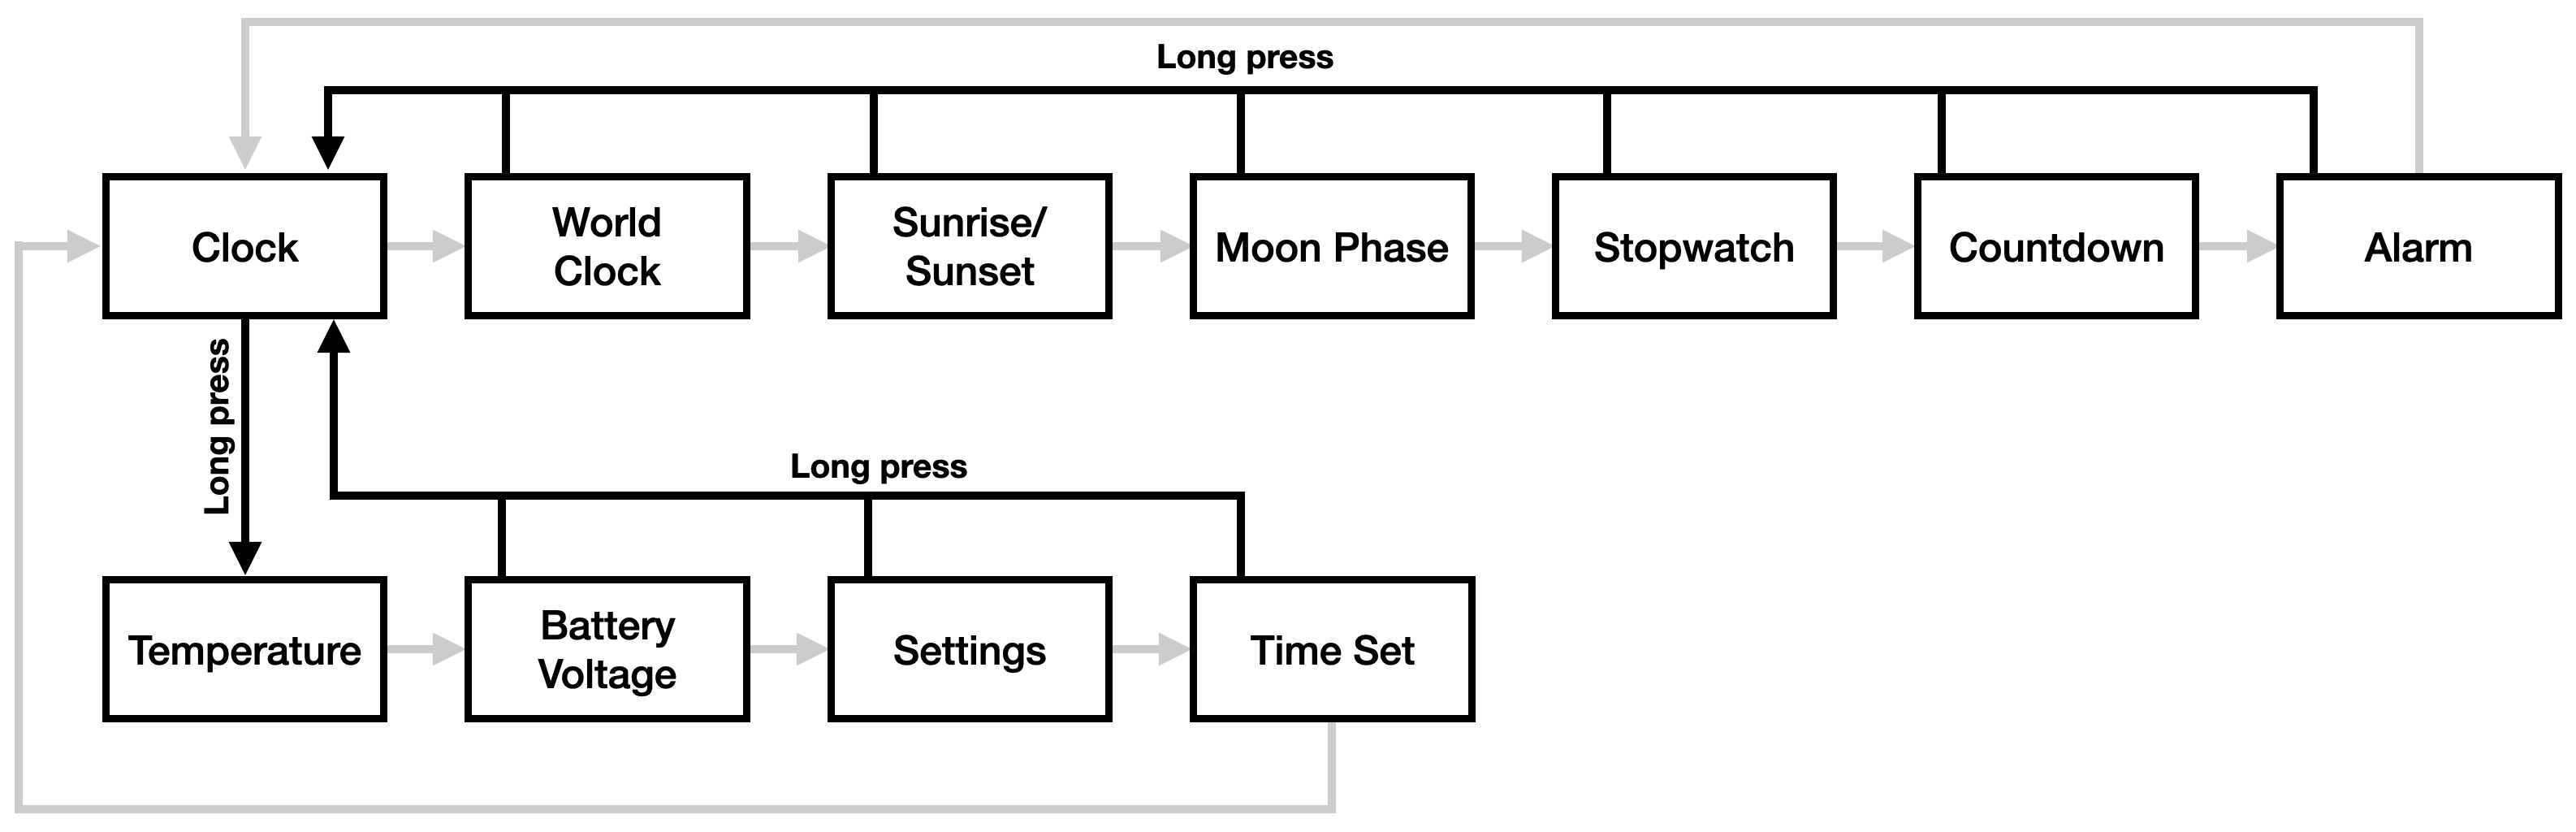
A long press of the MODE button behaves differently whether you are on the Clock face or not. (In the next two diagrams, the short press behavior is greyed out so you can more easily see the long press behavior.)
If you are currently at the Clock face, a long press of MODE takes you to the secondary list. At that point, continued short presses will advance through the secondary list, and return you to the Clock face when you reach the end.
If you’re not currently at the Clock face, a long press of MODE from anywhere else takes you back to the Clock face (accompanied by that higher-pitched beep).
The ALARM button
The ALARM button is a general purpose button. Where appropriate, a short press of the ALARM button will take an action: on the Stopwatch face, the ALARM button starts or stops the stopwatch. On the Countdown face, it starts or stops the countdown.
For watch faces with configurable options, a long press of the ALARM button can either change those options directly, or enter a secondary mode for configuring the watch face. On the Clock face, for example, a long press of the ALARM button toggles the hourly chime, and on the Temperature watch face it toggles metric vs imperial units (Celsius or Fahrenheit). On the Sunrise/Sunset watch face, a long press of the ALARM button enters the latitude / longitude settings screen; on World Clock, it allows you to add a name and configure the time zone.
A short press of the ALARM button can also advance a value: in the Time Set watch face, pressing Alarm while setting (say) the month, advances the month by one. Pressing it again advances it again, until you reach the final value (month 12) and it loops around.
The LIGHT button
On most watch faces, pressing the LIGHT button illuminates the LED backlight. Holding the LIGHT button down generally keeps the LED on as long as the button is being held. This behavior is occasionally overridden though, particularly when the LIGHT button is used for other functions.
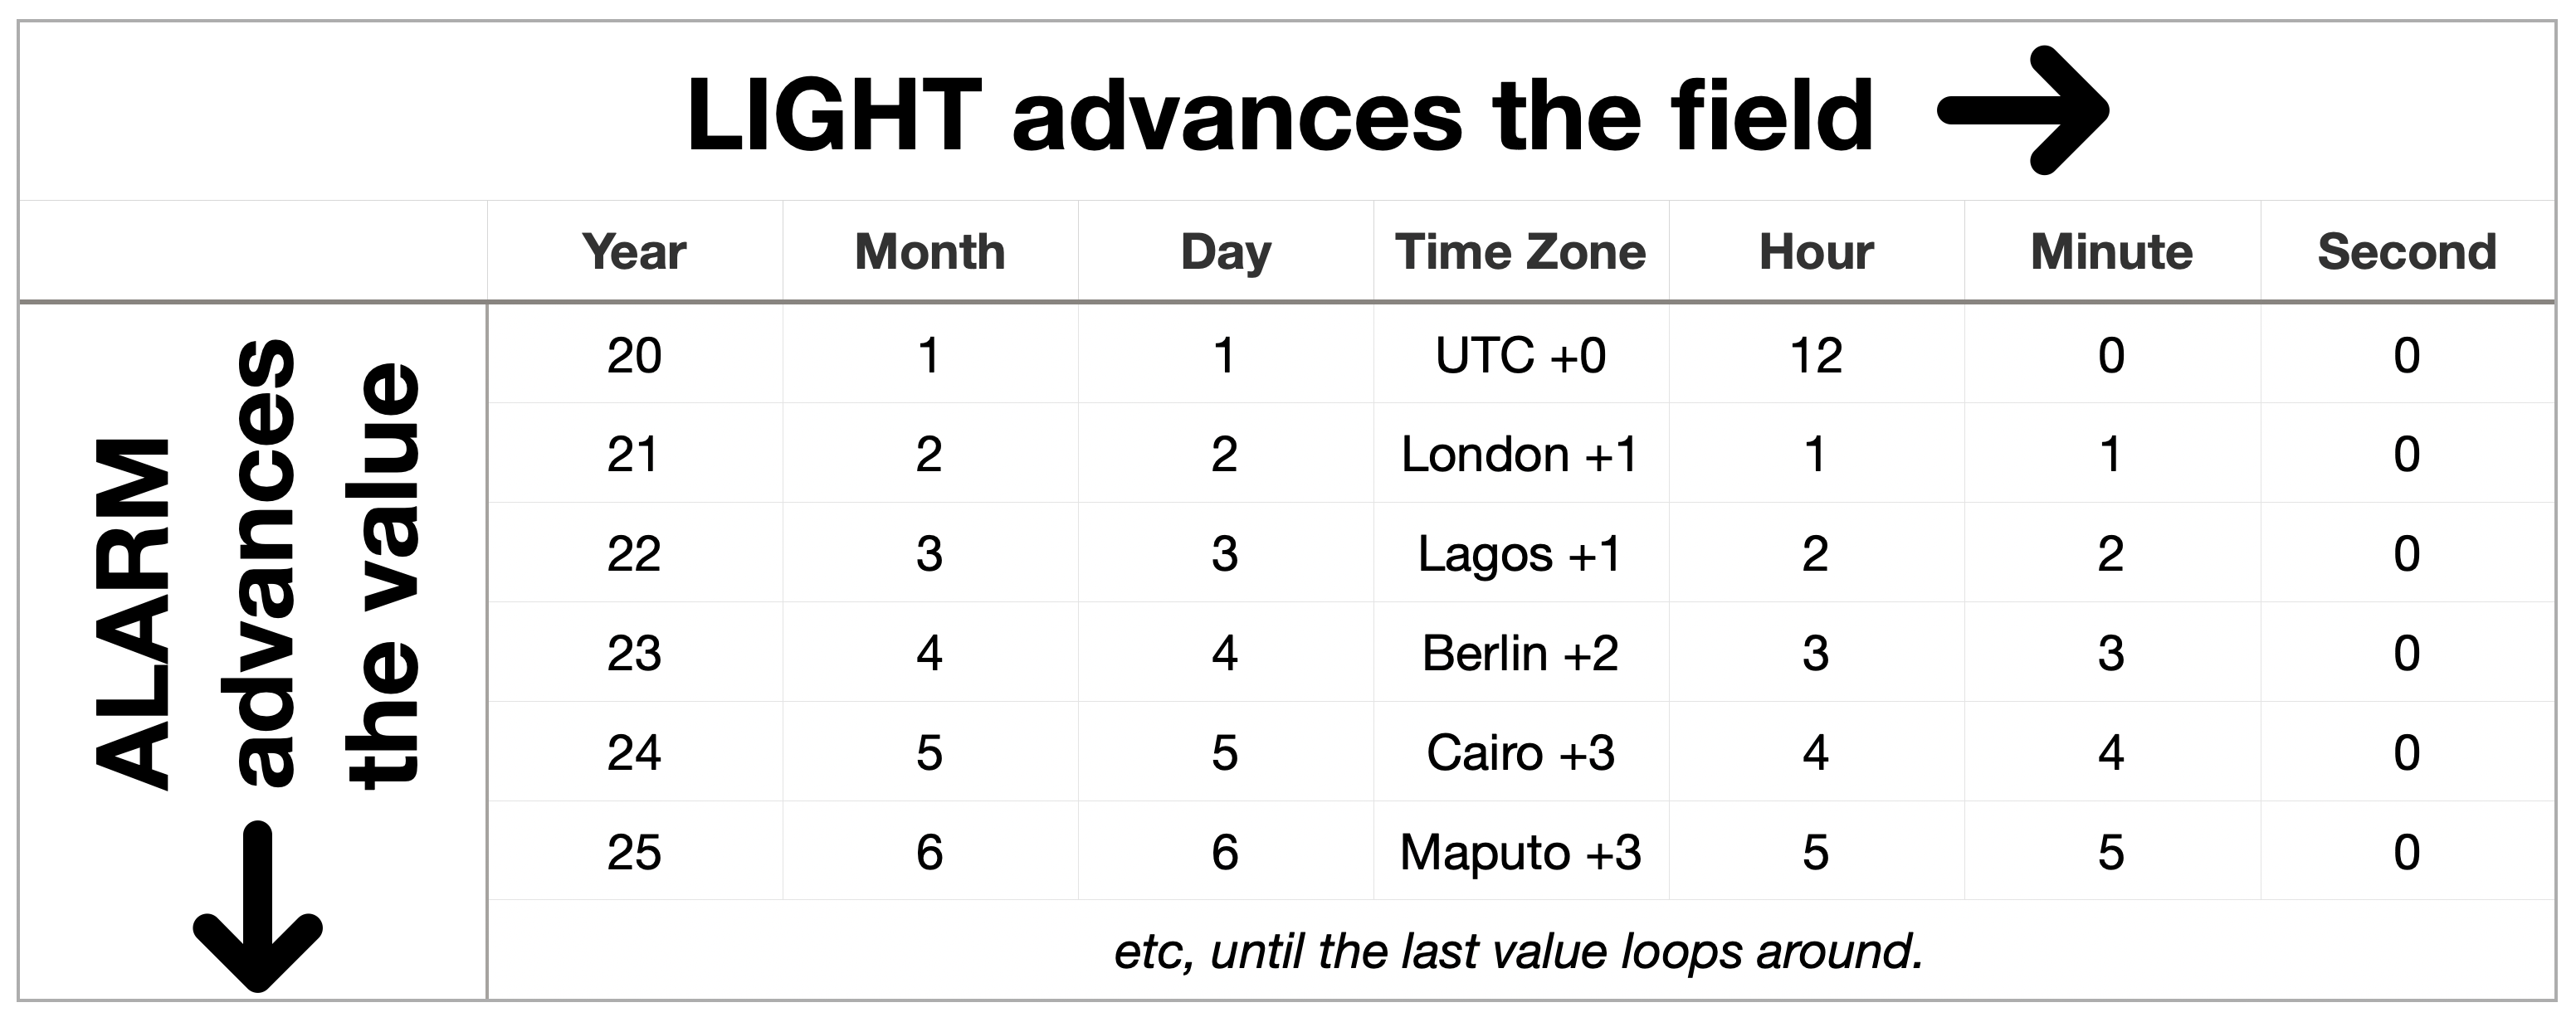
When more complex interactions call for it, the LIGHT button pulls double duty. In particular, some watch faces have different fields to navigate: when setting the time, we need a button to advance which part of the time we’re setting: the hours, minutes, seconds, etc. A short press of the LIGHT button advances through these fields, wrapping around when you reach the end.
On these watch faces, you can think of the LIGHT button as a “tab” button, navigating across through columns of data, and the ALARM button as an “enter” button, changing the selected value in that column.
Watch Face Documentation
The following pages contain documentation for each of the watch faces in the standard Second Movement firmware.
1.1 - Clock
The Clock face echoes the classic time and date display of the stock F-91W. It displays the day of the week and day of the month on the top line, along with the current time on the bottom line. Pressing the Light button illuminates the LED so that you can read the display in the dark. Holding the Light button keeps the LED on while the button is held.
You can toggle the Hourly Chime feature by pressing and holding the Alarm button. After holding it for a couple of seconds, the Signal indicator will turn on, indicating that the hourly chime is enabled.
The Clock face also incorporates a low battery warning: this watch face will display the LAP indicator when it detects that the battery voltage is low. This does not mean that power failure is imminent, but it does mean that your battery has only about 5% of its original capacity remaining and you should start thinking about a replacement. The battery is a CR2016 coin cell.
1.2 - World Clock
The World Clock watch face looks similar to the Simple Clock watch face, but you’ll notice that at first launch the day of week indicators are blank. That’s because this watch face does not display the day of the week. Instead, you may customize these letters to display the name of a time zone of your choosing.
To customize this watch face, press and hold the Alarm button. The first letter in the top row will begin flashing. Press the Alarm button repeatedly to advance through the available letters in the first slot, then press the Light button to move to the second letter. If you have the custom LCD, you can set a third letter as well.
Finally, press Light again to move to the time zone setting, and press Alarm to cycle through the available time zones. Rather than displaying time zone offsets from UTC, this watch face expects you to select a place that matches your time zone rules. For more information, see the Time Zones in Movement section in the Time Set documentation.
When you’re done selecting a time zone, press Light one last time to return to the world clock display.
Note that on the classic Casio LCD, the second letter position cannot display all letters or numbers.
1.3 - Sunrise / Sunset
This watch face displays local sunrise and sunset times. During the day, it displays today’s sunset; at night, it displays tomorrow’s sunrise.
When you first see this watch face, it will display “No Loc”, or No Location. This is because your latitude and longitude are required to calculate sunrise and sunset. When on this screen, you can set your location in a similar way to the World Clock screen.
Press and hold Alarm to enter location setting mode. The top line will read “LA” (Latitude), and the bottom line “+ 0000”. The large digits are the whole number part of the latitude, and the smaller digits (in the seconds place) are the fractional part.
Note that on the custom LCD, you’ll see “LAT” on top and “00.00° N”, which will make this screen clearer. Also note that on the classic LCD, you set the sign (+ or -) first, whereas on the custom LCD, you set the hemisphere (N, S, E or W) last.
Enter your latitude and longitude (“LO”) by pressing the Alarm button to change the sign or advance the digits, and the Light button to move to the next character. On the classic LCD, you can read a latitude of (say) 40.73° N as “+ 4073”, and a longitude of 73.94° W would be “–07394”.
Once you have set your latitude and longitude, the Sunrise/Sunset face will display the next sunrise or sunset on the bottom row, and the day of that sunrise or sunset at the top right.
A short press on the Alarm button will advance to the following sunrise or sunset: for example, on Monday afternoon, it will display Monday evening’s sunset, but a short press on the Alarm button will display Tuesday morning’s sunrise.
If you made a mistake while entering your location, or if you simply wish to change your location, you can re-enter location setting mode with another long press on the Alarm button.
1.4 - Moon Phase
The Moon Phase face is similar to the Sunrise/Sunset face: it displays the current phase of the moon, along with the day of the month. On the custom LCD, it displays “WAX” and “WAN” for a waxing or waning moon. On the classic LCD it displays a rudimentary graphical representation of the moon on the top row.
This graphical representation is a bit abstract. The segments that turn on represent the shape of the moon, waxing from the bottom right and waning at the top left. A small crescent at the bottom right will grow into a larger crescent, then add lines in the center for a quarter and half moon. All segments are on during a full moon. Then gradually the segments at the bottom right will turn off, until all that remains is a small waning crescent at the top left.
All segments turn off during a new moon.
On this screen you may press the Alarm button repeatedly to move forward in time: the day of the month at the top right will advance by one day for each button press, and both the text and the graphical representation will display the moon phase for that day. Try pressing the Alarm button 27 times now, just to visualize what the moon will look like over the next month.
1.5 - Stopwatch
The Stopwatch face provides basic stopwatch functionality with one-second resolution: you can start and stop the stopwatch with the alarm button. Pressing the light button when the timer is stopped resets it.
This watch face does not support lap functionality, and it does not count sub-seconds. There is a fast_stopwatch watch face by Andreas Nebinger that supports the full stopwatch functionality in a classic Casio F-91W, but note that it consumes about triple the typical power budget when running. As such, we opted to include this pared-down version in the standard firmware.
1.6 - Countdown
This watch face implements a simple countdown timer with one-second resolution:
Long press the ALARM button to enter setting mode and adjust the countdown timer.
In this mode, pressing ALARM advances the hour, minute or second.
Pressing LIGHT advances to the next field.
A long press on LIGHT clears curent field and any after it.
Press the ALARM button to start and pause the countdown, similar to the stopwatch face.
When paused or stopped, press the LIGHT button to reset the countdown.
Max countdown is 23 hours, 59 minutes and 59 seconds.
If you have the accelerometer sensor installed, this watch face will enable tap detection for three seconds when the face comes on screen. You can tap the watch to increment the number of minutes you want to count, and each tap will extend tap detection for another three seconds. Tap detection will be disabled after this timeout, or when the wearer presses the ALARM button to start the timer. This “quick set” time will not be remembered; when reset, the countdown timer will be reset to the last manually entered countdown time
1.7 - Alarm
This watch face implements a basic daily alarm:
Press the ALARM button to toggle the alarm on or off. An indicator at the top left will energize to show the alarm state.
Long press the ALARM button to enter setting mode and adjust the alarm time.
In this mode, pressing ALARM advances the hour, minute or second.
Pressing LIGHT advances to the next field.
When you finish setting the alarm time, the alarm will automatically be turned on if it was off before.
The alarm status will also be indicated on the main Clock face, but not on any other watch faces.
1.8 - Temperature Display
This watch face reads the current temperature and displays it in degrees Celsius or Fahrenheit. Pressing the Alarm button toggles the unit display from Celsius to Fahrenheit.
Note that ehen the watch is on your wrist, your body heat interferes with an ambient temperature reading, but if you set it on a bedside table, strap it to your bike handlebars or place it outside of your tent while camping, this watch face can act as a digital thermometer for displaying ambient conditions.
The temperature sensor watch face automatically samples the temperature once every five seconds, and it illuminates the Signal indicator just before taking a reading. It automatically uses the most accurate temperature sensor available: if a thermistor is installed (as on Lite, Pro or the classic board with the temperature sensor add-on), it uses that. If you are on a classic board with the accelerometer sensor, it will use the accelerometer’s lower-resolution temperature sensor.
If no temperature sensor is available, this watch face will skip itself by resigning immediately.
Note that the Celsius/Fahrenheit selection on this watch face also sets a global “Metric / Imperial” flag, so any other watch faces that display localizable units will display them in the system selected here.
1.9 - Battery
This watch face is very simple and has no controls to speak of. It displays the battery voltage as measured by the SAM L22’s ADC.
You can expect your battery to hover at or near 3 volts for the first few months of use. After a while it will start to decline. This is normal, and you can continue using your watch as it declines. As it declines to, say, 2.6 volts, you may also note that the voltage sags when the buzzer beeps or when you light the LED, but then recovers. This too is normal.
Once the battery voltage is at a steady reading of ~2.4 volts, it’s likely your battery’s demise is days away.
1.10 - Settings
The Settings watch face allows you to configure various options on your Sensor Watch. Like all other screens, you advance the field you’re setting with the Light button, and advance its value with the Alarm button.
On the Classic LCD, the Settings watch face labels each setting with a two-letter code on the top row; on the custom LCD, you’ll get a more descriptive line. The following list describes each setting and their options:
“CL” / “CLOCK” - Clock mode. This setting allows you to select a 12-or 24-hour clock display. All watch faces that support displaying the time will respect this setting; for example, both Clock, World Clock and Sunrise/Sunset will all display the time in a 24 hour format if the 24 hour clock is selected here.
“BT” / “BTN” - Button volume. The default option, “L”, beeps the button softly, reserving louder beeps for alarms and countdown timers. Set the volume to “H” for high volume, or “N” to silence the buzzer entirely. Also note that a loud beep consumes significantly more power: one loud beep uses five times the power of a soft beep, which will impact your battery life after a while.
“TO” / “Tmout” - Timeout. Sets the time until screens that time out (like Settings and Time Set) snap back to the first screen. 60 seconds is a good default for the stock firmware, but if you choose a custom firmware with faces that you’d like to keep on screen for longer, you can set that here.
“LE” / “LoEne” - Low Energy mode. Sets the time until the watch enters its low energy sleep mode. Options range from 1 hour to 7 days, or Never. The more often Sensor Watch goes to sleep, the longer its battery will last — but you will lose the seconds indicator while it is asleep. This setting allows you to make a tradeoff between the device’s responsiveness and its longevity.
“LT” / “LED” - LED Backlight. This setting has three or four screens, depending on your hardware:
The first screen lets you choose how long the LED should stay lit when the Light button is pressed. Options are “Instnt” to illuminate the LED only when the button is held down, “1 sec”, “3 sec” and “5 sec”, or “No LED” to disable the LED entirely.
The remaining screens set the color intensity for the LEDs in your watch. Values range from 0 (off) to 15 (full intensity)
On a Lite or classic green board, you’ll have two screens to set the green and red intensity; on a Pro board, you’ll get screens for red, green and blue. Note that full intensity on all LEDs does not necessarily blend to white; a good starting point for a white backlight is values of 5, 10 and 15 for red, green and blue, respectively.
1.11 - Setting the Time
The Time Set watch face is usually the last watch face in the secondary carousel. It will ask you to set the time and date in a specific order: date first (year, month and day), followed by time zone, and then the time. It does this because Second Movement is time-zone aware: if you select the correct time zone, Second Movement can automatically switch into and out of of daylight savings time, no matter where in the world you are.
Still, to take advantage of this feature, you have to select the right time zone, which may be counterintuitive.
Setting the date is the first step because the local time zone depends on the date. When you reach the Time Set watch face, it will be displaying “Year” or “YR”. Press ALARM to advance the year, or LIGHT to accept the year and move on to the “MO"nth. Same thing: ALARM advances the month, LIGHT moves on to “DA"Y. After moving on from setting the Day, you’ll see a Z at the top of the screen, and a flashing display: “UTC” / “+0:00”. This is the Time Zone setting.
Time Zones in Movement
A time zone consists of two things: the current offset from UTC, and a set of rules for daylight savings time changeovers. We couldn’t put every city on Earth into this screen, so we selected a set of cities that represent every possible set of rules. As you advance through the list, you may see several time zones with the same offset: for example as of this writing, “London” and “Lagos” both show “+1:00”. But you would select “London” if you are in the British Summer Time zone, and “Lagos” if you are in the West Africa Time zone. Selecting “London” ensures that your watch will switch back to GMT when BST ends, whereas selecting “Lagos” will keep you in WAT year-round.
You may not see your exact city in the list, but there should be a zone that matches your rules. Central Standard Time in the USA (which can change to CDT) is covered by “Chcago”, whereas year-round Central Standard Time is covered by “Regina” (Saskatchewan) in Canada. If you were in Omaha, you would select “Chicago”; if you were in Mexico City, you would select “Regina”.
Once you’ve selected your time zone, the rest is easy: press LIGHT to advance to setting the hours, minutes and seconds, and you’re done. Note that pressing ALARM with the seconds selected resets the seconds to 00, and does not affect the current minute. We may change this in the future to match the behavior of the original Casio F-91W.
2 - Sensor Watch Firmware
While you can build any number of bare-metal applications for Sensor Watch, when we refer to the Sensor Watch firmware, we’re really talking about Movement, the community firmware for Sensor Watch. You can read more about Movement here; for now, the important thing to know is that it manages a series of watch faces that you advance through using the mode button. It’s a very similar idiom to the classic Casio F-91W, which advances from Clock -> Alarm -> Stopwatch -> Time Set, and then wraps around to Clock.
Movement offers many more watch faces — some of which, like World Clock, you can include more than once! Still: you’d be pressing the Mode button for hours if we included them all, so instead, we only build a subset of the available faces into any given firmware. This means that you can download an alternate firmware that includes the kind of functionality you want, or build custom firmware that includes just the watch faces you desire.
2.1 - Flashing Firmware onto Sensor Watch
The small spade at the top of Sensor Watch is designed to plug directly into a USB Micro B cable. This allows you to flash new firmware directly onto the device via the built-in UF2 bootloader.
To accomplish this, disassemble your watch completely, and plug the Sensor Watch board into a USB Micro B cable plugged into your computer. Double tap the tiny Reset button on the back of the board; the LED should begin to pulse red (or blue, for Special Edition boards). You should see a disk drive called “WATCHBOOT” appear on your computer.
Drag a UF2 file with the firmware you want to use onto the WATCHBOOT drive. You can find some prebuilt firmware images right here on the Sensor Watch website, or you can build your own firmware with just the watch faces you want to wear.
After you drag the file over to WATCHBOOT, the LED should pulse intensely for a few seconds, and then turn off. This signals that the firmware has uploaded successfully; you can now reassemble the watch and wear the new firmware on your wrist.
NOTE: As a failsafe (in case the watch inadvertently enters bootloader mode while being worn), the bootloader is programmed to exit after 60 seconds of inactivity. This means that once you enter bootloader mode (red LED pulsing), you have one minute to copy over your firmware, or the watch will exit bootloader mode, and you will have to double-tap reset again.
2.2 - Prebuilt Alternative Firmware for Sensor Watch
As part of the move to Second Movement, we are paring down the number of alternative firmware images available on this page. Soon an online watch face builder will make it easier to build your own firmware, tailored to your device, with just the watch faces you want to make use of. In the meantime, we are offering two firmware images: the standard Movement firmware image, and an alternative version that supports experimentation with activity tracking.
Select the firmware image that matches both the color of your Sensor Watch board and the display you are using. Note that unless you bought a custom LCD from Crowd Supply, and swapped it out for the original Casio LCD that came with your wristwatch, you probably want to download variant 1: Original Casio display. Plug your board into a USB Micro-B cable, double tap the Reset button (the LED should pulse in red), and drag the new firmware over to the WATCHBOOT drive.
If you drag over the wrong color of firmware, i.e. if you put the blue/green firmware onto a red board, or the red firmware onto a Pro board, the LED will likely light up in yellow or white before you even unplug the board. This indicates an error; if this happens, double tap Reset, and drag the correct firmware onto your board.
If you drag over the wrong display variant, i.e. a Classic display when you have the custom LCD or vice versa, the display will appear garbled and unreadable when assembled. Disassemble the watch and repeat the above steps with the correct firmware image.
Note that all of these firmware images have the “Preferences” and “Time Set” screens hidden behind a long press of the Mode button from the Clock display. To set the time or change your settings, you must long-press the Mode button once, and then press it a few more times until you reach those screens.
This firmware image contains the following watch faces:
Simple Clock - A basic clock with date for timekeeping. Long press ALARM to toggle hourly chime.
World Clock - Long press ALARM to configure with a custom two- or three-letter title and time zone.
Sunrise/Sunset - Local sunrise and sunset times. (Press Alarm to see the next sunrise / sunset)
Moon Phase - Today’s moon phase. (press Alarm to see days in the future, if you want to know i.e. the next full moon)
Stopwatch (by Wesley Ellis) - A stopwatch with one-second resolution.
Countdown (by Wesley Ellis) - A countdown timer.
Alarm (by Josh Berson) - A simple alarm that fires daily at the same time.
After a long press of the Mode button:
Temperature Display - shows the current temperature, if a temperature sensor is available. If not, this watch face is skipped.
Battery - Shows the current battery voltage.
Settings - Allows you to configure your device. You can set: clock mode (12/24 hour), button volume (no beep / low / high), Timeout (for some watch faces to snap back to the Clock view), low energy timeout (how long until entering sleep mode), LED duration and finally LED color (red / green / blue from 0 to 15).
Time Set - Allows you to set the system time. You will first set the year, month and day, then the time zone, then the hour, minute and second.
Does not work with Sensor Watch Lite, which lacks exposed I2C pins.
This firmware image contains the following watch faces:
Simple Clock - A basic clock with date for timekeeping. Long press ALARM to toggle hourly chime.
World Clock - Long press ALARM to configure with a custom two- or three-letter title and time zone.
Sunrise/Sunset - Local sunrise and sunset times. (Press Alarm to see the next sunrise / sunset)
Moon Phase - Today’s moon phase. (press Alarm to see days in the future, if you want to know i.e. the next full moon)
Stopwatch (by Wesley Ellis) - A stopwatch with one-second resolution.
Countdown (by Wesley Ellis) - A countdown timer.
Alarm (by Josh Berson) - A simple alarm that fires daily at the same time.
After a long press of the Mode button:
Activity Log - A 14-day log of active minutes, defined as two consecutive minutes with acceleration over a given threshold.
Temperature Display - shows the current temperature. On Pro, this will use the on-board thermistor; on green and blue boards, it will use the accelerometer’s temperature sensor.
Battery - Shows the current battery voltage.
Accelerometer Status - Shows whether the accelerometer believes the wearer is “Still” or “Active”. This state latches for about 10 seconds. A long press of ALARM allows you to change the threshold for “Active” detection.
Settings - Allows you to configure your device. You can set: clock mode (12/24 hour), button volume (no beep / low / high), Timeout (for some watch faces to snap back to the Clock view), low energy timeout (how long until entering sleep mode), LED duration and finally LED color (red / green / blue from 0 to 15).
Time Set - Allows you to set the system time. You will first set the year, month and day, then the time zone, then the hour, minute and second.
2.3 - Building Firmware for the Custom LCD
TL;DR: If you are upgrading an existing Sensor Watch or Sensor Watch Lite board, you will need to re-flash your board with new firmware to take advantage of the new display.Firmware images are linked below.
All variants of Sensor Watch — Sensor Watch Pro, Sensor Watch Lite and both the green and blue versions of the original Sensor Watch board — have the ability to drive either the classic Casio LCD, or the new custom LCD designed by Oddly Specific Objects and available from Crowd Supply, but you need a firmware image targeted to your display. Your two options are to download a pre-built firmware image, or to build your own custom firmware with support for the custom LCD.
Boards ordered on Crowd Supply ship with a special firmware image that can support both displays, but we still highly recommend replacing that firmware with a version targeted to your chosen display.
Flashing Pre-Built Firmware
For the sake of convenience, a pre-built firmware image for the standard Second Movement firmware is provided here. Select the firmware image that matches your board variant and your choice of LCD:
If you want to use watch faces not available in the prebuilt images, uou can also clone the Second Movement repository and
build your own firmware image. Make sure to add DISPLAY=classic or DISPLAY=custom as a flag to make; this will ensure that the built firmware image targets the display you have installed.
Second Movement Builder
We are working on a web-based GUI for point-and-click generation of Sensor Watch firmware images.
Watch this space!
3 - Second Movement: The Community Firmware for Sensor Watch
Second Movement is an application that manages the display of different screens of content on the watch. These screens are called watch faces. Watch faces can be passive displays of information like a clock or a calendar, or they can be fully interactive user interfaces like the Preferences face, which allows the user to customize Movement’s behavior.
Second Movement handles the instantiation of your watch face and manages transitions between screens. It also provides a low-power sleep mode, triggered after a period of inactivity, to preserve the watch battery.
Several faces are provided that offer baseline functionality like a clock, a settings screen and an interface for setting the time. You can change and reorder the watch faces that Movement displays by editing movement_config.h, and you can write your own watch face using the guidance in this chapter.
make BOARD=X DISPLAY=y, with X and Y replaced with the following:
For Sensor Watch Pro boards make BOARD=sensorwatch_pro
For Sensor Watch Lite boards make BOARD=sensorwatch_red
For classic green or blue boards, make BOARD=sensorwatch_green or make BOARD=sensorwatch_blue
If you are using the original LCD that came with the Casio, add DISPLAY=classic
Otherwise, add DISPLAY=custom
The built firmware will be at build/firmware.uf2. You can now flash this firmware to your watch.
“I just want to pick my own set of watchfaces”
The list of included watchfaces can be found in the watch_faces array in movement_config.h. Simply add, remove, and/or rearrange faces in this list to your liking and re-compile/re-flash your firmware.
An official web-based builder for Second Movement, forked from the previous unofficial online firmware builder, is forthcoming. Watch this space.
3.2 - Building Firmware for the Sensor Watch Emulator
Install the Emscriptem (WASM) cross-compiling toolchain on Linux
Debian/Ubuntu: apt install emscripten
Compile firmware
Clone the repo, and install submodules. Then from a terminal, run emmake make. The built firmware will be output to the build-sim directory.
You can now run this firmware in your browser by serving it over HTTP: python3 -m http.server -d build-sim. You’ll access it at http://localhost:8000/firmware.html
3.3 - Designing a New Watch Face for Movement
In this document, we’re going to describe designing a single watch face for Movement, the community firmware for Sensor Watch. It’s a simple watch face that simply blinks an LED, and provides some options for blink speed and color.
We’ll start by generating a header and an implementation for our blink watch face. First, open a terminal and navigate to the movement/template directory: cd movement/template/.
You can create a watch face in any of the major categories of watch face that Movement offers:
clock faces tend to display the time, whether in a standard time system like a world clock or an alternative system like decimal time. The standard clock, Mars time and beat time all fit in this category.
complication faces tend to display some non-time information, but don’t generally require any data other than user input or the time. Sunrise, TOTP generation and dice rolling all fit into this category.
sensor faces are a lot like complication faces, but tend to display information from sensors attached to the watch. Temperature display, accelerometer display and battery voltage fit in this category.
settings faces are watch faces that involve configuring the watch.
demo faces are faces that involve demonstrating or testing functionality.
Once you know the category of watch face you’re building — blink is pretty clearly a complication — create the watch face files with the command python3 watch_face.py complication blink in a terminal window. That generates two files in the watch-faces/complication folder, called blink_face.h and blink_face.c. It also adds the watch face to both Movement’s Makefile and its include files.
Take a look at blink_face.h. Watch faces in Movement are just plain old C, and we’ll implement our blink watch face in the four functions that script has generated for us:
blink_face_setup is called when the watch boots, and when waking from deep sleep.
blink_face_activate is called just before our watch face comes on screen.
blink_face_loop is called every time the watch ticks, which is normally once a second, but watch faces can request something faster.
And blink_face_resign is called just before our watch face goes off screen.
The script also generates a structure to hold the state of our watch face. We’ll want to add some stuff: a boolean to keep track of whether the LED should be actively blinking — an on/off switch, if you will — as well as the speed and the color. It looks something like this:
Next, we’ll look to our implementation file, blink_face.c, and implement those four functions. Our setup function is simple: when the watch boots, Movement will call this function with a spot for us to stash a pointer to our watch face state. We’ll just allocate some memory for that purpose, and zero it out:
Next, we’ll implement our activate function. When the wearer activates our watch face, we’ll want to set up any initial state that makes sense when arriving at the watch face. The temperature log watch face, for example, moves to the most recently logged entry. For our blink face, we make sure to set the active property of our state to false so the light doesn’t start blinking right away. (Note that we get a void pointer here, which we cast to our blink_state_t type. This “context” pointer may look confusing, but it’s just Movement giving us back the same pointer that we malloc‘ed in setup above.)
Before we declare our loop function, I’m going to add a little helper function to update the LCD. This just takes the state of our watch face, and translates it to letters on the LCD. This function formats a ten-character string that looks something like this: “BL F Green”. The wearer can read that as “Blink face, fast blink, green LED”.
staticvoid_blink_face_update_lcd(blink_state_t*state){charbuf[11];constcharcolors[][7]={" red "," Green"," Yello"};sprintf(buf,"BL %c%s",state->fast?'F':'S',colors[state->color]);watch_display_string(buf,0);}
The watch_display_string function then displays it in the ten positions available on the watch:
Almost there! Next, we write our loop. This is where the action happens!
The core of this function is just a big switch statement that handles events. Movement abstracts away all of the button and timer interrupts, and instead gives our watch simple events that correspond to things like button presses or ticks. All we have to do is implement the cases. For example, we get an event when the watch face is first activated. We can use that to update the LCD for the first time:
Simple enough! Now we need a way to change the color. We’ll assign that function to the Light button: when the wearer presses that button, assuming the LED isn’t already blinking, we’ll move to the next color and update the display:
We’ll also need a way to start and stop the blinking. We’ll use the Alarm button for that. When the wearer presses that button, we want to do one of two things. If the blinking isn’t active, we set it to active, clear the display, and request a frequency to match the selected speed. If on the other hand the blinking is active, we’ll stop it and go back to displaying our state.
Of course, we also need to give the wearer a way to select the speed. But we’re out of buttons! Not to worry, there’s another event for that. Movement can detect a “long press” of a button, which is when the wearer holds the button for more than a half second. We’ll make a long press on the Alarm button change the speed (again, assuming the LED isn’t blinking):
Finally, we need to blink the light! We’ll use the tick event for that. Movement issues this event every time the clock ticks. Normally that’s once a second, but watch faces can request a faster tick, like we did above when setting the blinking state to active. We’ll use this tick function to toggle the LED off on even numbered ticks, and on odd numbered ticks:
That’s it for our loop! There’s only one function left, and it’s a short one. Our resign function is responsible for any last-minute cleanup before relinquishing control to the next watch face. In our case, it’s possible the wearer might press “Mode” while the LED was on, so we need to make sure to turn it off here, just in case:
With that, we’ve implemented a whole watch face in just a few dozen lines of code! All that’s left is opening up movement_config.h and adding it to the list of selected watch faces:
You may have noticed that there are no sensors on this board. That is by design: rather than pick sensors for you, the goal is to add a tiny flexible PCB with the sensors YOU want, and interface them over the nine-pin connector. The connector provides the following options for power and connectivity:
3V power (3.08 V nominal; can drop to ~2.7V near end of life)
An I²C interface with built-in pull-up resistors
Five general purpose IO pins, which can be configured as:
Five analog inputs
Five interrupt-capable digital inputs, with internal pull-up or pull-down resistors
Five digital outputs
SPI controller (with one spare analog / GPIO pin leftover)
One UART TX/RX pair (with three GPIO leftover)
Up to four PWM pins on two independent TC instances
Two external wake inputs that can wake from the ultra-low-power BACKUP mode
Pin
Digital
Interrupt
Analog
I2C
SPI
UART
PWM
Ext. Wake
A0
PB04
EIC/EXTINT[4]
ADC/AIN[12]
—
—
—
—
—
SCL
—
—
—
SCL SERCOM1[1]
—
—
—
—
SDA
—
—
—
SDA SERCOM1[0]
—
—
—
—
A1
PB01
EIC/EXTINT[1]
ADC/AIN[9]
—
SCK SERCOM3[3]
RX SERCOM3[3]
TC3[1]
—
A2
PB02
EIC/EXTINT[2]
ADC/AIN[10]
—
MOSI SERCOM3[0]
TX or RX SERCOM3[0]
TC2[0]
RTC/IN[1]
A3
PB03
EIC/EXTINT[3]
ADC/AIN[11]
—
CS SERCOM3[1]
RX SERCOM3[1]
TC2[1]
—
A4
PB00
EIC/EXTINT[0]
ADC/AIN[8]
—
MISO SERCOM3[2]
TX or RX SERCOM3[2]
TC3[0]
RTC/IN[0]
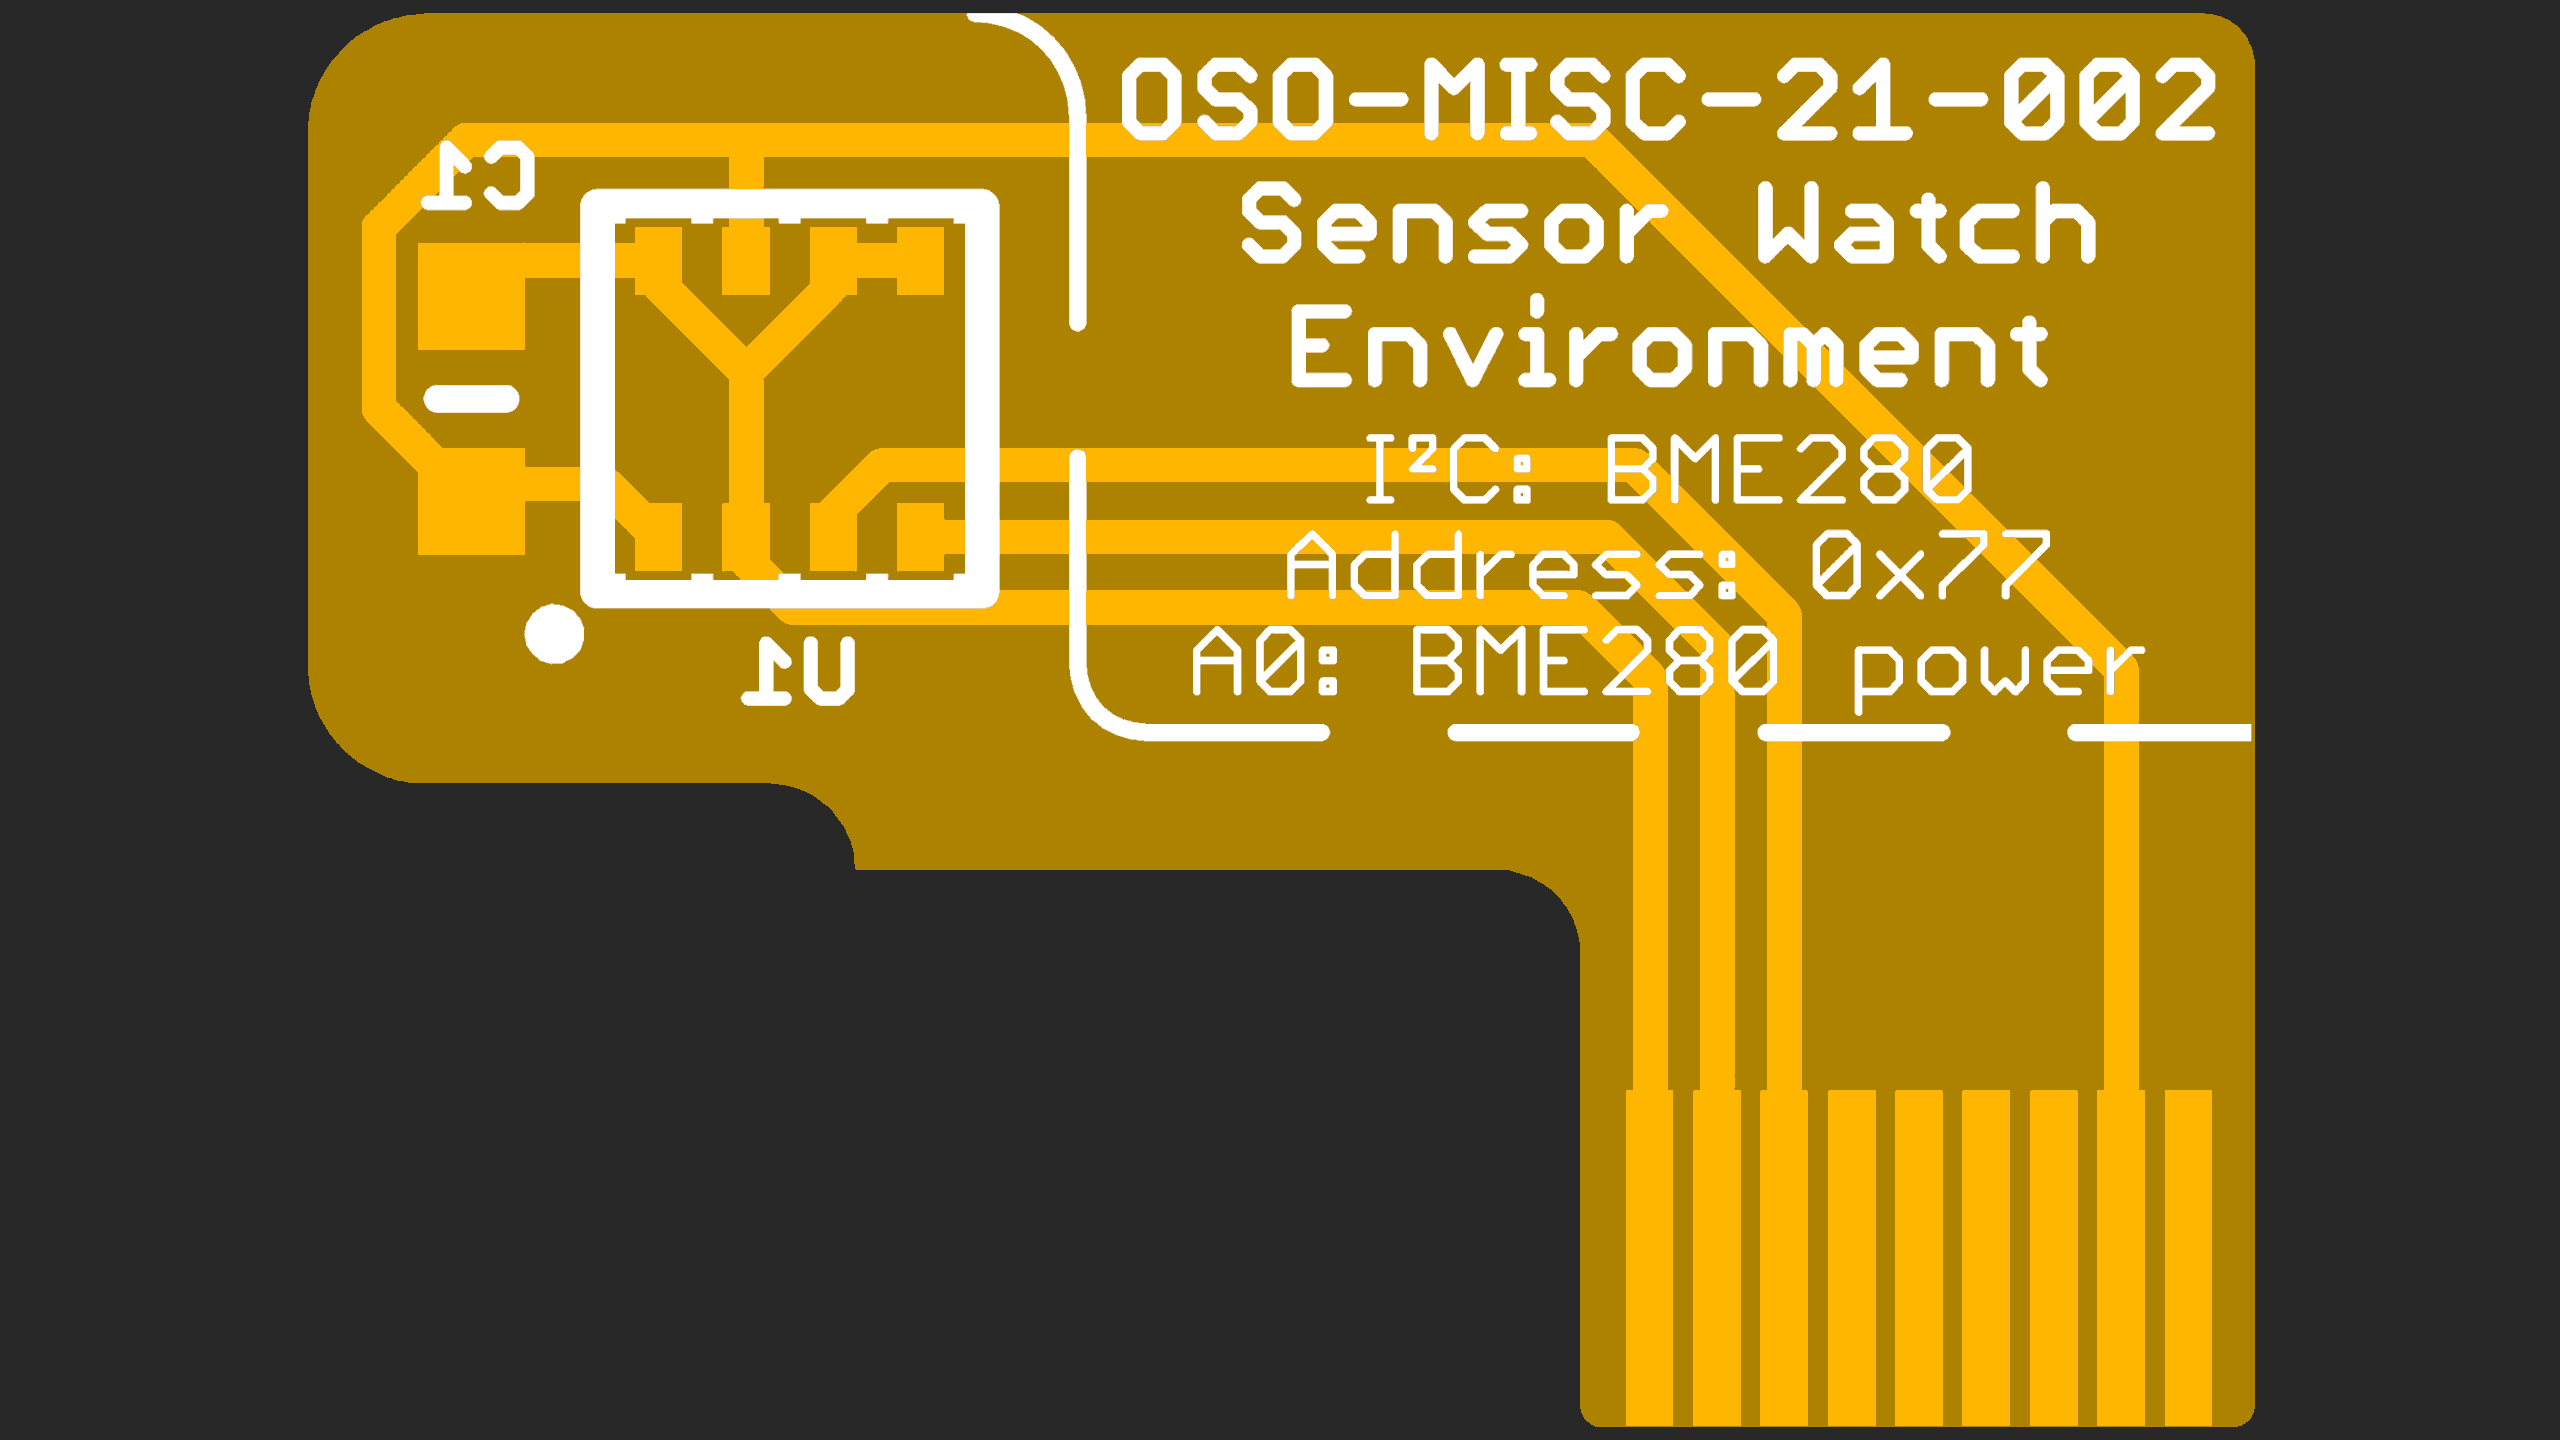
These tiny “sensor boards” have a set outline, and the available area for your electronics is quite small (5.7 × 5.7 × 1 mm). Still, this is plenty of room for an environmental sensor, MEMS accelerometer or magnetometer and a couple of decoupling capacitors. Note that you will likely be limited to QFN and LGA type parts; SOICs are too large, and even SSOP packages are generally too thick. You can find reference designs for several sensor boards in the PCB/Sensor Boards directory in the Sensor Watch repository.
4.1 - Sensor Watch Accessory Board: Temperature + GPIO
This sensor board shipped to all Sensor Watch Crowd Supply backers, and shipped as a standalone upgrade for several years. It is no longer available, as the new Sensor Watch Pro boards have a temperature sensor built in.
Temperature
The Temperature and GPIO board includes two passive components on the front, a very precise 10 kΩ resistor and a 10 kΩ thermistor, that together form a voltage divider. While the resistance of the 10 kΩ resistor stays very close to 10 kΩ at all temperatures, the thermistor’s resistance goes down as the temperature rises, and goes up as the temperature falls. This changes the voltage that’s measured at the middle of the voltage divider, and with some clever math, we can turn that voltage into a very precise temperature reading.
While the watch library’s thermistor driver is preconfigured with all required parameters for this calculation, we’ll repeat them here for completeness:
The resistor has a value of 10 kilo-ohms with a tolerance of 0.1%
The thermistor has a nominal value of 10 kilo-ohms at 25° C, and a B coefficient of 3380K
GPIO
In addition, this sensor board breaks out test points on the underside for six nets: power and ground, the I2C pins SDA and SCL, as well as two GPIO pins, A1 and A4. It will be fiddly, but you can solder fine enamel wires to these test points to connect other kinds of gadgets to your Sensor Watch, whether to test out possibilities for future sensor boards or to bodge in a device with additional functions you want.
Note that if you solder to these test pads, you must cover the five test points on the Sensor Watch board with tape! It’s possible for the solder bumps you create on the underside of the sensor board to touch the main Sensor Watch board, so you must electrically isolate them with tape.
The A1 and A4 pins are very versatile. You can use these two pins as:
General purpose digital IO to drive a low current device like a sensor or LED
Analog inputs to read an analog value from a circuit like a phototransistor
PWM output (they are both on the same TC3 peripheral)
Input to the TC3 counter peripheral for frequency measurement
UART transmit (A4) and receive (A1)
External interrupt inputs
In addition, you can use pin A4 as an external wake interrupt, which can wake the watch from the ultra-low-power BACKUP mode.
The accelerometer sensor board includes one active component: the LIS2DW12 high-performance ultra-low-power 3-axis “femto” accelerometer from STMicroelectronics. See the data sheet (PDF link) for details, but in short, it has a configurable output rate from 1.6 Hz to 1600 Hz and two interrupts for a variety of conditions including tap detection, orientation change, and freefall, as well as a status output indicating whether the device is stationary or in motion. All of these interrupts come with configurable thresholds and durations.
While you can do a TON with this sensor, Second Movement configures it to be as low-power as possible: at boot, the accelerometer is set to its low-power (not high-performance) mode, and then it is configured for stationary/motion detection. It’s configured to output this state on pin A4: if pin A4 reads high, the accelerometer is still; if A4 reads low, the accelerometer has recently experienced a high pass filtered acceleration event of >1g on one of its axes.
Then it’s powered down, not to be activated unless a watch face requests it. A watch face can request the accelerometer via two functions: movement_set_accelerometer_background_rate and movement_enable_tap_detection_if_available. To help understand the power impact of thesr options:
With the accelerometer powered down, as it is at boot, the accelerometer sensor board is consuming an additional 0.05 µA when compared to a board without the sensor installed.
Calling movement_set_accelerometer_background_rate with a background rate of 1.6 Hz adds <1 µA of power consumption.
Calling movement_enable_tap_detection_if_available adds about 150µA of power consumption. As such, tap detection should only be enabled briefly, and paired with a call to movement_disable_tap_detection_if_available.
Currently three watch faces make use of the accelerometer:
The Activity Logging face will enable the accelerometer at a slow 1.6 Hz sampling rate at boot, and keep there indefinitely in the background. It will then log any consecutive minutes where pin A4 read low. In my experience, this is adequate to capture jogging workouts.
The Accelerometer Status face displays the state of pin A4: active or still. If the accelerometer was on in the background, it will leave it at that sampling rate; if it was off, it will enable it at 1.6 Hz while the watch face is on screen. This watch face also allows you to change the threshold from 1 g to something else via a long press of the ALARM button.
The Countdown Timer face will enable tap detection for three seconds when the face comes on screen. You can tap the watch to increment the number of minutes you want to count, and each tap will extend tap detection for another three seconds. Tap detection will be disabled after this timeout, or when the wearer presses the ALARM button to start the timer.
All of these functions return a boolean that indicates whether the operation was successful. If they return false, that means that an accelerometer board was not present; you may want to either update your UI to reflect this condition, or include logic to skip your watch face if the accelerometer is critical for your use case.
UART
In addition to the accelerometer, this sensor board also breaks out test points on the underside for two signals, A2 and A1, as well as power and ground. It will be fiddly, but you can solder fine enamel wires to these test points and run them out of the watch case, which will allow you to talk to the watch over UART. This could be useful if you are interested in streaming acceleration data out of the watch.
5 - Watch Interface Guidelines (WIG)
This document outlines best practices for developing watch faces for Movement, the community firmware for the Sensor Watch. While this is a rather specific scope, many of these concepts will be relevant to writing a bare-metal Sensor Watch app as well. After reading this document, you should have a sense for the hardware capabilities and limitations of Sensor Watch, the kinds of applications that are well-suited to the hardware, and the interaction models that tend to make for a rich and usable watch face.
Before we get to details, there are two major points that underly every piece of guidance in this document:
Sensor Watch is a watch
You’ll wear Sensor Watch on your wrist, and you’ll interact with it to answer questions about your day and the world around you. “When does the sun set this evening?” “How late is it in Berlin right now?” “What’s the high tide today?” These are the kinds of questions that Sensor Watch can excel at answering quickly and clearly.
Example: a tide prediction app, showing the time of the high tide and its predicted height.
Even when you add sensors like a thermometer, light sensor or accelerometer, you should think about how your watch face can answer these kinds of simple questions. “How cold was it last night?” “What shutter speed should I use in this lighting?” “Was I active enough today?”
Keeping these prompts simple keeps the focus on the things that Sensor Watch can do well, because:
Sensor Watch is not a smart watch
While Sensor Watch can have sensors added to it to measure things like temperature, light or acceleration, it’s not generally designed to synchronize these measurements to another device like a smart phone; in fact, by default, it has no way of syncing data to or from a device. This makes Sensor Watch less well suited to answering complex questions that require external data or a longer data trail; questions like “Will it rain tomorrow” require data the watch does not have, and questions like “How active was I last month?“ may be too complex to answer on a small watch with only a few buttons.
There are three key hardware differences between Sensor Watch and a smart watch:
Whereas a smart watch has a high-resolution screen capable of displaying arbitrary graphics, Sensor Watch has a segment LCD with a fixed layout.
Whereas a smart watch generally has a touch screen, Sensor Watch has just three buttons for input: the Light, Mode and Alarm (Wake) buttons.
Whereas a smart watch has powerful processor and a battery that can be recharged daily, Sensor Watch has a much simpler processor, and a battery that must be discarded and replaced.
These differences have implications for how a watch face displays content, how the wearer will interact with a watch face, and how the watch face goes about running its logic:
You will need to think carefully about how to format the information you want to display and make it work within the constraints of the segment LCD layout.
You will need to make the most of the limited button inputs, especially since all of these buttons have default functions like changing the mode or illuminating the LED.
You must take care to ensure that your watch face does not consume too much battery power. In addition, your watch face must be able to work gracefully with Movement’s low energy mode.
Road Map
This document is divided into five sections. First, we’ll talk about the “big picture” stuff: some of the concepts you should keep in mind when designing watch faces for Sensor Watch, some of what it does well, and some of what it doesn’t. Next, we’ll have three sections dedicated to each of those three key areas of functionality: the display, the buttons, and the low-power microcontroller. Finally, we’ll bring all of these concepts together to make a very simple watch face that says hello.
5.1 - The Sensor Watch Display
Before we talk about the Sensor Watch display, let’s go through some key terminology to clarify our discussion:
Segment - A single addressable element on the liquid crystal display
Indicator - A segment like “PM”, “24H” or the bell icon that indicates status
Digit - A grouping of segments that can display a number, character or glyph
Position - The placement of a digit on the display; for example, the first digit at the left of the top row is Position 0
We also tend to label the segments of each digit clockwise from the top segment: the top segment is segment A, top right is B, bottom right is C, all the way to the center digit which is segment G:
In this image of a clock, you can see where the 8 has all segments (A-G) energized. You can display a 1 by energizing only segments B and C, and a 2 by energizing segments A, B, D, E and G.
The Sensor Watch has five indicators, ten digits, and one segment dedicated to the colon in the time display. We choose to number the digits as follows:
Positions 0-1 - The digits in the top middle, usually used to display the current mode or the weekday. We can call these the “Weekday” digits.
Positions 2-3 - The digits at the top right, usually used to display the day of the month. The “Day” digits.
Positions 4-9 - The digits on the bottom row, usually used to display the time; the “Clock” digits.
Positions 4-5 are normally the hours display.
Positions 6-7 are normally the minutes display.
Positions 8-9 are normally the seconds display, and are slightly smaller than the other digits on the bottom row.
As alluded to in the “Big Picture” section, this document is not going to be prescriptive about how you use the digits in these positions; there is no “must” about how you display information on your watch face. Still, there are some broad guidelines on where these digits can be most useful:
The “Weekday” digits are particularly useful for displaying alphanumeric information.
The “Day” digits are best for displaying a single number from 0-39, such as a day, an index or a countdown.
The “Clock” digits are well suited for the main informational display of your watch face.
You are going to need flexibility to adapt the information you want to display to the Sensor Watch LCD. This section is merely going to walk through some useful patterns, some limitations, and some best practices.
The Weekday Digits
The digits in these first two positions, positions 0 and 1, have some extra segments that make them useful for displaying letters. The stock F‑91W uses these positions to display the day of the week (SU, MO, TU, etc). If you have some alphanumeric information to relay on your watch face, it would make sense to look to these first; the tide prediction concept in the previous section, for example, imagined labeling the displayed prediction with “HT” for high tide and “LT” for low tide.
If you have no data to put in these segments, they can also serve as a useful spot to title your watch face, so that the wearer is clear what information they are looking at. The “Temperature” watch face, for example, uses these digits to display “TE”. This distinguishes it from the “Temperature Log” watch face, which titles itself “TL”.
Note that you are not limited to keeping the same characters in this position the whole time your watch face is on screen! The “Temperature Log” watch face displays “TL” most of the time, but when the wearer enters timestamp mode, it displays the word “AT” in these positions, signaling that the data point was logged “at” the displayed time and date.
Consider: when the wearer presses the “Mode” button and sees the watch face for the first time, “TL” tells them which watch face they are viewing. Once they have that information, they know they will remain in this watch face until they press “Mode” again, so you can feel free to change it after a short delay or in response to a button press. It’s done its job, and given the wearer the context they need to use the watch in the current mode.
Of course, you could use these segments in a completely different way. The LIS2DH accelerometer test face (which we’ll look at a bit later) uses these two positions to indicate the presence of an interrupt on the X or Y axes, lighting up “Y” and/or “X” when an interrupt is asserted, and remaining blank otherwise.
Limitations of the Weekday Digits
On a stock Casio F‑91W, the digits in these two positions normally display one of just nine values: abbreviations for the seven days of the week, the text “AL” for alarm mode, or the text “ST” for stopwatch mode. If you break this down, position 0 will only ever display one of the characters A, F, M, S, T or W, and position 1 will only display the letters A, E, H, L, O, R, T, or U. The Sensor Watch aims to display many more characters in these positions, and in the case of position 0, we can do it! With the exception of an uppercase R, the digit in position 0 can display any character in the Sensor Watch character set.
Position 1 is a bit more trouble. Looking closely at the position 1 letters above, you’ll notice that segments B/C and E/F never have to operate independently (as they would to, say, display the letter S or the number 2). Thus, to save pins on the LCD, the designers of the F‑91W tied these two pairs of segments together. This means you can only display a limited set of characters in position 1: the letters A, B, C, D, E, F, H, I, J, L, N, O, R, T, U and X, and the numbers 0, 1, 3, 7 and 8.
All of this is to say that you may need to think about terminology that makes sense for your watch face, and tweak it to fit the constraints. For example, the “Settings” watch face requires changing a setting related to Movement’s low power mode, but the ‘P’ in “LP” cannot be displayed in position 1. To address this limitation, the setting is instead called “Low Energy” mode, which abbreviates to “LE”.
The theme of limitations will come up in each of these groups.
The Day Digits
On a stock Casio F‑91W, these two digits normally display the day of the month. This makes this position very useful for displaying values from 0-39:
The Clock and World Clock face use this area to display the day of the month.
The TOTP watch face uses this area for a 30-second countdown, indicating the validity window for the displayed code
The Temperature Log uses this area to display the index of the logged measurement, from 0 to 35
Limitations of the Day digits
While the digit in position 3 is a full-featured 7-segment display that can display any number and just about any letter, the digit in position 2 is the most limited digit on the watch: it can only display the numbers 1, 2 and 3. This constraint relates to the fact that it is missing one segment (segment F), and that segments A, D and G are all tied together.
There’s not much to say about these digits because they are pretty limited: if you have a single letter or a number from 0-39, you can display it here. If not, you can leave these digits blank.
The Clock Digits
The bottom row of digits, positions 4-9, comprise the clock display on a stock F‑91W. This is the main event: you can display a ton of information here. But before we look at some of the ways we might want to use this display, let’s take a look at some of the subtler properties of these digits:
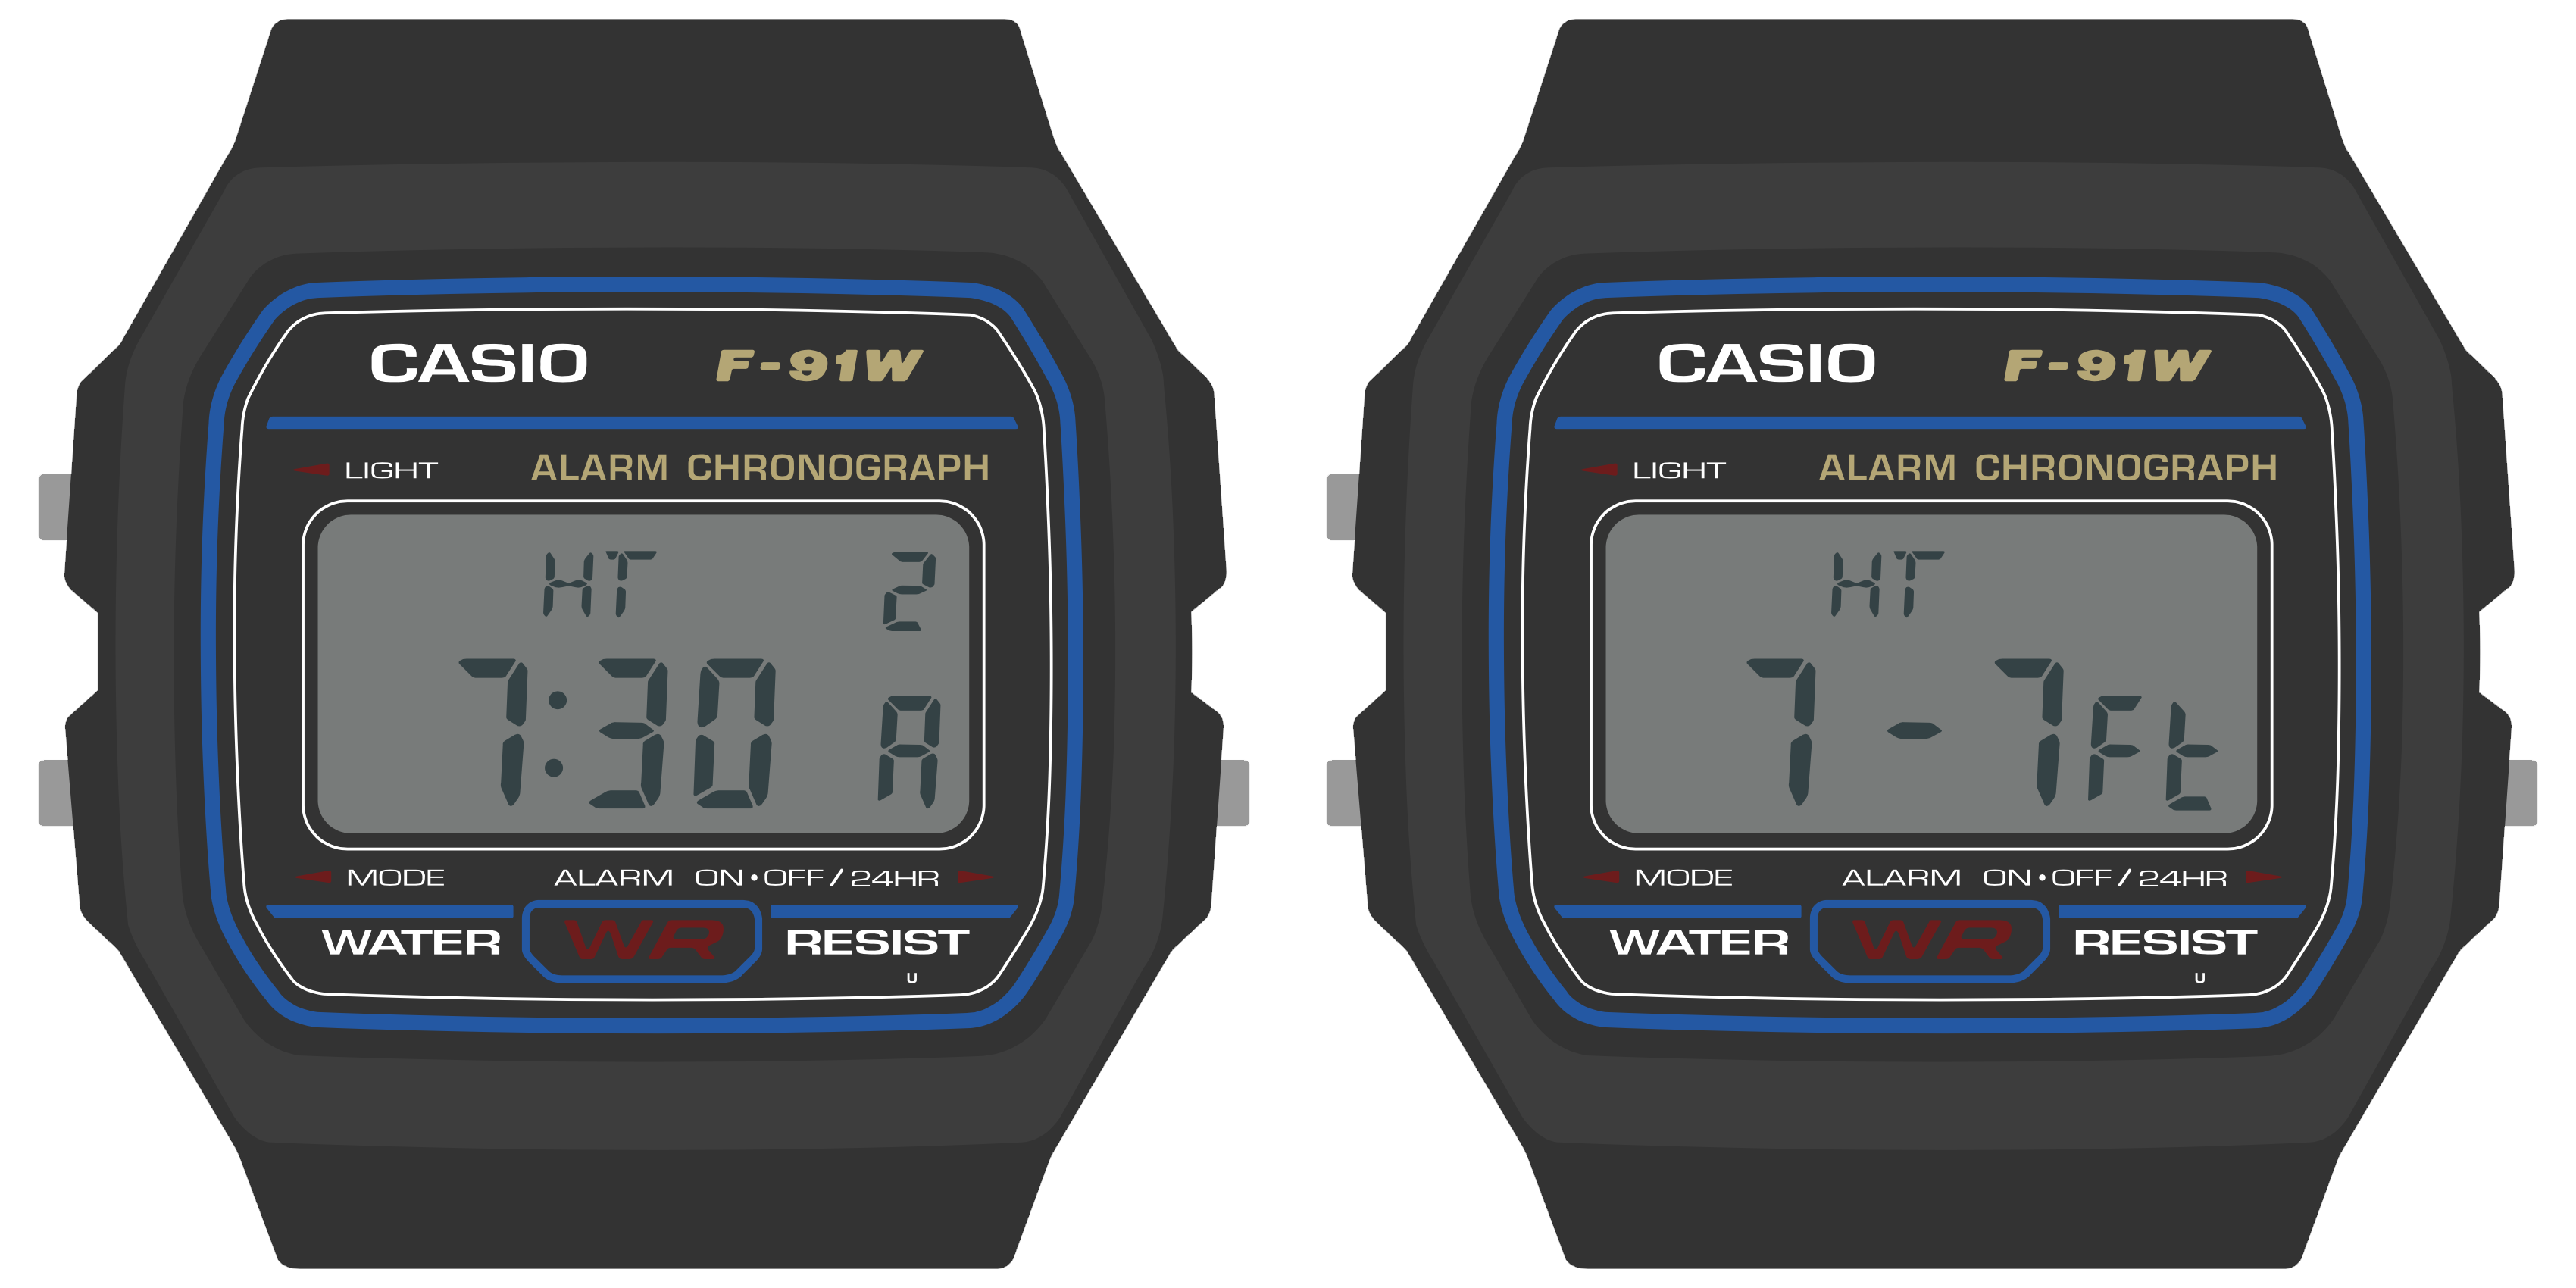
First, note that the digits in positions 8-9, the seconds, are slightly smaller than the rest. This makes it obvious even without a colon that they are the seconds on a clock.
Next, note the way that the colon separates positions 5 and 6 in the display on the left. This clarifies the separation of the hours and the minutes on the clock.
Now look at the display on the right, where the colon is turned off. Note that in the absence of a colon, these digits are not evenly spaced: there is a gap between them.
These details are useful to keep in mind as you think about the data you want to display, as these subtleties lend themselves to some non-obvious strategies. For example:
Consider how the visual weighting of the seconds digits could make them useful for displaying the decimal part of a floating point number, as shown in the display on the left (87.2°).
Also on the left: consider how the colon might be useful both as a separator in a clock display, and as a punctuation mark separating two concepts, like the high temperature label and the measured temperature.
Consider how the spacing of these digits might let you treat this line not as one six-digit display, but as three distinct two-digit displays. For example: 10, 20 and 30 could represent three separate data points in the display in the middle.
Also consider how the wearer’s eye would read across the display if a full word were placed there, as in the display on the right. Do your eyes notice the gap, or does the word “Sunset” read legibly?
You saw this guideline before in the “Big Picture” section, but it bears repeating: over time, the wearer will become familiar with the layout of your watch face, so don’t be afraid to use these digits in an unorthodox way.
Limitations of the Clock digits
As you might have expected, there are some limitations to the clock digits. The first limitation applies to all of them: these are 7-segment displays meant to display numbers, not letters. As such, characters like ‘M’ and ‘W’ are not available; they will render as an ‘N’ or a ‘U’ respectively. Additionally, some letters aren’t available in their preferred case; uppercase ‘R’, for example, will appear as a lowercase ‘r’. Finally, some of these characters may look a bit awkward. ‘K’, for example, requires a little bit of imagination, and ‘X’ requires a lot of imagination; the screens below are meant to display the words “Ranked” and “PIXEL”:
The second limitation has to do specifically with digits 4 and 6: the top and bottom segments of these digits (segments A and D) are tied together:
The Sensor Watch display library will try to work around this limitation in some cases. For example, some letters may have their case changed: in displaying the word “Apogee” below, the Sensor Watch will render the “a” in lowercase and the ‘O’ in uppercase — “apOgee” — to work around the constraints on positions 4 and 6. This is because position 4 cannot turn off segment D without also turning off segment A, as would be required for an uppercase ‘A’, and position 6 cannot turn on segment D without also turning on segment A, as would be required for a lowercase ‘o’.
Other characters may take on slightly different forms in these positions: for example, a 7 in position 4 or 6 will render as a short “lowercase” 7, and characters that require a segment on the top or bottom may be shifted up or down to make the best use of the position.
With some extra care, you can sometimes dodge this limitation. In the two screens above, for example, you can see that displaying the name of this popular soft drink in positions 4-7 results in a lowercase 7, and a U that’s shifted up to the top half of the digit. But by shifting it over to positions 5-8, both the 7 and the U get displayed normally.
Note however that in some cases, you cannot dodge this limitation. Letters that can only be displayed by energizing segments A and D independently will not display correctly. In the above example, the lowercase ‘t’ in ‘Hi tide’ will not work in position 4 or 6. It will display as an uppercase E, “Hi Eide”, because segment D also controls the state of segment A. You will have to figure out another way to convey this concept, either by shifting the ‘t’ to a position that can display it, or re-imagining the way the information is presented to the wearer.
Regardless of case, the following characters are fully unsupported in positions 4 and 6: F, K, P, Q, T, X and Y, as well as the underscore and a few other punctuation marks. In addition, the decimal point appears as a hyphen; this may lead to confusion when displaying negative numbers, so you may have to work around this as well.
The Indicator Segments
In addition to the three major segmented display areas, the watch has five indicator segments: “Signal”, “Bell”, “PM”, “24H” and “LAP”. You can energize these indicator segments to convey information or status to the user. In the stock F‑91W, these have some fairly obvious uses: Signal and Bell indicate whether the hourly signal and alarm are active, and PM and 24H relate to the clock display. “LAP” only operates in stopwatch mode, where it indicates when the stopwatch is showing a lap time. Still, when looking at these indicators, you should consider what concepts people might have associated with these icons.
The “Signal” indicator takes the form of a series of bars moving from thick to thin. It does convey the sound waves of an hourly indicator, but consider other possible meanings: they could represent radio waves, sensor activity or the reading of data from an accessory board. The Temperature watch face, for example, energizes this segment to indicate that a new reading is being taken from the thermistor.
The “Bell” conveys the concept of an alarm bell, but consider alternate meanings like the presence of a notification or a warning condition. For example, a tide prediction face could energize this segment when high tide is very near — an important thing to know if you are walking along a remote stretch of beach!
The PM indicator has the narrowest use case: if you are displaying a time value that is in the afternoon, you should activate this segment. This guidance also applies to the 24H indicator. Also note that Movement has a global setting that will tell you whether the user has selected 24H mode; you should respect this whenever displaying time values.
Finally, the LAP indicator. This indicator has a very specific meaning for a stopwatch face, and almost no meaning anywhere else. The Stopwatch face uses this segment for its expected use case, but beyond that, it’s not a great semantic fit for most others. Having said that, if you need to indicate a rare warning or error condition, and none of the other indicators are a good fit, the LAP indicator might make sense. For example, the Simple Clock face energizes this segment when a low power condition is detected. It’s awkward, but it works.
Putting It All Together
While the previous sections outlined how each of these bits of the display worked on their own, the fact is, you will mix and match these strategies. We’ve seen how the Temperature and Temperature Log watch faces use the Weekday digits to display their name (TE, TL) and a data point. But a Sunrise/Sunset face could use those characters to display something about the data point: that this is a sunSEt at 5:42 PM on the 5th, and a sunRIse at 6:24 AM on the 6th:
The accelerometer test face uses all of these areas in a radically different way. It uses the top row to indicate the presence of a Y, X or Z interrupt, and a single digit in the top right to count the last ten seconds to the logging of the next data point. The bottom line counts interrupts per minute, and displays the most recent three minutes’ counts in three two-digit groups on the clock line:
There’s also nothing that says you have to use these displays for digits at all. Here we imagine using the 12 vertical bars in the clock display to show an activity log over the last 12 hours, where the presence of a short bar indicates some activity in that hour, and a tall bar indicates more. You can imagine toggling this watch face between different timeframes, which could be displayed in the top right: 6/12/24, or 1d/2d/3d.
Final Notes
The Sensor Watch display is both powerful and limited: we can push it to do things that a stock F‑91W couldn’t dream of, but it also inherits some of the limitations inherent to the donor watch. Still, armed with these guidelines, you should feel empowered to build useful and information-rich watch faces. The important things to remember:
Keep in mind how the segments are grouped, and think about how you can make the information you want to display fit into those groups.
Be mindful of the limitations of various digits and groups, and prepare to be flexible when naming things or laying out text.
Don’t be afraid of information-dense displays or unorthodox uses of the LCD. The wearer using your watch face will develop a mental model for the information you’re presenting to them.
Use indicators to signal various conditions, and keep in mind creative ways of using them to convey meaning to the wearer.
5.2 - Big Picture Stuff
The Casio F‑91W, the donor watch on which Sensor Watch is based, is one of Casio’s smallest and simplest wristwatch designs. It is designed to show very basic information: the date and time. As we walk through the device’s hardware capabilities, we can see how it is tailored carefully to that use case:
It has a small segment liquid crystal display with ten digits.
It has a dim backlight on the left side of the display that mostly illuminates the hours and minutes.
It has a buzzer for firing a single alarm, as well as an hourly alert.
The three buttons on the watch offer very basic inputs:
the “Light” button illuminates the watch face,
the “Mode” button cycles through the four modes that the watch offers,
and the “Alarm” button is the only truly multi-function button: it turns the alarms on or off when the alarm face is active, and swaps the main 12/24 hour mode when the main clock is active.
Sensor Watch inherits many of the same hardware limitations of the F‑91W: the screen is small, the layout is designed to display no more than ten characters at a time, and we have only those three buttons to work with (one of which is dedicated to switching modes). This leads to some broad guidelines that will be useful to think about when designing your watch face:
Your watch face’s main interface should focus on presenting a single screen of useful information.
If possible, your most important information should appear on the left side of the screen, since the LED will illuminate the left side more brightly than the right.
You should feel free to use every character position and every indicator segment to its maximum potential! You have ten characters to work with; use them to the fullest.
If you have more than one screen of information to display, you should hide it behind a press of either the “Alarm” or “Light” buttons…
…because your watch face should be prepared to resign immediately when the wearer presses the “Mode” button. (More on this in the “buttons” section!)
Let’s look at some of the watch faces that come with Sensor Watch to see how these guidelines are implemented in practice.
The Temperature Watch Face
This is the Temperature watch face. It displays the current temperature, as read from a thermistor voltage divider on a Sensor Watch accessory board.
This watch face is relatively simple. It’s dominated by a single large piece of information: the current temperature. The wearer is able to absorb this information quickly and easily. The temperature data itself is left-justified. If the LED only illuminated the first two digits, the wearer would at least know that the temperature is in the range of 68 degrees. The fractional part, while useful, is not essential to a quick read of the conditions.
Also note that the “signal” indicator segment, used on the main watch face to indicate the status of the hourly beep, is here repurposed to indicate when a new reading is being taken. Don’t be afraid to use these indicators for your own purposes! Whereas the bell indicator might signal that an alarm is enabled on an alarm watch face, you may want to use it to signal an error or warning condition on another face. This is totally fine: the wearer will over time grow familiar with the layout of your watch face, and make the correct associations between icons and concepts.
The temperature display face is relatively simple; let’s take a look at a more complex watch face.
The Temperature Log Watch Face
This watch face stores a 36-hour log of temperature values, which the wearer can read back to get a sense of high and low temperatures over time. This seems at first glance like it might be a formidable challenge for a watch face with only ten digits, but by thinking carefully about the design, we can fit a lot of information on this small screen.
Let’s revisit the first guideline. This screen displays a useful, information-dense readout of the most recent temperature logged: the “TL” indicates the mode (Temperature Log), and the “0” at the top right indicates that this is the zeroth (i.e. most recent) reading taken. The whole bottom line is dedicated to a large, clear display of the logged temperature.
For clarity, it would be nice for this screen to display not just the index of the temperature reading, but also the time that the temperature reading was taken. There isn’t room for that on the display, but by pressing the “Light” button, the wearer can temporarily move the watch face into a mode that displays the timestamp of the reading:
This mode simply displays the timestamp for a second or so — this reading was taken at 12:00 AM on the 25th day of the month — and then returns the wearer to the temperature reading at that timestamp. This is a simple way to stack two aspects of the data point into one screen. If you had multiple aspects (say, temperature, humidity and timestamp) you might consider using the light button to cycle through those three aspects of the data point.
This handles the most recent temperature and timestamp. But what about our 36 hour log? The answer there lies in the other button, the “Alarm” button. Pressing the “Alarm” button moves one index back in the list of readings:
Once again, we’ve managed to fit more information onto the screen by hiding it behind a button press. The index at the top right makes clear that this is data point 1 (not data point 0), and again, pressing the “Light” button on this screen will display the timestamp for this reading: 11:00 PM on the 24th. Repeated presses of the “Alarm” button move the wearer back in time. At any time, the wearer can press the “Light” button to view the timestamp. And of course, the wearer can press “Mode” at any time to move from the temperature log face to the next face in the list.
Note that while the wearer is likely to develop familiarity with your watch face’s unique visual layout over time, they will likely expect the buttons to behave consistently between watch faces. They will always expect the “Mode” button, for example, to advance the watch face, and for the “Alarm” button to toggle settings or change values. Generally speaking, you should use the “Alarm” button to move through time or advance a value, and use the “Light” button to move between sub-modes within the watch face (and illuminate the LED, as appropriate). The “Time Set” watch face, for example, uses the “Light” button to move between setting the hour, minute and second, and uses the Alarm button to change the value in each field.
Wrapping Up
When designing watch face visuals for the Sensor Watch, you should aim to present one screen of content with clarity:
Don’t shy from information density; use as many digits and indicators as you need.
Try to fit more crucial information on the left side of the screen, and put less pressing information on the right.
Don’t worry about how segments or digits are used on other watch faces; when your watch face is on screen, you are in control.
When designing interactions for the Sensor Watch, you should aim for consistency with other watch faces:
Your watch face should resign immediately when the “Mode” button is pressed and pass control to the next watch face in the list.
If your watch face has multiple modes, you should use the “Light” button to toggle or advance through them.
If your watch face presents multiple data points or advances through multiple values, you should use the “Alarm” button to advance through those.
6 - Legacy Watch Faces
This section includes detailed documentation for each of the watch faces available in the classic Movement firmware. We are working to port these over to Second Movement, and will create new documentation pages for them once they are available there.
The Sensor Watch measures time using a quartz crystal that oscillates at a frequency of 32,768 kHz. In practice, the frequency of every crystal deviates a little from the nominal value. Because the difference is very small, we don’t express it as a percentage (“parts per hundred”), but as ppm (“parts per million”). For example, a deviation of +1 ppm means the frequency is 32,768.03278 kHz. This would make the watch gain about 31.5 seconds per year, because there are about 31.5 million seconds in a year.
In addition to the static offset of individual crystals, their frequency also varies dynamically with temperature. Crystals are manufactured in a way that their frequency peaks at 25 °C and decreases at both higher and lower temperatures.
For accurate timekeeping, you need to correct for your crystal’s static frequency offset, and your watch needs to dynamically compensate for the variation due to temperature changes. These are the things that the Nanosec and Finetune watch faces let you do.
Calibrating the Sensor Watch
For really good results you need a watch with a temperature sensor, but you can also get a significant improvement without one. Without a temperature sensor, select correction profile P1 instead of the default P3 (details in the last section).
The firmware has to include these faces:
A regular clock face like Simple Clock (simple_clock_face), because you want a way to see the time;
Time Set (set_time_face), because you need a way to set the date and time;
Finetune (finetune_face), so you can set the time precisely and adjust the static frequency correction;
Nanosec (nanosec_face), because it contains the behind-the-scenes magic that dynamically compensates for temperature-driven variation.
To calibrate your watch, follow these steps:
Flash a firmware that contains the necessary faces onto the watch, assemble it, and set the time via the Time Set face.
Open time.is in a browser to display the accurate time. Go to the Finetune face and adjust the offset until the seconds on the watch precisely match the seconds on the screen. Apply the change without updating the frequency correction value with a long ALARM press.
See the Finetune section below for the details of doing this.
Wait a few days, then fine-tune your watch again using time.is and Finetune, saving your changes with a long LIGHT press. Your watch now knows how many hours have passed since the last time it was accurate, and how much it has drifted since then. From these two values Finetune can calculate an update to the static frequency correction value, beyond adjusting the current time itself.
Your watch is now a lot more accurate. Wait a few weeks until it has drifted a second or two, then repeat Step 3.
Wait a few months, then repeat Step 3. At this stage your Sensor Watch will be accurate to within 10 seconds per year.
Some useful details:
You need a special site like time.is for this type of calibration. The normal time on most websites (and on most devices like laptops or smartphones) is not accurate enough.
The Finetune face lets you adjust the time in increments of 25 msec. That is below most people’s threshold of perception. You need to wait for the watch to build up a noticeable amount of drift before re-calibration is practical.
The static frequency correction value is preserved when the watch resets. You don’t need to calibrate from scratch after replacing the battery or re-flashing the firmware.
The 10 seconds per year accuracy puts your watch right up there with the most expensive high-end quartz timekeepers.
Finetune
When you reach Finetune by repeatedly pressing MODE to cycle through the installed watch faces, it will first look a little like this:
The four 0s mean that you haven’t input any time adjustment yet. The number on the right keeps updating to show the seconds part of the current time.
Finetune has two secondary faces. You need a long MODE press to move to the first of them; after that, a short press is enough.
FT means Finetune, and it’s the main screen where you can enter the desired time adjustment.
DT stands for delta time and it shows the number of hours since you last adjusted the time with the Finetune face. At first you will see a small value like this because your watch hasn’t been on for very long yet. The small numbers are fractional hours. E.g., the image above shows 0.05 hours, which is 3 minutes.
F stands for frequency, and it shows the amount by which your current adjustment will update the static frequency correction value. However, unless at least 6 hours have passed, Finetune will not mess with the frequency correction, which is why at first you will see “6Hr” here.
Back on the main screen, you can use LIGHT and ALARM to change the adjustment. A long LIGHT press increases the offset by 250 msec; a short LIGHT press adds 25 msec.
The first and third digits of the display have some limitations, which is why the “7” in 0275 looks a bit odd.
You need to go towards a positive value as shown above if your watch is ahead of the true time.
You can verify the adjustment’s effect by holding your watch next to the time on an accurate clock, like time.is. Your adjustment offsets the constantly ticking seconds value.
A long ALARM press decreases the value by 250 msec. A short ALARM press decreases it by 25 msec.
The odd shape in the top right is meant to be a double minus sign, indicating that this is a negative adjustment.
You need a negative adjustment if your watch is behind the true time.
Now let’s see what a real calibration looks like!
On the FT screen I have input an offset of 1025. My watch was just a bit over a second fast.
The DT screen tells me that 693.72 hours, or a little over four weeks, have passed since the last time I adjusted the time with Finetune.
The F screen tells me that if I apply this adjustment, the static time correction value will increase by 0.4104 ppm. (This will make my watch about 12.9 seconds slower per year.)
A long LIGHT press applies the adjustment to the time and updates the static time correction value. This is what I did above. Sensor Watch will be more accurate going forward!
A long ALARM press applies the adjustment to the time but does not update the static frequency correction. This is what you need to do the very first time you use Finetune, when you initially set the exact time.
After either a long LIGHT or long ALARM press on the F screen, Sensor Watch returns to the default face that shows the current time.
What if you have come to the Finetune face only to experiment but do not want to change the time, let alone mess with Sensor Watch’s calibration? Easy: on the FT screen, change the value 0000 again. If you now press MODE a couple of times, Sensor Watch will move on from Finetune. Or if you just wait for a minute without pressing anything, it will return to the Simple Time screen.
Nanosec
The Nanosec face has two functions. The first of the two is invisible but absolutely crucial. The face contains code that Sensor Watch executes regularly in the background. This code dynamically adjusts the time in minuscule increments to compensate for the effects of the current temperature on the crystal’s frequency.
The second, visible function is a collection of screens where you can review and change various parameters that affect Nanosec’s internal calculations. You essentially won’t need to change any of these settings, but they are fun to review.
In each of the screens below, you can use LIGHT to increase the value and ALARM to decrease it. Where it makes sense, a long press means a larger change.
FC: The static frequency correction value.
T0: The crystal’s center temperature, in °C. Nominally this is 25 °C for all crystals, but small variations are possible. A true center temperature improves the precision of dynamic frequency adjustments. However, in order to determine this value, a number of fine measurements are needed at controlled temperatures, which is beyond the reach of most Sensor Watch users.
2C: The quadratic coefficient in the formula that Nanosec uses to approximate the quartz crystal’s temperature characteristics.
3C: The cubic coefficient in the formula that Nanosec uses to approximate the quartz crystal’s temperature characteristics.
PR: The correction profile (formula) used to model the crystal’s temperature characteristics. You will most likely want to stick with P3, but see description of profiles below.
CD: The cadence of time correction, i.e., the length of the interval (in minutes) at which Nanosec makes a minuscule adjustment to the time.
AA: Aging compensation (ppm/year). The static frequency of crystals changes with age, but the exact value can only be determined empirically. If you notice that you keep adding 0.5 ppm each year to the static frequency correction to stay accurate, you can instead enter that value here.
Nanosec correction profiles
This is what the various correction profiles do.
P0: Static hardware correction with 1ppm resolution. This has the least additional power draw because the correction is done entirely in the hardware.
P1: High-resolution (0.01ppm) static correction implemented in software. This is the profile you’d want to choose if your watch has no temperature sensor.
P2: High-resolution static correction, plus dynamic frequency correction for temperature changes. The dynamic correction uses the quadratic formula from the crystal’s datasheet.
P3: Like P2, both static and dynamic correction, but using an empirically measured cubic formula.
P4: Custom settings for a specific crystal, using values that you can edit in the source code. You need to determine these values yourself; your crystal is unlikely to match what you find in the source code.
6.2 - Clocks
The core function of a watch is telling time. All of the watch faces in this category tell time in one form or another.
The Beat Time face displays the current Swatch Internet Time, or .beat time. This is a decimal time system that divides the day into 1000 beats.
The three large digits in the bottom row indicate the current beat, and the two smaller digits (normally the seconds in Simple Clock) indicate the fractional beat; so for example you can read “67214” as “beat 672.14”.
A “fork” of the simple clock face, which provides the functionality of showing
the current time by flashing the LED using binary representation.
This feature serves as a practical solution to compensate for the admittedly
subpar backlight of the F91w watch and is especially useful if your eyesight
is not the best. By pressing and holding the light button long enough, the
watch will illuminate the LED to showcase the current time.
How to interpret the flashing led:
Firstly, the hour is presented as a binary number, with the lowest bit displayed
first. A short flash signifies 0, while a longer flash represents 1. If you use
the watch in 24h mode, please note that the indicated value may be decreased
by 12, to keep things simple and short. For example, 22h would be translated
to 10h.
After showing the hour, a lengthier pause indicates that minutes will be shown
next.
Similar to the hour representation, minutes are displayed in binary format,
starting with the lowest bits. A short flash denotes 0, a longer flash
represents 1.
This face presents the current time as hours and hundredths of an hour.
Every hundreth of an hour, or “centihour”, occurs every 36 seconds. Because they range from 0 to 99, centihours, in the seventies range, will be displayed with a lowercase 7.
This method of timekeeping is used by the United States Postal Service.
This watch face is dedicated to Martian timekeeping. It has several modes, and can display either a time or a date. Pressing the Alarm button cycles through different time zones on Mars:
MC - Mars Coordinated Time, the time at Airy-0 Crater on the Martian prime meridian
ZH - Local mean solar time for the Zhurong rover
PE - LMST for the Perseverance rover
IN - LMST for the Insight lander
CU - LMST for the Curiosity rover
Press the Light button to toggle between displaying time and date:
MC S - the Mars Sol Date, Martian days since December 29, 1873
ZH Sol - Mission sol for the Zhurong rover
PE Sol - Mission sol for the Perseverance rover
IN S - Mission sol for the InSight lander
CU S - Mission sol for the Curiosity rover
Note that where the mission sol is below 1000, this watch face displays the word “Sol” on the bottom line. When the mission sol is over 1000, the word “Sol” will not fit and so it displays a stylized letter S at the top right.
A hopefully useful complication for friendly neighbors in the dark
Originating from 1676 from reverend and mechanician Edward Barlow, and
perfected in 1820 by neighbor Abraham Breguet, a minute repeater or
“repetition minute” is a complication in a mechanical watch or clock that
chimes the hours and often minutes at the press of a button. There are many
types of repeater, from the simple repeater which merely strikes the number
of hours, to the minute repeater which chimes the time down to the minute,
using separate tones for hours, quarter hours, and minutes. They originated
before widespread artificial illumination, to allow the time to be determined
in the dark, and were also used by the visually impaired.
How to use it :
Long press the light button to get an auditive reading of the time like so :
0..23 (1..12 if 24-hours format isn’t enabled) low beep(s) for the hours
0..3 low-high couple pitched beeps for the quarters
0..14 high pitched beep(s) for the remaining minutes
Prerequisite : a watch with a working buzzer
~ Only in the darkness can you see the stars. - Martin Luther King ~
The Simple Clock watch face echoes the classic time and date display of the stock F-91W. It displays the day of the week and day of the month on the top line, along with the current time on the bottom line. Pressing the Light button illuminates the LED so that you can read the display in the dark. Holding the Light button keeps the LED on while the button is held.
If you soldered the buzzer connector to your Sensor Watch board, you may also toggle the Hourly Chime feature by pressing and holding the Alarm button. When you release the Alarm button, the Signal indicator will turn on, indicating that the hourly chime is enabled.
The Simple Clock face also incorporates a low battery warning: this watch face will display the LAP indicator when it detects that the battery voltage is low. This does not mean that power failure is imminent, but it does mean that your battery has only about 5% of its original capacity remaining and you should start thinking about a replacement. The battery is a CR2016 coin cell.
The World Clock watch face looks similar to the Simple Clock watch face, but you’ll notice that at first launch the day of week indicators are blank. That’s because this watch face does not display the day of the week. Instead, you may customize these letters to display the name of a time zone of your choosing.
To customize this watch face, press and hold the Alarm button. The first letter in the top row will begin flashing. Press the Alarm button repeatedly to advance through the available letters in the first slot, then press the Light button to move to the second letter. Finally, press Light again to move to the time zone setting, and press Alarm to cycle through the available time zones. Press Light one last time to return to the world clock display.
Note that the second slot cannot display all letters or numbers. Also note that at this time, time zones do not automatically update for daylight saving time; you will need to manually adjust this field each spring and fall.
This is an alternative world clock face that allows the user to cycle
through a list of selected time zones. It extends the original
implementation by Joey Castillo. The face has two modes: display mode
and settings mode.
Settings mode
When the clock face is activated for the first time, it enters settings
mode. Here, the user can select the time zones they want to display. The
face shows a summary of the current time zone:
The top of the face displays the first two letters of the time zone
abbreviation, such as “PS” for Pacific Standard Time or CE for
“Central European Time”.
The upper-right corner shows the index number of the time zone. This
helps avoid confusion when multiple time zones have the same two-letter
abbreviation.
The main display shows the offset from UTC, with a “+” indicating a
positive offset and a “-” indicating a negative offset. For example,
the offset for Japanese Standard Time is displayed as “+9:00”.
The user can navigate through the time zones and select them using the
following buttons:
The ALARM button moves forward to the next time zone, while the LIGHT
button moves backward to the previous zone. This way, the user can
cycle through all 41 supported time zones.
A long press on the LIGHT button selects the current time zone, and
the signal indicator appears at the top left. Another long press of
the LIGHT button deselects the time zone.
A long press on the ALARM button exits settings mode and returns to
display mode.
Display mode
In the display mode, the face shows the time of the currently selected
time zone. The face includes the following components:
The top of the face displays the first two letters of the time zone
abbreviation, such as “PS” for Pacific Standard Time or “CE” for
Central European Time.
The upper-right corner shows the current day of the month, which helps
indicate time zones that cross the international date line with respect
to the local time.
The main display shows the time in the selected time zone in either
12-hour or 24-hour form. There is no timeout, allowing users to keep
the chosen time zone displayed for as long as they wish.
The user can navigate through the selected time zones using the following
buttons:
The ALARM button moves to the next selected time zone, while the LIGHT
button moves to the previous zone. If no time zone is selected, the
face simply shows UTC.
A long press on the ALARM button enters settings mode and enables the
user to re-configure the selected time zones.
A long press on the LIGHT button activates the LED illumination of the
watch.
8 frames per number * 6 numbers + the trailing 16 frames = 64 frames
at 32 frames per second, this is a 2-second cycle time or 0.5 Hz.
It is giving me a stack overflow after about 2.5 cycles of the time display
in the emulator, but it works fine on the watch.
I’d like to make something for the low energy mode, but I haven’t thought
about how that might work, right now it just freezes in low energy mode
until you press the 12-24HR button.
There are no controls; it simply animates as long as the page is active.
6.3 - Complications
In horology, a complication is an additional set of gears in a mechanical watch movenent that enables a secondary function, such as a sunrise/sunset dial. The watch faces in this category do just that.
The Activity face lets you record activities like you would do with a fitness watch.
It supports different activities like running, biking, rowing etc., and for each recorded activity
it stores when it started and how long it was.
You can save up to 99 activities this way. Every once in a while you can chirp them out
using the watch’s piezo buzzer as a modem, then clear the log in the watch.
To record and decode a chirpy transmission on your computer, you can
use the web app here.
Using the face
When you activate the face, it starts with the first screen to select the activity you want to log.
ALARM cycles through the list of activities.
LONG ALARM starts logging.
While logging is in progress, the face alternates between the elapsed time and the current time.
You can press ALARM to pause (e.g., while you hop in to the baker’s for a croissant during your jog).
Pressing ALARM again resumes the activity.
LONG ALARM stops logging and saves the activity.
When you’re not loggin, you can press LIGHT to access the secondary faces.
LIGHT #1 => Shows the size of the log (how many activities have been recorded).
LIGHT #2 => The screen to chirp out the data. Press LONG ALARM to start chirping.
LIGHT #3 => The screen to clear the log in the watch. Press LONG ALARM twice to clear data.
Quirky details
The face will discard short activities (less than a minute) when you press LONG ALARM to finish logging.
These were probably logged by mistake, and it’s better to save slots and chirping battery power for
stuff that really matters.
The face will continue to record an activity past the normal one-hour mark, when the watch
enters low energy mode. However, it will always stop at 8 hours. If an activity takes that long,
you probably just forgot to stop logging.
The log is stored in regular memory. It will be lost when you remove the battery, so make
sure you chirp it out before taking the watch apart.
See the top of activity_face.c for some customization options. What you most likely want to do
is reduce the list of activities shown on the first screen to the ones you are regularly doing.
The Alarm face implements 16 customizable alarms on the sensor watch.
Usage:
In normal mode, the alarm button cycles through all 16 alarms.
Pressing the alarm button long in normal mode toggles the corresponding alarm on or off. (Whereas pressing the alarm button extra long jumps back to the first alarm.)
Pressing the light button enters settings mode and cycles through the settings of each alarm. (Long pressing the light button enters settings mode without illuminating the led.)
In settings mode an alarm slot is selected by pressing the alarm button when the slot number
in the upper right corner is blinking.
For each alarm slot, you can select the day. These are the day modes:
ED = the alarm rings every day
1t = the alarm fires only one time and is erased afterwards
MF = the alarm fires Mondays to Fridays
WN = the alarm fires on weekends (Sa/Su)
MO to SU = the alarm fires only on the given day of week
You can fast cycle through hours or minutes by holding the alarm button.
You can select the tone in which the alarm is played. (Three pitch levels available.)
You can select how many “beep rounds” are played for each alarm. 1 to 9 rounds, plus extra
long (‘L’) and extra short (‘o’) alarms.
The simple watch face indicates if any alarm is set within the next 24h by showing the signal
indicator.
The Astronomy watch face is among the most complex watch faces in the Movement collection. It allows you to calculate the locations of celestial bodies in the sky, as well as distance in astronomical units (or, in the case of the Moon, distance in kilometers).
When you arrive at the Astronomy watch face, you’ll see its name (“Astro”) and an animation of two objects orbiting each other. You will also see “SO” (for Sol) flashing in the top left. The flashing letters indicate the currently selected celestial body. Short press Alarm to advance through the available celestial bodies:
SO - Sol, the sun
ME - Mercury
VE - Venus
LU - Luna, the Earth’s moon
MA - Mars
JU - Jupiter
SA - Saturn
UR - Uranus
NE - Neptune
Once you’ve selected the celestial body whose parameters you wish to calculate, long press the Alarm button and release it. The letter “C” will flash while the calculation is performed.
When the calculation is complete, the screen will display the altitude (“aL”) of the celestial body. You can cycle through the available parameters with repeated short presses on the Alarm button:
aL - Altitude (in degrees), the elevation over the horizon. If negative, it is below the horizon.
aZ - Azimuth (in degrees), the cardinal direction relative to true north.
rA - Right Ascension (in hours/minutes/seconds)
dE - Declination (in degrees/minutes/seconds)
di - Distance (the digits in the top right will display either aU for astronomical units, or K for kilometers)
Long press on the Alarm button to select another celestial body.
The blinky light watch face was designed as a tutorial for making a watch face in Movement, but it actually might be useful to have a blinking light in a pinch.
The screen displays the name of the watch face (”BL”), as well as an S at the top right for slow blink or an F for fast blink. The bottom line selects the color: green, red or yellow. You can change the speed of the blinking light by pressing the Alarm button, and change the color with the Light button. A long press on the Alarm button starts the blinking light, and another long press stops it.
Note that this will chew through your battery! The green LED uses about 450µA at full brightness, which is 45 times the normal power consumption of the watch. The red LED is an order of magnitude less efficient (4500 µA), and the yellow setting lights both LEDs, which chews through nearly 5 milliamperes. This means that one hour of yellow blinking is likely to eat up between 2 and 3 percent of the battery’s usable life! Still, if you need to signal your location to someone in a dark forest, this watch face could come in handy.
Breathing is a complication for guiding boxed breathing sessions.
Boxed breathing is a technique to help you stay calm and improve
concentration in stressful situations.
Usage: Timed messages will cycle as long as this face is active.
Press ALARM to toggle sound.
Displays some pre-defined data that you might want to remember
Math constants, birthdays, phone numbers…
Usage: Edit the global variable pi_data in “databank_face.c”
to the define the data that will be displayed. Each “item” contains
a two-letter label (using the day-of-week display), then a longer
string that will be displayed one “word” (six characters) at a time.
This watch face displays the number of days since a given date. It was originally designed to display the number of days you’ve been alive, but technically it can count up from any date in the 20th century or the 21st century, so far.
Long press on the Alarm button to enter customization mode. The text “YR” will appear, and will allow you to set the year starting from 1959. Press Alarm repeatedly to advance the year. If your birthday is before 1959, advance beyond the current year and it will wrap around to 1900. Once you have set the year, press Light to set the month (“MO”) and day (“DA”), advancing the value by pressing Alarm repeatedly.
Note that at this time, the Day One face does not display the sleep indicator in sleep mode, which may make the watch appear to be unresponsive in sleep mode. You can still press the Alarm button to wake the watch. This UI quirk will be addressed in a future update.
Keep track of scores in discgolf or golf!
The watch face operates in three different modes:
dg_setting: Select a course
Enter this mode by holding down the light button. The screen will display
the label for the hole and the lowest score since last boot.
Press alarm to loop through the holes. Press the light button to make a
selection. This will reset all scores and start a new game in dg_idle mode.
dg_idle: We’re playing a hole
This either shows your current score relative to par, or the score for a
particular hole.
At the start of a game, press alarm to loop through the holes and leave it
your starting hole. For optimal experience, play the course linearly after that
If you’re viewing the hole you’re supposed to be playing, the watch face will
display your score relative to par.
Use the alarm button to view other holes than the one you’re playing, in which
case the input score for that hole will be displayed, in case it needs changing.
Long press the alarm button to snap back to currently playing hole.
To input scores for a hole in this mode, press the light button.
dg_scoring: Input score for a hole
In this mode, if the score is 0 (hasn’t been entered during this round),
it will blink, indicating we’re in scoring mode. Press the alarm button
to increment the score up until 15, in which case it loops back to 0.
Press the light button to save the score for that hole, advance one hole
if you’re not editing an already input score, and returning to idle mode.
When all scores have been entered, the LAP indicator turns on. At that point, if we enter
dg_setting to select a course, the score for that round is evaluated against the current
lowest score for that course, and saved if it is better.
Inspired by special ops and tactical trope targeted watches like the Nixon Regulus
that feature two chronographs for timing two simultaneous events, here is a watch
face that expands upon Andreas Nebinger’s Stock Stopwatch Face code to implement this
functionality.
ALARM starts/stops timer A, resets on the next start
LIGHT starts/stops timer B, resets on the next start
When a timer is running, tapping MODE toggles between displaying timers A or B, as
indicated at the top of the display.
The currently selected timer shows minutes, seconds, and 100ths of seconds until the
timed event passes the hour mark. Then it shows hours, minutes, and seconds. Once
it runs for more than a day it shows days, hours, and minutes. The blinking colon
indicates that the timer is running.
The longest time span the timers are able to track as 99 days and 23:59:59:99 hours and
they will simply stop.
If the other timer that is not currently selected is also running then a plus sign is
blinking next to the A or B indicator. Its progress is indicated by showing the timer’s
currently highest time unit ( 100ths of seconds if less than a second, seconds if less
than a minute, minutes if less than an hour, hours if less than a day, days if more than
a day).
Please Note: If at least one timer is running then the default function of the MODE
button to move to the next watch face is disabled to be able to use it to toggle between
the timers. In this case LONG PRESSING MODE will move to the next face instead of moving
back to the default watch face.
IMPORTANT: This watch face uses the same TC2 callback counter as the Stock Stopwatch
watch-face. It works through calling a global handler function. The two watch-faces
therefore can’t coexist within the same firmware. If you want to compile this watch-face
then you need to remove the line <../watch_faces/complication/stock_stopwatch_face.c >
from the Makefile.
A simple and straightforward watch face for the ancient Eastern geomantic divination system
of I Ching and the western system of “Geomancy”. It is an optional addition to the Toss Up
Face.
The LIGHT button toggles between the two systems of geomancy.
The ALARM button casts an I Ching hexagram or Geomantic figure based on drawing virtual
stalks from the True Random Number Generator in the Sensor Watch.
The figures are flipped 90 degrees clockwise, so the left side is the bottom and the
right side the top.
LONG PRESSING ALARM toggles the display of the King Wen sequence index for the cast I Ching
Hexagram (https://en.wikipedia.org/wiki/King_Wen_sequence )or the abbreviated name for the
cast Geomantic Figure:
Allows the user to record a single succesful instance of a particular habit
occuring per day, and displays history for eight days prior as well as a
total counter.
The Interval face provides 9 customizable interval timers, which can be used for hit training and/or time management techniques.
To cycle through the 9 interval timers, press the alarm button (short press). For each timer slot, the relevant details for each timer phase are shown in a “carousel” (see below).
To start an interval timer, press and hold the alarm button.
To pause a running timer, press the alarm button (short press).
To completely abort a running timer, press and hold the alarm button.
Press and hold the light button to enter settings mode for the current interval timer. Short pressing the light button cycles through the settings of each timer.
Each interval timer has 1 to 4 phases of customizable length like so: (1) prepare/warm up --> (2) work --> (3) break --> (4) cool down
When setting up or running a timer, each of these phases is indicated by the letters “PR” (prepare), “WO” (work), “BR” (break), or “CD” (cool down).
Each of these phases is optional, and you can set the corresponding minutes and seconds to zero. If you want to use the timer, at least one phase needs to be set to a non-zero value.
You can define the number of rounds either only for the work phase and/or for the combination of work + break phase. Let’s say you want an interval timer that counts 3 rounds of 30 seconds work, followed by 20 seconds rest, like so: work 30s –> work 30s –> work 30s –> break 20s You can do this by setting 30s for the “WO"rk phase and setting a 3 in the lower right-hand corner of the work page. The “LAP” indicator lights up at this position, to explain that we are setting laps here. After that, set the “BR"eak phase to 20s and leave the rest as it is.
If you want to set up a certain number of “full rounds”, consisting of work phase(s) plus breaks, you can do so at the “BR"eak page. The number in the lower right-hand corner determines the number of full rounds to be counted. A “-” means that there is no limit, and the timer keeps alternating between work and break phases.
This watch face comes with several pre-defined interval timers suitable for HIIT training (timer slots 1 to 4) as well as doing work according to the Pomodoro technique (timer slots 5 to 6). Feel free to adjust the timer slots to your own needs (or completely wipe them).
The Invaders watch face is an authentic remake of the “famous” number invaders game, found on the Casio calculator wristwatches CA-85 or CA-851.
How to play:
Press the alarm button to start the game. “Invaders” (just digits, tbh) will start coming in from the right-hand side.
Press the light button to “aim”. The digit on the top of the display cycles from 0 to 9.
If your aiming digit is identical to one of the invaders, press the alarm button to “shoot”. The corresponding invader will disappear.
If the invaders reach beneath the very first position, you loose one defense line. When all three defense lines are gone, the game is over.
Also: If you shoot more than 29 times per wave, you lose the game.
There are 16 invaders per wave. There is a short break between waves.
Long pressing the light button toggles sound on or off (not while playing).
The “n” invaders are ufos!
Whenever the sum of all invaders shot is divisible by 10 the next invader will be an ufo, represented by the n-symbol. Shooting a ufo gets you extra points. Example: shoot 2, 5, 3 –> ufo next
As for points: the earlier you shoot an invader, the more points you get.
The Moon Phase face is similar to the Sunrise/Sunset face: it displays the current phase of the moon, along with the day of the month and a graphical representation of the moon on the top row.
This graphical representation is a bit abstract. The segments that turn on represent the shape of the moon, waxing from the bottom right and waning at the top left. A small crescent at the bottom right will grow into a larger crescent, then add lines in the center for a quarter and half moon. All segments are on during a full moon. Then gradually the segments at the bottom right will turn off, until all that remains is a small waning crescent at the top left.
All segments turn off during a new moon.
On this screen you may press the Alarm button repeatedly to move forward in time: the day of the month at the top right will advance by one day for each button press, and both the text and the graphical representation will display the moon phase for that day. Try pressing the Alarm button 27 times now, just to visualize what the moon will look like over the next month.
The calculator is operated by first composing a token in Morse code,
then submitting it to the calculator. A token specifies either a calculator
operation or a float value.
These two parts of the codebase are totally independent:
The Morse-code reader (mc.h, mc.c)
The RPN calculator (calc.h, calc.c, calc_fn.h, calc_fn.c, small_strtod.c)
The user interface (morsecalc_face.h, morsecalc_face.c) lets you talk
to the RPN calculator through Morse code.
Controls
light is dash
alarm is dot
mode is “finish character”
long-press mode or submit a blank token to switch faces
long-press alarm to show stack
long-press light to toggle the light
Morse code token entry
As you enter .s and -s, the morse code char you’ve entered will
appear in the top center digit. At the top right is the # of morse code
./- you’ve input so far. The character resets at the 6th ./-.
Once you have the character you want to enter, push mode to enter it.
The character will be appended to the current token, whose 6 trailing
chars are shown on the main display. Once you’ve typed in the token you
want, enter a blank Morse code character and then push mode.
This submits it to the calculator.
Special characters:
Backspace is ( (-.--.).
Clear token input without submitting to calculator is Start transmission (-.-.-).
Writing commands
First the calculator will try to interpret the token as a command/stack operation.
Commands are defined in calc_dict[] in movement/lib/morsecalc/calc_fns.h.
If the command doesn’t appear in the dictionary, the calculator tries to interpret the token as a number.
Writing numbers
Numbers are written like floating point strings.
Entering a number pushes it to the top of the stack if there’s room.
This can get long, so for convenience numerals can also be written in binary with .- = 01.
0   1    2    3    4    5    6    7    8    9
.   -    -.   --   -..  -.-  --.  ---  -... -..-
e   t    n    m    d    k    g    o    b    x
Exponent signs must be entered as “p”.
Decimal place “.” can be entered as “h” (code ….)
Sign “-” can be entered as “Ch digraph” (code —-)
For example: “4.2e-3” can be entered directly, or as “4h2pC3”
similarly, “0.0042” can also be entered as “eheedn”
Once you submit a number to the watch face, it pushes it to the top of the stack if there’s room.
Number display
After a command runs, the top of the stack is displayed in this format:
Main 4 digits = leading 4 digits
Last 2 digits = exponent
Top middle = [Stack location, Sign of number]
Top right = [Stack exponent, Sign of exponent]
Blank sign digit means positive.
So for example, the watch face might look like this:
[   0 -5]
[4200 03]
… representing +4.200e-3 is in stack location 0 (the top) and it’s one of five items in the stack.
Looking at the stack
To show the top of the stack, push and hold light/alarm or submit a blank token by pushing mode a bunch of times.
To show the N-th stack item (0 through 9):
Put in the Morse code for N without pushing the mode button.
Push and hold alarm.
To show the memory register, use m instead of a number.
To see all the calculator operations and their token aliases, see the calc_dict[] struct in calc_fns.h
The Orrery watch face is similar to the Astronomy watch face in that it calculates properties of the planets, but instead of calculating their positions in the sky, this watch face calculates their absolute locations in the solar system. This is only useful if you want to plot the planets on graph paper, but hey, you never know!
The controls are identical to the Astronomy watch face: while the title screen (“Orrery”) is displayed, you can advance through the available planets with repeated short presses on the Alarm button. The available planets:
ME - Mercury
VE - Venus
EA - Earth
LU - Luna, the Earth’s moon
MA - Mars
JU - Jupiter
SA - Saturn
UR - Uranus
NE - Neptune
Note that the sun is not available in this menu, as the sun is always at (0,0,0) in this calculation.
Long press on the Alarm button to calculate the planet’s location, and after a flashing “C” (for Calculating), you will be presented with the planet’s X coordinate in astronomical units. Short press Alarm to cycle through the X, Y and Z coordinates, and then long press Alarm to return to planet selection.
The large numbers represent the whole number part, and the two smaller numbers (in the seconds place) represent the decimal portion. So if you see “SA X 736” and “SA Y -662”, you can read that as an X coordinate of 7.36 AU and a Y coordinate of -6.62 AU. You can literally draw a dot at (0, 0) to represent the sun, and a dot at (7.36, -6.62) to represent Saturn. (the Z coordinates tend to be pretty close to zero, as the planets largely orbit on a single plane, the ecliptic)
Both the 24 hour day and the order of our weekdays have quite esoteric roots.
The ancient Egyptians divided the day up into 12 hours of sunlight and 12 hours
of night time. Obviously the length of these hours varied throughout the year.
The Greeks assigned each hour a ruler of the planetary gods in the ancient
“Chaldean” order from slowest (Chronos for Saturn) to fastest (Selene for Moon).
Because 24 hours cannot be equally divided by seven, the planetary rulers carried
over to the first hour of the next day, effectively ruling over the entire day
and lending the whole day their name. The seven day week was born.
PLANETARY HOUR CHART COMPLICATION
This complication watch face displays the start time of the current planetary hour
according to the given location and day of the year. The number of the current
planetary hour (1 - 24) is indicated at the top right.
Short pressing the ALARM button flips through the start times of the following
planetary hours, long pressing it flips backwards in time. A long press of the
LIGHT button immediately switches back to the start time of the current hour.
The Bell indicator always marks the current planetary hour in the list.
The LAP indicator shows up when the hours of the next phase are part of the
upcoming day instead of the current one. This happens when the watch face is
launched after sunset.
The planetary ruler of the current hour and day is displayed at the top in
Latin or Greek shorthand notation:
Saturn (SA) / Chronos (CH) / ♄
Jupiter (JU) / Zeus (ZE) / ♃
Mars (MA) / Ares (AR) / ♂
Sol (SO) / Helios (HE) / ☉
Venus (VE) / Aphrodite (AF) / ♀
Mercury (ME) / Hermes (HR) / ☿
Luna (LU) / Selene (SE) / ☾
A short press of the LIGHT button toggles between Latin and Greek ruler shorthand
notation.
(IMPORTANT: Make sure the watch’s time, timezone and location are set correctly for this
watch face to work properly!)
Both the 24 hour day and the order of our weekdays have quite esoteric roots.
The ancient Egyptians divided the day up into 12 hours of sunlight and 12 hours
of night time. Obviously the length of these hours varied throughout the year.
The Greeks assigned each hour a ruler of the planetary gods in the ancient
“Chaldean” order from slowest (Chronos for Saturn) to fastest (Selene for Moon).
Because 24 hours cannot be equally divided by seven, the planetary rulers carried
over to the first hour of the next day, effectively ruling over the entire day
and lending the whole day their name. The seven day week was born.
PLANETARY TIME COMPLICATION
The hour digits of this complication watch-face display the current planetary hour
according to the given location and day of the year (First hour from 12am to 1am,
the second hour from 1am to 2am, and so forth).
Like with normal clocks the minutes and seconds help dividing the hour into smaller
units. On this watch-face, all units naturally vary in length because the planetary
hours are not fixed by duration but by the moments of sunrise and sunset which
obviously vary throughout the year, especially in higher latitudes.
On this watch-face the hours indicated as 12am to 12pm (00:00 - 12:00) are used for
the planetary daytime hours between sunrise and sunset and hours indicated as 12pm
to 12am (12:00 - 00:00) are used for the planetary night hours after sunset and before
sunrise.
The planetary ruler of the current hour and day is displayed at the top in Latin or
Greek shorthand notation:
Saturn (SA) / Chronos (CH) / ♄
Jupiter (JU) / Zeus (ZE) / ♃
Mars (MA) / Ares (AR) / ♂
Sol (SO) / Helios (HE) / ☉
Venus (VE) / Aphrodite (AF) / ♀
Mercury (ME) / Hermes (HR) / ☿
Luna (LU) / Selene (SE) / ☾
The ALARM button toggles between displaying the ruler of the hour and the ruler of the day
The LIGHT button toggles between Latin and Greek ruler shorthand notation
(IMPORTANT: Make sure the watch’s time, timezone and location are set correctly for this
watch face to work properly!)
The Pulsometer is an implementation of a sort of a classic mechanical watch complication. A classic pulsometer complication involves a chronograph with a scale calibrated for counting a certain number of heartbeats (often 30). You start it and begin counting heartbeats, and stop it after counting the specified number of beats. Once stopped, the needle will point to your heart rate.
The pulsometer on Sensor Watch flashes its instructions at launch: “Hold Alarm + count 30 beats.” Using the hand on the side where you wear your watch, touch your carotid artery (in your neck) and feel for your pulse. Once you find it, use your other hand to press and hold the Alarm button, and count your heartbeats. When you reach 30 beats, release the Alarm button. The display will show a number such as “60 bpm”; this is your heart rate in beats per minute.
Two notes:
For the first few seconds of a measurement, the display will read “Hi”. This indicates that it’s too early for the measured value to be a valid heart rate. Once the measurement is below 240 bpm, the display will update.
If you hold the button down for more than 45 seconds, the display will read “Lo”. If it took this long for you to count 30 heartbeats, this indicates that your heart rate is below 40 beats per minute.
Randonauting is a way to turn the world around you into an adventure and get the user outside
of their day-to-day routine by using a random number generator to derive a coordinate to journey
to. In Randonauts lore so-called “Blind Spots” are places you cannot reach methodologically. They
may exist in your own backyard for your whole life and you will never even notice them, because
you simply have no reason to go to that exact place or look in its direction. Since the very
limitations of our behavioral algorithms are the reason for the existence of blindspots, they
can only be found using a randomizer.
This watch face generates a random location based on the watch’s location and a set radius using
the official Randonautica Blind Spot algorithm.
The ALARM button starts the random location generation and then automatically displays the found
Blind Spot.
By pressing ALARM again the user can flip through different pieces of information about the Blind
Spot: Distance (DI), Bearing Degree (BE), Latitude degrees and decimal digits (LA), Longitude
degrees and decimal digits (LO).
Pressing LIGHT switches between generating a new blind spot (“Rando”) and displaying the info of
the last generated one (“Point”).
LONG PRESSING LIGHT toggles setup mode. Here pressing LIGHT switches between setting the desired
radius (RA) and setting the random number generator (RNG) for generating the blind spot.
ALARM changes the values respectively:
The radius can be set in 500 meter steps between 1000 and 10,000 meters
The RNG can be set to “true” which utilizes the SAML22J’s internal True Random Number Generator
Setting it to “psudo” will use the pseudorandom number generation algorithm arc4random
Setting it to “chance” will randomly chose either of the RNGs for each generation (default)
LONG PRESSING ALARM toggles DATA mode in which the currently generated Blind Spot coordinate can
be written to the <place.loc> file on the watch (press ALARM) and set as active high precision
location used by other watch faces. It does not overwrite the low precision location information
in the watch register commonly used for astronomical watch faces.
The rate meter shows the rate per minute at which the ALARM button is
being pressed. This is particularly useful in sports where cadence
tracking is useful. For instance, rowing coaches often use a dedicated
rate meter - clicking the rate button each time the crew puts their oars
in the water to see the rate (strokes per minute) on the rate meter.
The calculator uses RPN notation. So instead of using infix operators, the operators always follow the parameters.
Example: To calculate 4 - 3 one would enter 4 3 -
Using this notation also does not require any braces, so instead of 2 * (3 - 2) one would enter 2 3 2 - *.
The parameters are put on to a stack, which currently has a size of 4. So if one enters 2 3 2 - * the stack would contain 2 3 2 0. The subtraction then uses the first two values from the stack and pushes the result back on the stack, which leaves 1 2 0 0. The multiplication then uses the next two values from the stack and pushes the end result: 2 0 0 0.
Normal mode
In normal mode the top of the stack is displayed (initially zero), which usually represents the result of the calculation.
ALARM enters number mode
LIGHT enters operator mode
MODE switches to the next watch face
Number mode
Number mode pushes a new parameter on the stack. The first four digits are whole numbers, the last two (smaller) digits are decimals.
LIGHT cycles through digits
ALARM increases the selected digit
MODE pushes the parameter on the stack (and goes back to normal mode)
Operation mode
Operation mode executes operations on the stack. Parameters are taken from the stack and the result is pushed back. If there aren’t enough parameters on the stack, the calculator will go into error mode.
The display shows the current selected operation.
LIGHT cycles through the available operations
ALARM executes the selected operation (and goes back to normal mode, which will display the result)
Currently implemented operations:
add (2 params)
sub (2 params)
mul (2 params)
div (2 params)
pow (2 params)
sqrt (1 param)
pi (0 params, will just push pi onto the stack)
Error mode
An error has happened (currently only caused by too few parameters on the stack).
Operations appear in the ‘day’ section; ALARM changes between operations when
operation is flashing. LIGHT executes current operation.
This is the alternate face because it has a non-traditional number entry system which
I call ‘guess a number’. In number entry mode, the watch tries to guess which number you
want, and you respond with ‘smaller’ (left - MODE) or larger (right - ALARM). This means
that when you are entering a number, MODE will no longer move between faces!
Example of entering the number 27
select the NO operation (probably unnecessary, as this is the default),
and execute it by hitting LIGHT.
you are now in number entry mode; you know this because nothing is flashing.
Watch displays 10; you hit ALARM to say you want a larger number.
Watch displays 100; you hit MODE to say you want a smaller number.
Hit LIGHT to add the number to the stack (and now ‘NO’ is flashing
again, indicating you’re back in operation selection mode).
One other thing to watch out for is how quickly it will switch into scientific notation
due to the limitations of the display when you have large numbers or non-integer values.
In this mode, the ‘colon’ serves at the decimal point, and the numbers in the top right
are the exponent.
As with the main movement firmware, this has the concept of ‘secondary’ functions which
you can jump to by a long hold of ALARM on NO. These are functions to do with stack
manipulation (pop, swap, dupe, clear, size (le)). If you’re not on NO, a long
hold will take you back to it.
See ‘functions’ in “rpn_calculator_alt_face.c” for names of all operations.
ALARM button switches to next programmed start signal.
Long press on LIGHT button resets timer and enters waiting mode.
Countdown to zero, then switch to counting mode.
Counting mode:
After the start signal (0s), the duration of the race is counted (like a stopwatch timer).
ALARM button increases the lap counter, ALARM long press resets lap counter.
Long press on LIGHT button resets timer and enters waiting mode.
Setting mode:
ALARM button increases active (blinking) signal. Goes to 0 if upper boundary
(11 or whatever the signal left to the active one is set to) is met.
10 is printed vertically (letter o plus top segment).
ALARM button long press resets to default minutes (5-4-1-0).
LIGHT button cycles through the signals.
Long press on LIGHT button cycles through sound modes:
Bell indicator: Sound at start (0s) only.
Signal indicator: Sound at each programmed signal and at start.
Bell+Signal: Sound at each minute, at 30s and at 10s countdown.
Similar to the default hourly signal of the simple_clock_face this complication will use the buzzer to signal
the time in half-hour intervals according to the scheme mentioned above.
Additionally, the user can specify one of the three watches
of the standard merchant watch system to only receive signals during this watch.
If no watch is specified all signals are emitted.
Usage:
short press Alarm button: Turn on/off bell
long press Alarm button: Cycle through the watches (All/1/2/3)
The Stock Stopwatch face implements the original F-91W stopwatch functionality, including counting hundredths of seconds and lap timing.
Use the alarm button to start and stop the stopwatch.
Press the light button while the stopwatch is running to view the lap time. The stopwatch continues running in the background, indicated by a blinking colon.
Press the light button again to switch back to the running stopwatch.
Press the light button when the timekeeping is stopped to reset the stopwatch.
There are two improvements compared to the original F-91W:
When the stopwatch reaches 59:59, the counter does not simply jump back to zero but keeps track of hours in the upper right-hand corner (up to 24 hours).
Long-press the light button to toggle the LED behavior. It either turns on with each button press or remains off.
The Stopwatch face provides basic stopwatch functionality: you can start and stop the stopwatch with the alarm button. Pressing the light button when the timer is stopped resets it. This face does not count sub-seconds.
This watch face displays local sunrise and sunset times. During the day, it displays today’s sunset; at night, it displays tomorrow’s sunrise.
When you first see this watch face, it will display “No Loc”, or No Location. This is because your latitude and longitude are required to calculate sunrise and sunset. When on this screen, you can set your location in a similar way to the World Clock screen.
Press and hold Alarm to enter location setting mode. The top line will read “LA” (Latitude), and the bottom line “+ 0000”. The large digits are the whole number part of the latitude, and the smaller digits (in the seconds place) are the fractional part. Enter your latitude and longitude (“LO”) by pressing the Alarm button to change the sign or advance the digits, and the Light button to move to the next character; for example, a latitude of 40.73° N would be “+ 4073”, and a longitude of 73.94° W would be “–07394”.
Once you have set your latitude and longitude, the Sunrise/Sunset face will display the next sunrise or sunset on the bottom row, and the day of that sunrise or sunset at the top right.
A short press on the Alarm button will advance to the following sunrise or sunset: for example, on Monday afternoon, it will display Monday evening’s sunset, but a short press on the Alarm button will display Tuesday morning’s sunrise.
If you made a mistake while entering your location, or if you simply wish to change your location, you can re-enter location setting mode with another long press on the Alarm button.
The Tachymeter complication emulates the tachymeter function often
present in watches, that computes the average speed in [units per hour]
for a given distance given in [units].
Use case:
User sets the distance
User starts the tachymeter when the trip begins
User stops the tachymeter when the trip ends
The watch presents the average speed and trip duration in seconds
Usage:
Go to tachymeter face, TC is shown in the Weekday Digits
A steady d in the Day Digits indicates the distance to be used. To edit the distance:
Long-press the Alarm button, the distance edition page (d will blink)
Use the Light button to change the editing (blinking) digit, and press Alarm to increase its value
Once done, long-press the Alarm button to exit the distance edition page
Press the Alarm button to start the tachymeter.
A running animation will appear in the Day Digits
Press the Alarm button to stop the tachymeter
The average speed and total time information will alternate.
The average speed will be shown alongside /h in the Day Digits; and the total time will be shown alongside t in the Day Digits.
Long press the Light button to return to the distance d page, and restart the tachymeter from there.
Long-press the light button in the steady distance page to reset the distance to 1.00
Pending design points
movement_request_tick_frequency(4) is used to obtain a 4Hz ticking, thus
having a time resolution of 250 ms. Not sure if using event.subsecond`
is the proper way to get the fractions of second for the start and
final times.
For distance and average speed, the Second Digits (position 8 and 9)
can be seen as decimals, thus possible to show distances as short as
0.01 km (or miles) and speeds as low as 0.01 km/h (or mph). However,
if the same idea is used for the total time (showing hundredths),
this limits the display to 9999.99 seconds (~2h:45m).
Draw from a deck of tarot cards. Can choose between major arcana only or
entire deck.
In tarot reading, a card orientation can be upright or inverted, and the
interpertation of the card can change depending on this state. This face
lights the alarm indicator to show when a card is inverted. Just ignore it
if you prefer not to deal with card inversions.
This face uses the terms “Wands”, “Cups”, “Swords” and “Coins” for the four
suits, and numbers to represent the 14 ranked cards, with the cards 11-14
representing the Page, the Knight, the Queen, and King respectively.
Default draw is a 3-card major arcana spread.
To make it easier to keep track of where you are in the list of drawn cards,
after drawing, “St” is shown for the 1st card in the spread and “En” is
shown for the last card.
At any point, the mode button can be held to return to your first configured
watch face.
When “Major” or “All” is shown:
Light button: cycle # of cards to draw
Light button (long press): toggle between major arcana and all cards
Alarm button: shuffle deck and draw cards
After cards are drawn/showing:
Light button: view the next drawn card
Alarm button: shuffle and re-draw new cards
Light button (long press): go back to Draw screen, for choosing different draw parameters.
The Time Left Face helps you visualize how far you have progressed in a certain time span. Similar to the Day One Face, you can set your starting date. Additionally, you can also set your target or destination date. You can then use the face to display your progress in various ways.
Usage:
Long-pressing of the light button starts the settings mode:
First, you set the beginning date (indicated by a ‘b’ in the upper right corner).
Begin by setting the year (indicated by the letter ‘YR’). Use the alarm button to cycle through the values. Short-pressing the light button brings you to the next settings page.
Set the values in this order:
beginning date (indicated by a ‘b’): year - month - day
destination date (indicated by a ’d’): year - month - day
After cycling through all settings pages, the face returns to display mode.
In display mode, use the alarm button (short press) to cycle through these four types of display:
number of days left (‘DL’) until the destination date is reached.
remaining days expressed as a percentage of the total time span. The value is shown with two decimals, using the colon as a decimal point.
number of days passed (‘DA’) since the beginning date. (This is the same value the Day One Face would give you.)
number of days passed expressed as a percentage of the total time span.
What is this for?
You can use this watch face to be reminded of any kind of progress between a set start and end date. The brave among us can use it as a kind of memento mori visualization. Set your date of birth and look up the average life expectancy of your age cohort based on publicly available mortality tables. Then, set the statistically expected day of death as the target date, and you will be able to see how much of your time has passed and how much is still to come.
The timer watch face is an advanced countdown face, providing the functionality of starting a countdown by choosing one out of nine programmable timer presets. A timer/countdown can be 23 hours, 59 minutes, and 59 seconds max. A timer can also be set to auto-repeat, which is indicated by the lap indicator.
How to use in NORMAL mode:
Short-pressing the alarm button cycles through all preset timer lengths. Find the current timer slot number in the upper right-hand corner.
Long-pressing the alarm button starts the timer.
Long-pressing the light button initiates settings mode.
How to use in SETTINGS mode:
There are up to nine slots for storing a timer setting. The current slot is indicated by the number in the upper right-hand corner.
Short-pressing the light button cycles through the settings values of each timer slot in the following order: hours -> minutes -> seconds -> timer repeat
Short-pressing the alarm button alters the current settings value.
Long-pressing the light button returns to normal mode.
Add a “tomato” timer watch face that alternates between 25 and 5 minute
timers as in the Pomodoro Technique.
The top right letter shows mode (f for focus or b for break).
The bottom right shows how many focus sessions you’ve completed.
(You can reset the count with a long press of alarm)
When you show up and it says 25 minutes, you can start it (alarm),
switch to 5 minute (light) mode or leave (mode).
When it’s running you can reset (alarm), or leave (mode).
When it’s done, we beep and go back to step 1, changing switching
mode from focus to break (or break to focus)
Playful watch face for games of chance or divination using coins or dice.
LIGHT switches between Coins and Dice mode
COINS
ALARM tosses a coin. If it lands on heads it gets sorted to the left side of the
display, if it lands on tails then sorted to the right side.
LONG PRESSING ALARM adds up to 5 more coins to the toss for more nuance in the decision
making (e.g. three heads vs two tails could be read as “yes, but with serious doubts”).
LONG PRESSING LIGHT flips through additional style for the coins from the default Ө/O
to H/T (heads/tails), Y/N (yes/no), E/Ǝ, C/Ↄ
LONG PRESSING ALARM on the “Coins” title page resets to one coin.
LONG PRESSING LIGHT on the “Coins” title page resets the style to Ө/O
DICE
ALARM rolls a six sided dice.
LONG PRESSING ALARM adds up to 2 more dice to the roll.
LONG PRESSING LIGHT flips through other available polyhedral dice types with less or more
than the default 6 sides. The options are D2, D4, D6, D8, D10, D12, D20, D24, D30, D32, D36,
D48, and a hypothetical D99.
When more than one dice is used for a roll this changes only the last added dice. (see Note
below)
LONG PRESSING ALARM on the “Dice” title page resets to one dice.
LONG PRESSING LIGHT on the “Dice” title page resets the dice to D6.
Please Note: If you need let’s say a D8, D12, and D20 for your rolls then the procedure to
set this up would be as follows: from the default screen where you can roll the one D6 dice
you would LONG PRESS LIGHT a few times to change the D6 to a D8, then LONG PRESS ALARM to add
a second dice, LONG PRESS LIGHT again until the second dice changes to D12, then LONG PRESS
ALARM to add the third dice and LONG PRESS LIGHT again a few times until it becomes a D20.
This watchface generates time based one time passwords (two factor auth codes) allowing you to sign in securely to many popular websites (e.g. Google, GitHub). Time-based one-time password (TOTP) is a computer algorithm that generates a one-time password (OTP) that uses the current time as a source of uniqueness.
Press the Alarm button to cycle between your configured websites / TOTP secrets.
The watchface supports multiple websites / TOTP secrets, which need to be extracted from TOTP QR codes and added to the source code for the watchface as follows:
Obtain a TOTP secret or QR ode from the website you want to generate codes for.
If you have just the QR code, Stefan Sundin’s web site will allow you to extract the secret - it will be an alphanumeric string around 32 characters long, which is the TOTP secret encoded in Base32.
To add the secret to the watchface code, you need to convert it to hexadecimal bytes. This cryptii.com page will allow you to do that conversion. Note you’ll have to enter your TOTP secret in uppercase.
Shell tools can be used to convert secret to bytes:
Finally, you’ll need to take the Hexadecimal bytes and add them to the TOTP watchface source code and recompile movement:
Edit totp_face.c
You may want to remove the demo keys. Assuming you want to add a key to the end of the list:
static const uint8_t num_keys = 2;
Add one to the number on this line.
static uint8_t keys[] = {
   // Add the hex bytes for your key
};
Add the hexadecimal bytes from step 3 to the end of this array, comma separated and each one preceeded by 0x. Don’t forget to add a comma after the previous final byte.
static const uint8_t key_sizes[] = {
Add the size of your secret (the number of hex bytes you just added) to the end of this array.
static const uint32_t timesteps[] = {
Add another 30 entry to the end of this array.
static const char labels[][2] = {
Add a label for your secret… E.g. if it’s for your Google account you might want to add { 'g', 'o' } as a friendly label.
That’s it - enjoy the convenience of TOTP codes on your wrist!
echo otpauth://totp/ACME%20Co:john.doe@email.com?secret=HXDMVJECJJWSRB3HWIZR4IFUGFTMXBOZ&issuer=ACME%20Co&algorithm=SHA1&digits=6&period=30 >> totp_uris.txt
(note the double “»”)
You may want to customise the characters that appear to identify the 2FA
code. These are just the first two characters of the issuer, and it’s fine
to modify the URI.
If you have more than one secret key, press ALARM to cycle through them.
Basic daily alarm clock face. Seems useful if nothing else in the interest
of feature parity with the F-91W’s OEM module, 593.
Also experiments with caret-free UI: One button cycles hours, the other
minutes, so there’s no toggling between display and adjust modes and no
cycling the caret through the UI.
LIGHT advances hour by 1
LIGHT long press advances hour by 6
ALARM advances minute by 10
ALARM long press cycles through signal modes (just one at the moment)
This watch face displays all of the characters in the Sensor Watch character set. You can advance from one character to the next with a short press of the Alarm button.
This watch face may be useful to watch face developers, in that it can help them to understand which characters will work in different positions.
This face demonstrates the chirpy-tx library. It is intended to help you
include chirpy-tx in your own watch faces that need to transmit data out
of the watch.
The face’s first screen lets you select from a few built-in transmissions:
SCALE cycles through frequencies in fixed increments. This is intended to
collect and analyze audio samples from different watches. With this info
it may be possible to improve chirpy-tx’s parameters like the frequencies
it uses to make the method more robust.
SHORT is a small transmission that contains data taked from the activity_face.
LONG is a longer transmission that contains the first two strophes of a
famous sea shanty.
Select the transmission you want with ALARM, the press LONG ALARM to chirp.
To record and decode a chirpy transmission on your computer, you can
use the web app here.
This watch was designed for the Crowd Supply marketing team, so they could photograph the various functions of Sensor Watch. The Alarm button advances through static screens that simulate different watch faces.
This watch face may only be useful to you if you need to photograph Sensor Watch, i.e. for a blog post.
While active, this face generates a square-wave on pin A1 of the 9-pin
connector. The output frequency is adjustable from 64 Hz to 0.5 Hz.
Long-press ALARM to cycle through available frequencies.
This face also displays the value of the watch’s frequency-correction
register. This setting varies from -127 to +127. Press LIGHT to increment
or ALARM to decrement the setting.
This is an experimental watch face for logging data on the “Sensor Watch Motion Express” board. I will add more documentation for this watch face once this sensor board is more widely available.
This watch face is very simple and has no controls to speak of. It displays the battery voltage as measured by the SAM L22’s ADC.
Note that the Simple Clock watch face includes a low battery warning, so you don’t technically need to this watch face unless you want to track the battery level.
6.5 - Sensors
Sensor Watch is designed to display data from sensors. The watch faces in this category read sensor data and present it in a useful way.
Tested with the “Q3Q-SWAB-A1-00 Temperature + Test Points + OPT3001” flexboard.
This flexboard could use a revision:
The thermistor components should be moved west a mm or flipped to the backside
to avoid stressing the flexboard against the processor so much.
The ’no connect’ pad falls off easily.
Controls:
Trigger a measurement by long-pressing Alarm.
Sensor integration is happening when the Signal indicator is on.
ISO setting can be cycled by long-pressing Light.
During integration the current ISO setting will be displayed.
EV measurement in the top right: “LAP” indicates “half stop”.
So “LAP -1” means EV = -1.5. Likewise “LAP 13” means EV = +13.5
Aperture in the bottom right: the last 3 main digits are the f-stop.
Adjust this number in half-stop increments using Alarm = +1/2 and Light = -1/2.
Best shutter speed in the bottom left: the first 3 digits are the shutter speed.
Some special chars are needed here: “-” = seconds, “h” = extra half second, “K” = thousands.
“HI” or “LO” if there’s no shutter in the dictionary within 0.5 stops of correct exposure.
Mode long-press changes the main digits to show raw sensor lux measurements.
This watch face is designed to work with either the Temperature + GPIO sensor board or the Temperature + Light sensor board. It reads the current temperature from the thermistor voltage divider on the sensor board, and displays the current temperature in degrees Celsius.
When the watch is on your wrist, your body heat interferes with an ambient temperature reading, but if you set it on a bedside table, strap it to your bike handlebars or place it outside of your tent while camping, this watch face can act as a digital thermometer for displaying ambient conditions.
The temperature sensor watch face automatically samples the temperature once every five seconds, and it illuminates the Signal indicator just before taking a reading.
Pressing the Alarm button toggles the unit display from Celsius to Fahrenheit. Technically this sets the global “Metric / Imperial” flag, so any other watch face that displays localizable units will display them in the system selected here.
This watch face automatically logs the temperature once an hour, and maintains a 36-hour log of readings. This watch face is admittedly rather complex, and bears some explanation.
The main display shows the letters “TL” in the top left, indicating the name of the watch face. At the top right, it displays the index of the reading; 0 represents the most recent reading taken, 1 represents one hour earlier, etc. The bottom line in this mode displays the logged temperature.
A short press of the “Alarm” button advances to the next oldest reading; you will see the number at the top right advance from 0 to 1 to 2, all the way to 35, the oldest reading available.
A short press of the “Light” button will briefly display the timestamp of the reading. The letters at the top left will display the word “At”, and the main line will display the timestamp of the currently displayed data point. The number in the top right will display the day of the month for the given data point; for example, you can read “At 22 3:00 PM” as ”At 3:00 PM on the 22nd”.
If you need to illuminate the LED to read the data point, long press the Light button and release it.
This watch face is similar to the Temperature watch face, but it updates the temperature several times per second. You likely don’t need this watch face, but it is useful for testing the temperature sensor boards.
6.6 - Settings
The watch faces in this section relate to watch configuration.
FineTune face allows to align watch with sub-second precision in 25/250ms
accuracy. Counts time since previous finetune, and allows to calculate &
apply ppm correction for nanosec.
The goal of nanosec face is dramatic improvement of SensorWatch accuracy.
Minimum goal is <60 seconds of error per year. Full success is if we can
reach <15 seconds per year (<0.47ppm error).
Based on and expanded from the Sunrise/Sunset face. Outsourced the location setting functionality to
its own face. Also serves as a converter between different coordinate notation formats.
With the LIGHT button each place coordinate can be shown and edited in 4 different display modes:
Decimal Latitude and Longitude (WGS84) up to 5 decimal points
Latitude and Longitude (WGS84) in traditional DD°MM’SS" notation
Ten digit Open Location Code (aka. PlusCode) format
Ten digit Geohash format
Using the ALARM button the user can flip through 2 pages of coordinate info to see the first and
second sets of digits.
(please also refer to the notes on precision below)
Editing Mode
A LONG PRESS of the LIGHT button toggles editing mode for each of the selected notations.
In this mode LIGHT moves the cursor and ALARM changes the letter cycling through the available
alphabet or numbers.
When OLC or Geohash display are edited, Digit Info mode is activated. It serves as a workaround
for the limitation of how ambiguously alphanumeric characters are displayed on the main seven segment
digits of the watch face ( S or 5, I or 1, U or W?).
The selected letter is also shown in the much easier to read alphanumeric 8 segment weekday digit above.
In addition the ‘24H’ indicator is active when the selected digit represents a number and the ‘PM’
indicator for a letter.
A LONG PRESS of LIGHT saves the changes.
Coordinates are read or stored to both the traditional internal location register and a file on
the LFS file system (“place.loc”). By default the Watch Face loads the coordinates from file
when activated. If no file is present, the coordinates are loaded from the register.
(please also see the notes on precision below)
Auxiliary Mode: Digit Info
A LONG PRESS of the ALARM button toggles Digit Info mode when OLC or Geohash display is active.
(LAP indicator is on) It is a means of being able to see the detailed Digit Info as described above
but without the risk of accidentally editing any of digits.
Both ALARM and LIGHT buttons can be used to flip through the letters.
Notes on Coordinate Precision
The common WGS84 Latitude and Longitude degrees naturally do not represent meters in distance
on the ground. 1° Longitude on the equatorial line equals a width of 111.32 kilometers, but
at 40° latitude further North or South it is approximately 85 kilometers wide. The closer to
the poles the narrower (and more precise) the latitude degrees get.
The Sensor Watch’s traditional 16bit location register only stores latitudes and longitudes
with two decimal points. That equals a longitudal precision of 36 arc seconds, or ~1111 meters
at the equator - precise enough for astronomical calculations, but not if you want to store the
location of let’s say a building.
Hence we propose the <place.loc> file that serves the same purpose, but with a precision of
five decimal digits. That equals 0.04 arc seconds or 1.11 meters at the equator.
Please also note that the different notations of this watch face also have varying magnitudes
of precision:
Format
Notation
Precision at Equator
Precision at 67° N/S
2d. Decimal LatLon
29.98, 31.13
1111.320 m
435.125 m
5d. Decimal LatLon
29.97916, 31.13417
1.111 m
0.435 m
DMS LatLon
N 29°58′45″, E 31°8′3″
30.833 m
12.083 m
Open Location Code
7GXHX4HM+MM
13.875 m
13.875 m
Geohash
stq4s3x1qu
1.189 m
0.596 m
Since all notations are internally converted into degrees with 5 decimal points, expect some
rounding errors when editing or loading the coordinates in other notation formats.
The Preferences watch face allows you to configure various options on your Sensor Watch. Like all other screens, you advance the field you’re setting with the Light button, and advance its value with the Alarm button. The Preferences watch face labels each setting with a two-letter code on the top row; the following list describes each setting and their options:
CL - Clock mode. This setting allows you to select a 12-or 24-hour clock display. All watch faces that support displaying the time will respect this setting; for example, both Simple Clock, World Clock and Sunrise/Sunset will display the time in 24 hour format if the 24 hour clock is selected here.
BT - Button tone. This setting is only relevant if you installed the buzzer connector, and it toggles the beep when changing modes. If Y, the buzzer will sound a tone when Mode is pressed. Change to N to make the Mode button silent.
TO - Timeout. Sets the time until screens that time out (like Settings and Time Set) snap back to the first screen. 60 seconds is a good default for the stock firmware, but if you choose a custom firmware with faces that you’d like to keep on screen for longer, you can set that here.
LE - Low Energy mode. Sets the time until the watch enters its low energy sleep mode. Options range from 1 hour to 7 days, or Never. The more often Sensor Watch goes to sleep, the longer its battery will last — but you will lose the seconds indicator while it is asleep. This setting allows you to make a tradeoff between the device’s responsiveness and its longevity.
LT - Light. This setting has three screens:
The first lets you choose how long the LED should stay lit when the Light button is pressed. Options are 1 second, 3 seconds and 5 seconds, or “No LED” to disable the LED entirely.
The second screen, titled “blu”, sets the intensity of the blue LED. Values range from 0 (off) to 15 (full intensity)
The third screen, “red”, sets the intensity of the red LED, again from 0 to 15.
On the last two screens, the LED remains on so that you can see the effect of mixing the two LED colors. On the Special Edition boards, you’ll have red, blue and a variety of shades of pink and purple to experiment with!
The Time Set watch face allows you to set the time on Sensor Watch. Use the Light button to advance through the field you are setting, and the Alarm button to change the value in that field. The fields are, in order: Hour, Minute, Second, Year, Month, Day and Time Zone.
For features like World Clock and Sunrise/Sunset to work correctly, you must set the time to your local time, and the time zone to your local time zone. This allows Sensor Watch to correctly offset the time. This also means that when daylight savings time starts or ends, you must update both the time and the time zone on this screen.
This is an extended version of set_time face which allow setting seconds
precisely. To achieve that - press and hold alarm button few seconds before
00 and release exaclty as reference clock turns 00.
All settings can go up, or down (long alarm press).
The challenge is that SensorWatch display is delayed 0.5 seconds vs hardware
RTC clock. It is caused by interrupts being generated by raising edge of
counter. It means there is no way to precisely trigger at 0.5s, as events
at different frequencies slightly mismatch. This watch face achieves this
approximately by triggering at 15th out of 32Hz events.
If you are <30 seconds when setting seconds - you will stay in the same
minute. Otherwise - you will go to next minute.
Note that changing anything will slightly delay subseconds counter. This
is why this face sets seconds last to achiveve best precision. Still,
best possible precision is achieved with finetune face.
7 - Contribution Guidelines
In the interest of creating a welcoming and constructive space, we have adopted the Contributor Covenant Code of Conduct:
Our Pledge
We as members, contributors, and leaders pledge to make participation in our community a harassment-free experience for everyone, regardless of age, body size, visible or invisible disability, ethnicity, sex characteristics, gender identity and expression, level of experience, education, socio-economic status, nationality, personal appearance, race, caste, color, religion, or sexual identity and orientation.
We pledge to act and interact in ways that contribute to an open, welcoming, diverse, inclusive, and healthy community.
Our Standards
Examples of behavior that contributes to a positive environment for our community include:
Demonstrating empathy and kindness toward other people
Being respectful of differing opinions, viewpoints, and experiences
Giving and gracefully accepting constructive feedback
Accepting responsibility and apologizing to those affected by our mistakes, and learning from the experience
Focusing on what is best not just for us as individuals, but for the overall community
Examples of unacceptable behavior include:
The use of sexualized language or imagery, and sexual attention or advances of any kind
Trolling, insulting or derogatory comments, and personal or political attacks
Public or private harassment
Publishing others’ private information, such as a physical or email address, without their explicit permission
Other conduct which could reasonably be considered inappropriate in a professional setting
Enforcement Responsibilities
Community leaders are responsible for clarifying and enforcing our standards of acceptable behavior and will take appropriate and fair corrective action in response to any behavior that they deem inappropriate, threatening, offensive, or harmful.
Community leaders have the right and responsibility to remove, edit, or reject comments, commits, code, wiki edits, issues, and other contributions that are not aligned to this Code of Conduct, and will communicate reasons for moderation decisions when appropriate.
Scope
This Code of Conduct applies within all community spaces, and also applies when an individual is officially representing the community in public spaces. Examples of representing our community include using an official e-mail address, posting via an official social media account, or acting as an appointed representative at an online or offline event.
Enforcement
Instances of abusive, harassing, or otherwise unacceptable behavior may be reported to the community leaders responsible for enforcement by contacting @josecastillo on Twitter. All complaints will be reviewed and investigated promptly and fairly.
All community leaders are obligated to respect the privacy and security of the reporter of any incident.