Using Sensor Watch: Introducing Second Movement
The new firmware for Sensor Watch is called Second Movement. It supersedes the old Movement firmware, but it works in largely the same way if you’re familiar with it from a previous Sensor Watch iteration. If you are not familiar with it, this section will get you up to speed.
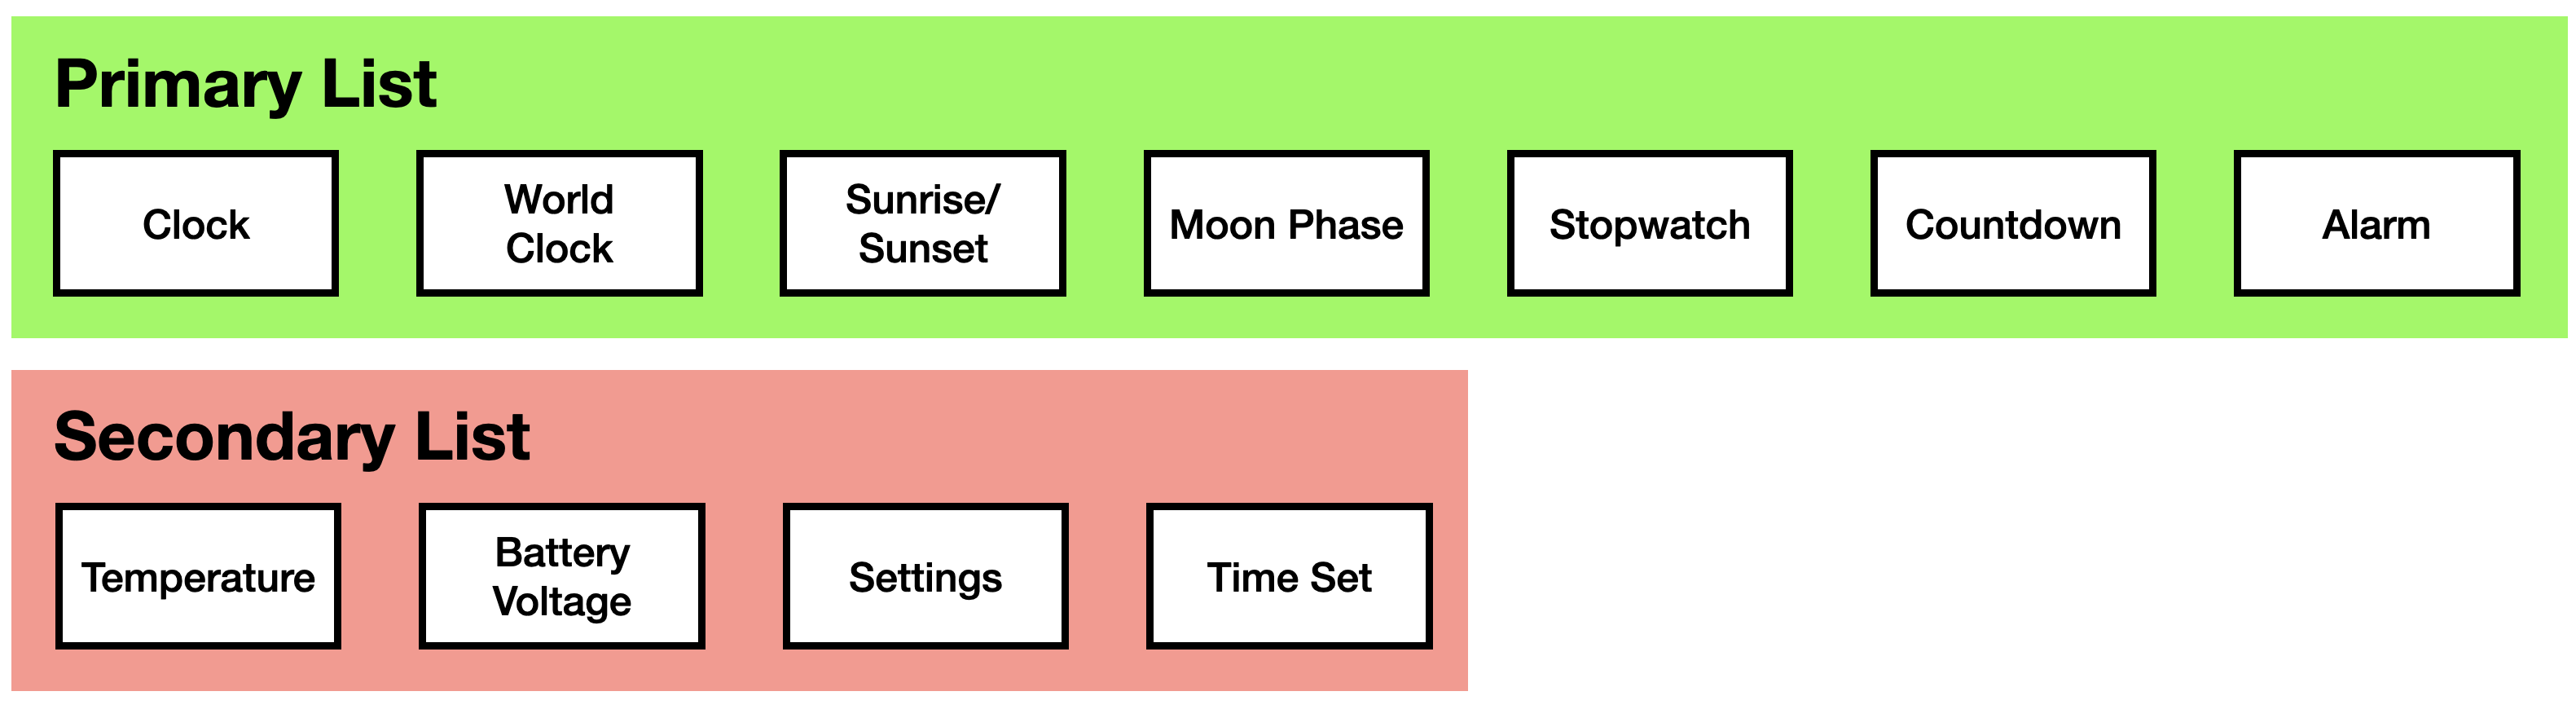
Mental Model: Two Lists of Watch Faces
In Second Movement, a Watch Face is a fully encapsulated block of functionality that you interact with. Your device contains two lists of watch faces that you can use: a primary list, and a secondary list. The primary list of watch faces consists of generally useful bits of information and functionality that you’ll use day to day. The secondary list contains diagnostics and settings you may only need to interact with occasionally.
You interact with watch faces using the buttons on your watch. Each button can be pressed, in which you push it and release, or it can be long pressed, in which you push and hold the button.
There are three buttons on the Casio F-91W: the MODE button, the ALARM button and the LIGHT button. While watch faces are free to use these buttons however they see fit, most watch faces adhere to a set of idioms that should make navigating your watch easy; you can expect the behavior of the buttons to be generally consistent across watch faces.
A short press of the MODE button immediately moves from the current watch face to the next watch face in the list, until you reach the end of the list and wrap around. You can repeatedly press the MODE button, and you’ll find yourself right back where you started.

If button beeps are enabled, each press of the MODE button will be accompanied by a low-pitch beep, except for the first watch face in the primary list — usually Clock — which gets a higher-pitched beep.

NOTE: As a shorthand, we will refer to this first face as Clock going forward, but if you build your own custom firmware, you can place any watch face first in the list.
A long press of the MODE button behaves differently whether you are on the Clock face or not. (In the next two diagrams, the short press behavior is greyed out so you can more easily see the long press behavior.)
If you are currently at the Clock face, a long press of MODE takes you to the secondary list. At that point, continued short presses will advance through the secondary list, and return you to the Clock face when you reach the end.
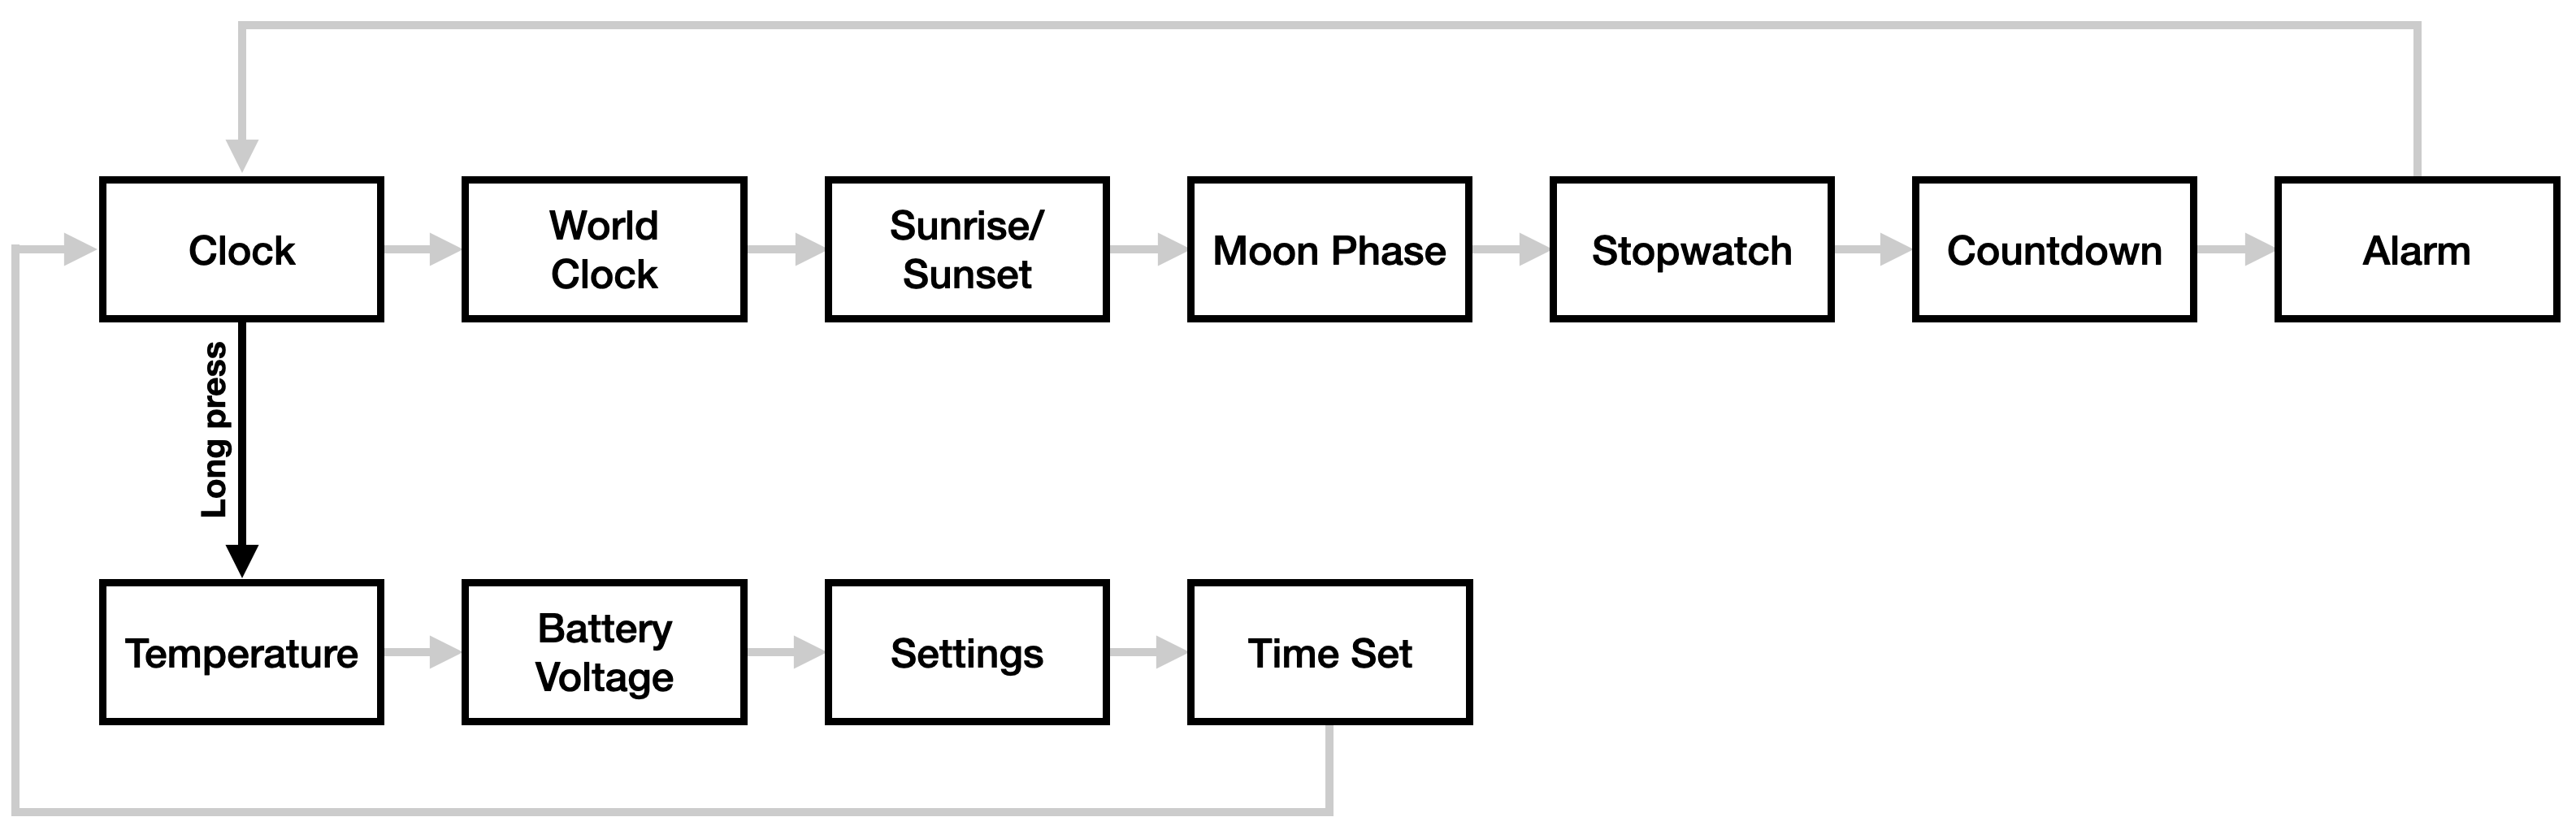
If you’re not currently at the Clock face, a long press of MODE from anywhere else takes you back to the Clock face (accompanied by that higher-pitched beep).
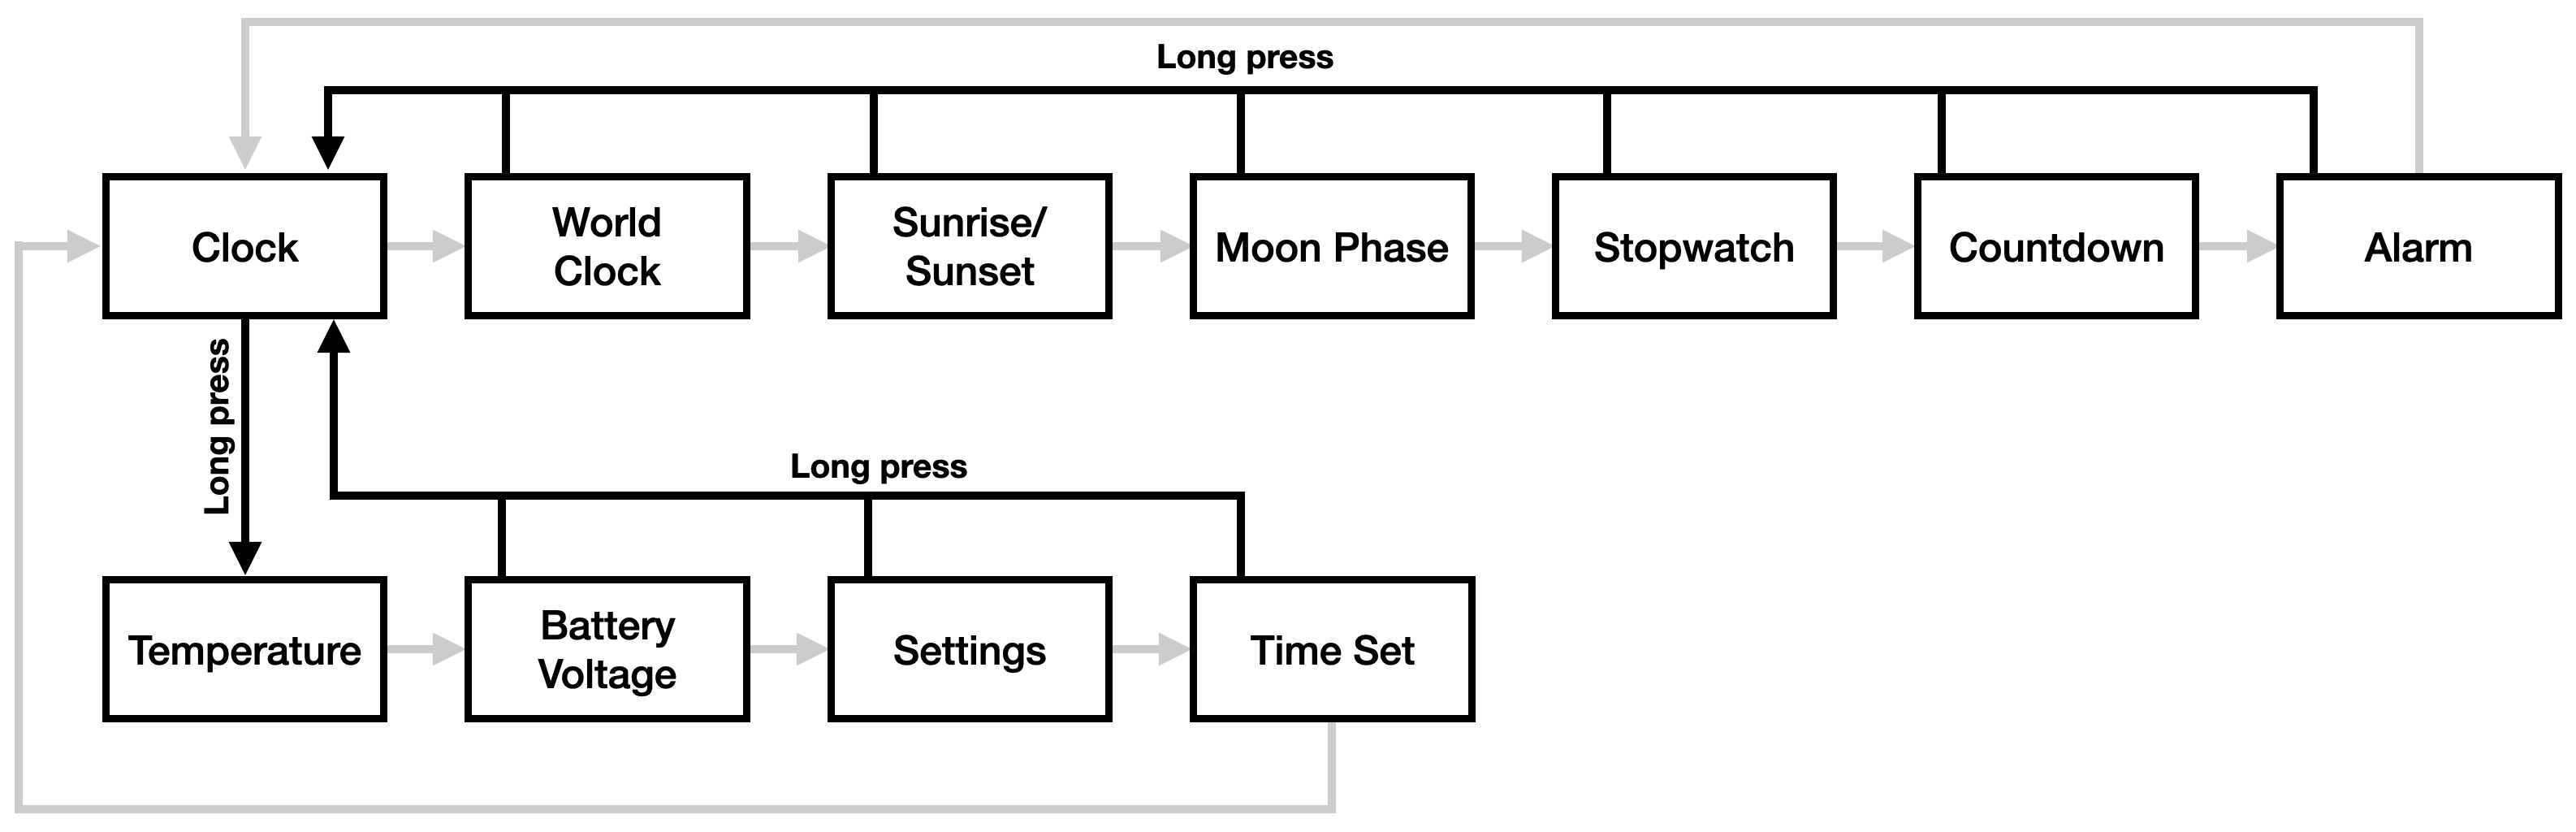
The ALARM button is a general purpose button. Where appropriate, a short press of the ALARM button will take an action: on the Stopwatch face, the ALARM button starts or stops the stopwatch. On the Countdown face, it starts or stops the countdown.

For watch faces with configurable options, a long press of the ALARM button can either change those options directly, or enter a secondary mode for configuring the watch face. On the Clock face, for example, a long press of the ALARM button toggles the hourly chime, and on the Temperature watch face it toggles metric vs imperial units (Celsius or Fahrenheit). On the Sunrise/Sunset watch face, a long press of the ALARM button enters the latitude / longitude settings screen; on World Clock, it allows you to add a name and configure the time zone.
A short press of the ALARM button can also advance a value: in the Time Set watch face, pressing Alarm while setting (say) the month, advances the month by one. Pressing it again advances it again, until you reach the final value (month 12) and it loops around.
On most watch faces, pressing the LIGHT button illuminates the LED backlight. Holding the LIGHT button down generally keeps the LED on as long as the button is being held. This behavior is occasionally overridden though, particularly when the LIGHT button is used for other functions.
When more complex interactions call for it, the LIGHT button pulls double duty. In particular, some watch faces have different fields to navigate: when setting the time, we need a button to advance which part of the time we’re setting: the hours, minutes, seconds, etc. A short press of the LIGHT button advances through these fields, wrapping around when you reach the end.
On these watch faces, you can think of the LIGHT button as a “tab” button, navigating across through columns of data, and the ALARM button as an “enter” button, changing the selected value in that column.
Watch Face Documentation
The following pages contain documentation for each of the watch faces in the standard Second Movement firmware.
1 - Clock
The Clock face echoes the classic time and date display of the stock F-91W. It displays the day of the week and day of the month on the top line, along with the current time on the bottom line. Pressing the Light button illuminates the LED so that you can read the display in the dark. Holding the Light button keeps the LED on while the button is held.
You can toggle the Hourly Chime feature by pressing and holding the Alarm button. After holding it for a couple of seconds, the Signal indicator will turn on, indicating that the hourly chime is enabled.
The Clock face also incorporates a low battery warning: this watch face will display the LAP indicator when it detects that the battery voltage is low. This does not mean that power failure is imminent, but it does mean that your battery has only about 5% of its original capacity remaining and you should start thinking about a replacement. The battery is a CR2016 coin cell.
2 - World Clock
The World Clock watch face looks similar to the Simple Clock watch face, but you’ll notice that at first launch the day of week indicators are blank. That’s because this watch face does not display the day of the week. Instead, you may customize these letters to display the name of a time zone of your choosing.
To customize this watch face, press and hold the Alarm button. The first letter in the top row will begin flashing. Press the Alarm button repeatedly to advance through the available letters in the first slot, then press the Light button to move to the second letter. If you have the custom LCD, you can set a third letter as well.
Finally, press Light again to move to the time zone setting, and press Alarm to cycle through the available time zones. Rather than displaying time zone offsets from UTC, this watch face expects you to select a place that matches your time zone rules. For more information, see the Time Zones in Movement section in the Time Set documentation.
When you’re done selecting a time zone, press Light one last time to return to the world clock display.
Note that on the classic Casio LCD, the second letter position cannot display all letters or numbers.
3 - Sunrise / Sunset
This watch face displays local sunrise and sunset times. During the day, it displays today’s sunset; at night, it displays tomorrow’s sunrise.
When you first see this watch face, it will display “No Loc”, or No Location. This is because your latitude and longitude are required to calculate sunrise and sunset. When on this screen, you can set your location in a similar way to the World Clock screen.
Press and hold Alarm to enter location setting mode. The top line will read “LA” (Latitude), and the bottom line “+ 0000”. The large digits are the whole number part of the latitude, and the smaller digits (in the seconds place) are the fractional part.
Note that on the custom LCD, you’ll see “LAT” on top and “00.00° N”, which will make this screen clearer. Also note that on the classic LCD, you set the sign (+ or -) first, whereas on the custom LCD, you set the hemisphere (N, S, E or W) last.
Enter your latitude and longitude (“LO”) by pressing the Alarm button to change the sign or advance the digits, and the Light button to move to the next character. On the classic LCD, you can read a latitude of (say) 40.73° N as “+ 4073”, and a longitude of 73.94° W would be “–07394”.
Once you have set your latitude and longitude, the Sunrise/Sunset face will display the next sunrise or sunset on the bottom row, and the day of that sunrise or sunset at the top right.
A short press on the Alarm button will advance to the following sunrise or sunset: for example, on Monday afternoon, it will display Monday evening’s sunset, but a short press on the Alarm button will display Tuesday morning’s sunrise.
If you made a mistake while entering your location, or if you simply wish to change your location, you can re-enter location setting mode with another long press on the Alarm button.
4 - Moon Phase
The Moon Phase face is similar to the Sunrise/Sunset face: it displays the current phase of the moon, along with the day of the month. On the custom LCD, it displays “WAX” and “WAN” for a waxing or waning moon. On the classic LCD it displays a rudimentary graphical representation of the moon on the top row.
This graphical representation is a bit abstract. The segments that turn on represent the shape of the moon, waxing from the bottom right and waning at the top left. A small crescent at the bottom right will grow into a larger crescent, then add lines in the center for a quarter and half moon. All segments are on during a full moon. Then gradually the segments at the bottom right will turn off, until all that remains is a small waning crescent at the top left.
All segments turn off during a new moon.
On this screen you may press the Alarm button repeatedly to move forward in time: the day of the month at the top right will advance by one day for each button press, and both the text and the graphical representation will display the moon phase for that day. Try pressing the Alarm button 27 times now, just to visualize what the moon will look like over the next month.
5 - Stopwatch
The Stopwatch face provides basic stopwatch functionality with one-second resolution: you can start and stop the stopwatch with the alarm button. Pressing the light button when the timer is stopped resets it.
This watch face does not support lap functionality, and it does not count sub-seconds. There is a fast_stopwatch watch face by Andreas Nebinger that supports the full stopwatch functionality in a classic Casio F-91W, but note that it consumes about triple the typical power budget when running. As such, we opted to include this pared-down version in the standard firmware.
6 - Countdown
This watch face implements a simple countdown timer with one-second resolution:
- Long press the ALARM button to enter setting mode and adjust the countdown timer.
- In this mode, pressing ALARM advances the hour, minute or second.
- Pressing LIGHT advances to the next field.
- A long press on LIGHT clears curent field and any after it.
- Press the ALARM button to start and pause the countdown, similar to the stopwatch face.
- When paused or stopped, press the LIGHT button to reset the countdown.
Max countdown is 23 hours, 59 minutes and 59 seconds.
If you have the accelerometer sensor installed, this watch face will enable tap detection for three seconds when the face comes on screen. You can tap the watch to increment the number of minutes you want to count, and each tap will extend tap detection for another three seconds. Tap detection will be disabled after this timeout, or when the wearer presses the ALARM button to start the timer. This “quick set” time will not be remembered; when reset, the countdown timer will be reset to the last manually entered countdown time
7 - Alarm
This watch face implements a basic daily alarm:
- Press the ALARM button to toggle the alarm on or off. An indicator at the top left will energize to show the alarm state.
- Long press the ALARM button to enter setting mode and adjust the alarm time.
- In this mode, pressing ALARM advances the hour, minute or second.
- Pressing LIGHT advances to the next field.
- When you finish setting the alarm time, the alarm will automatically be turned on if it was off before.
The alarm status will also be indicated on the main Clock face, but not on any other watch faces.
8 - Temperature Display
This watch face reads the current temperature and displays it in degrees Celsius or Fahrenheit. Pressing the Alarm button toggles the unit display from Celsius to Fahrenheit.
Note that ehen the watch is on your wrist, your body heat interferes with an ambient temperature reading, but if you set it on a bedside table, strap it to your bike handlebars or place it outside of your tent while camping, this watch face can act as a digital thermometer for displaying ambient conditions.
The temperature sensor watch face automatically samples the temperature once every five seconds, and it illuminates the Signal indicator just before taking a reading. It automatically uses the most accurate temperature sensor available: if a thermistor is installed (as on Lite, Pro or the classic board with the temperature sensor add-on), it uses that. If you are on a classic board with the accelerometer sensor, it will use the accelerometer’s lower-resolution temperature sensor.
If no temperature sensor is available, this watch face will skip itself by resigning immediately.
Note that the Celsius/Fahrenheit selection on this watch face also sets a global “Metric / Imperial” flag, so any other watch faces that display localizable units will display them in the system selected here.
9 - Battery
This watch face is very simple and has no controls to speak of. It displays the battery voltage as measured by the SAM L22’s ADC.
You can expect your battery to hover at or near 3 volts for the first few months of use. After a while it will start to decline. This is normal, and you can continue using your watch as it declines. As it declines to, say, 2.6 volts, you may also note that the voltage sags when the buzzer beeps or when you light the LED, but then recovers. This too is normal.
Once the battery voltage is at a steady reading of ~2.4 volts, it’s likely your battery’s demise is days away.
10 - Settings
The Settings watch face allows you to configure various options on your Sensor Watch. Like all other screens, you advance the field you’re setting with the Light button, and advance its value with the Alarm button.
On the Classic LCD, the Settings watch face labels each setting with a two-letter code on the top row; on the custom LCD, you’ll get a more descriptive line. The following list describes each setting and their options:
“CL” / “CLOCK” - Clock mode. This setting allows you to select a 12-or 24-hour clock display. All watch faces that support displaying the time will respect this setting; for example, both Clock, World Clock and Sunrise/Sunset will all display the time in a 24 hour format if the 24 hour clock is selected here.
“BT” / “BTN” - Button volume. The default option, “L”, beeps the button softly, reserving louder beeps for alarms and countdown timers. Set the volume to “H” for high volume, or “N” to silence the buzzer entirely. Also note that a loud beep consumes significantly more power: one loud beep uses five times the power of a soft beep, which will impact your battery life after a while.
“TO” / “Tmout” - Timeout. Sets the time until screens that time out (like Settings and Time Set) snap back to the first screen. 60 seconds is a good default for the stock firmware, but if you choose a custom firmware with faces that you’d like to keep on screen for longer, you can set that here.
“LE” / “LoEne” - Low Energy mode. Sets the time until the watch enters its low energy sleep mode. Options range from 1 hour to 7 days, or Never. The more often Sensor Watch goes to sleep, the longer its battery will last — but you will lose the seconds indicator while it is asleep. This setting allows you to make a tradeoff between the device’s responsiveness and its longevity.
“LT” / “LED” - LED Backlight. This setting has three or four screens, depending on your hardware:
- The first screen lets you choose how long the LED should stay lit when the Light button is pressed. Options are “Instnt” to illuminate the LED only when the button is held down, “1 sec”, “3 sec” and “5 sec”, or “No LED” to disable the LED entirely.
- The remaining screens set the color intensity for the LEDs in your watch. Values range from 0 (off) to 15 (full intensity)
On a Lite or classic green board, you’ll have two screens to set the green and red intensity; on a Pro board, you’ll get screens for red, green and blue. Note that full intensity on all LEDs does not necessarily blend to white; a good starting point for a white backlight is values of 5, 10 and 15 for red, green and blue, respectively.
11 - Setting the Time
The Time Set watch face is usually the last watch face in the secondary carousel. It will ask you to set the time and date in a specific order: date first (year, month and day), followed by time zone, and then the time. It does this because Second Movement is time-zone aware: if you select the correct time zone, Second Movement can automatically switch into and out of of daylight savings time, no matter where in the world you are.
Still, to take advantage of this feature, you have to select the right time zone, which may be counterintuitive.
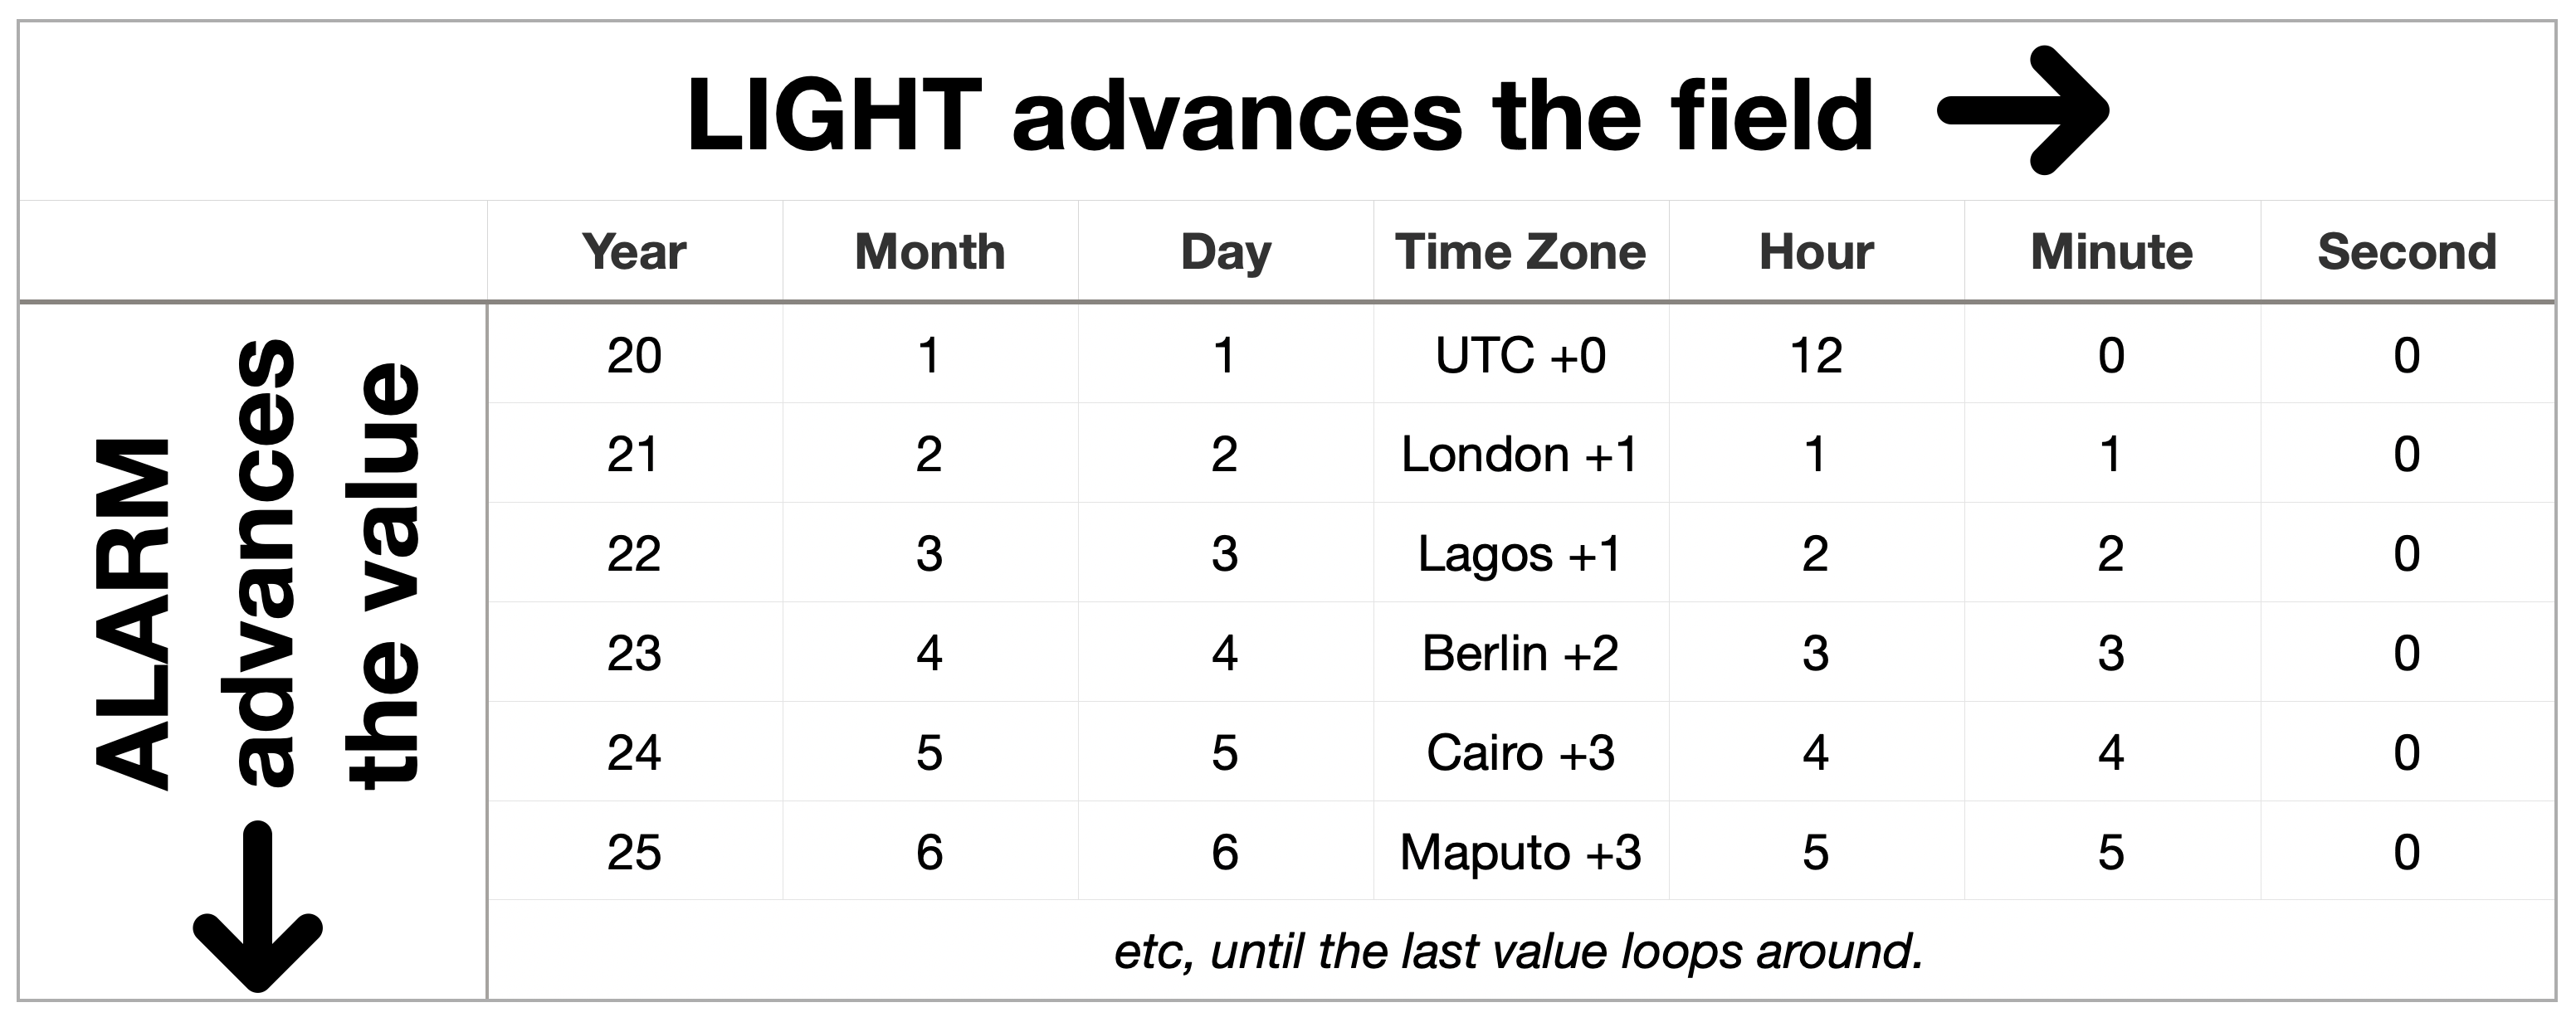
Setting the date is the first step because the local time zone depends on the date. When you reach the Time Set watch face, it will be displaying “Year” or “YR”. Press ALARM to advance the year, or LIGHT to accept the year and move on to the “MO"nth. Same thing: ALARM advances the month, LIGHT moves on to “DA"Y. After moving on from setting the Day, you’ll see a Z at the top of the screen, and a flashing display: “UTC” / “+0:00”. This is the Time Zone setting.
Time Zones in Movement
A time zone consists of two things: the current offset from UTC, and a set of rules for daylight savings time changeovers. We couldn’t put every city on Earth into this screen, so we selected a set of cities that represent every possible set of rules. As you advance through the list, you may see several time zones with the same offset: for example as of this writing, “London” and “Lagos” both show “+1:00”. But you would select “London” if you are in the British Summer Time zone, and “Lagos” if you are in the West Africa Time zone. Selecting “London” ensures that your watch will switch back to GMT when BST ends, whereas selecting “Lagos” will keep you in WAT year-round.
You may not see your exact city in the list, but there should be a zone that matches your rules. Central Standard Time in the USA (which can change to CDT) is covered by “Chcago”, whereas year-round Central Standard Time is covered by “Regina” (Saskatchewan) in Canada. If you were in Omaha, you would select “Chicago”; if you were in Mexico City, you would select “Regina”.
Once you’ve selected your time zone, the rest is easy: press LIGHT to advance to setting the hours, minutes and seconds, and you’re done. Note that pressing ALARM with the seconds selected resets the seconds to 00, and does not affect the current minute. We may change this in the future to match the behavior of the original Casio F-91W.